How to Collect PayPal Payments on WordPress Site? Nowadays, most of the webmaster is looking to integrate a payment gateway with their website to collect international and domestic payments on their website.
Whether you are having an eCommerce store using WooCommerce for your WordPress website or selling online courses, advertisements, or guest posts on your website. All require a payment module to be integrated with the websites to collect the payments.
Collecting payments on WordPress website is very simple and can be integrated with multiple payment gateways. If you are looking to build and website that should collect online payments then WordPress is the right choice.
If you have still not started building your website then below is the link given to an in-depth tutorial that will help you build your website step by step.
In the previous article, we have covered the step by step procedure to Accept Recurring Payments With WPForms Using Stripe on WordPress Site. However, we have received a request from many readers to cover the procedure to accept Paypal payments on the WordPress website.
There are tons of websites offering you to collect PayPal payment on your website. But as a webmaster, you must look for customization and easy to use the plugin for collecting PayPal payments. I have tried multiple plugins to collect payment on my and my client’s website and then finally stopped over at a single plugin offering multiple features.
Yes, the only plugin offering multiple features and easy to integrate with PayPal is WPForms. WPForms is a simple drag and drop form builder plugin offering more than creating just a simple contact form.
If you want to take your business to the next level then this is the must-have plugin on your WordPress website.
In this article, we are not covering the features of the WPForms plugin and rather we will focus on How to Collect PayPal Payments on WordPress Site. But our in-depth WPForms review will definitely help you explore WPForms features.
Before writing WPForms review we have done extensive research to find if WPForms is actually the best WordPress form plugin as claimed by its creators. To find that we have conducted a battle of popular WordPRess form plugins.
The results were amazing and WPForms stands to be the winner. Below is the one to one comparison of WPForms with other form plugins.
| WPForms Comparison | Winner | Details |
| WPForms vs Formidable forms | WPForms | Read Comparison |
| WPForms vs Visual Form builder | WPForms | Read Comparison |
| WPForms vs Jot Forms | WPForms | Read Comparison |
| WPForms vs Caldera Forms | WPForms | Read Comparison |
| WPForms vs Type Forms | WPForms | Read Comparison |
| WPForms vs Everest Forms | WPForms | Read Comparison |
| WPForms vs Gravity Forms | WPForms | Read Comparison |
| WPForms vs WuFoo | WPForms | Read Comparison |
Without wasting much of time lets us jump directly on How to Collect PayPal Payments on WordPress Site.
How to Collect PayPal Payments on WordPress Site?

WPForms is available is both free and premium versions. But if you are really looking to take your blog to the next level then you must go with the WPForms Pro license.
The payment modules are not available with the free version. You need to have the Pro version to take advantage of this feature. Apart from PayPal WPForms Pro license also allows you to integrate the stripe payment gateway.
WPForms is offering a 50% discount on all the pro licenses. Click on the link below to avail of the discount.
Get 50% Discount on WPForms Pro License
Below is the step by step procedure to integrate PayPal payment gateway with WordPress site using WPForms.
1. Install and Activate WPForms
WPForms can be easily installed like any other WordPress plugins. If you have difficulty in installing WordPress plugins then below is the detailed tutorial to help you.
Installing WPForms is easy follow the simple steps given below.
- Login to your WordPress Admin Panel.
- Look for the Plugins menu at the left of the screen.
- Click on Plugins >> Add New.
- On the search bar type WPForms.
- Install and Activate WPForms Plugin.
The plugin which you installed is the free version and has limited functionality. You need to purchase the license to explore and use all the features.
Purchase WPForms Pro License at 50% discount (Limited Time Offer)
Before the installation of the conversational forms, you must purchase and validate the license key.
To validated licence key just follow the simple steps.
Validate WPForms License Key:
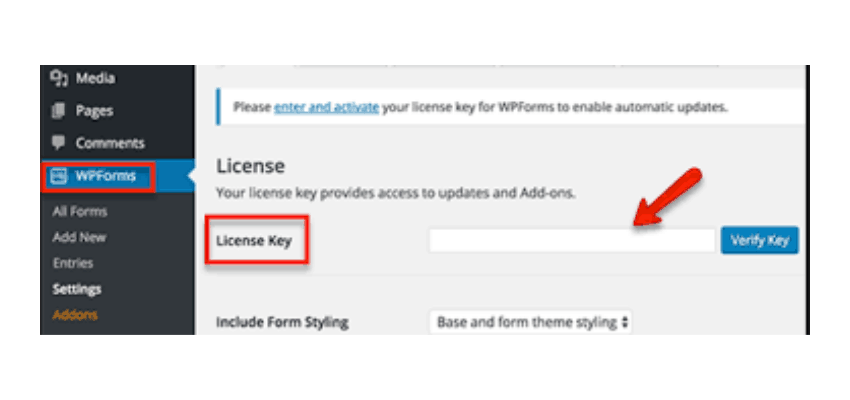
- After the activation of WPForm plugins. Go to WPForms>> settings.
- This option will be available to you at the left sidebar of your page. Here, you can see the text field to verify the license key. Put the license key in the text field and click on the button “verify key“.
2. Install PayPal Addon
Once WPForms is installed, you can also go ahead and install the PayPal Addon. Go on WPForms >> Addons. Here, you can find the PayPal Addon.
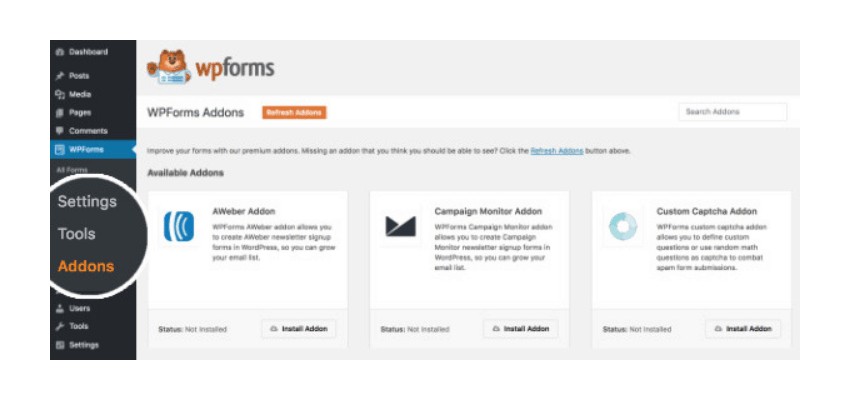
At the PayPal Addon, you will find the option “install Addon“. Simply click on that button. It will take some time to install the Addon.
After clicking, you will see the status active at the left bottom which means you can now use it.
Now you have successfully installed and activated PayPal Addon on WPForms plugin.
3. Create a Form
With the PayPal addon installed and activated, we’re ready to add PayPal to a form. To do this, you can either create a new form or edit an existing form.
For this example, we’ll create a new form using the Billing / Order Form template. This template is the inbuilt template. However, you can use any form to integrate with PayPal to collect the payments.
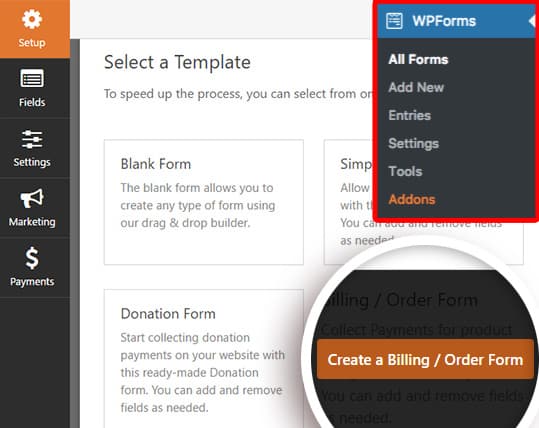
By default, the Billing / Order form template comes with the fields that you’d most often want in a payment form. But PayPal needs only one field to work properly: an items field (which could be a Single Item, Multiple Items, Checkbox Items, or Dropdown Items field).
You and add or delete the field within the forms that are of no use to you.
Even with more than one item field, a Total field is not required for PayPal to work. However, including a Total can be helpful for users to easily see how much they’ll be paying.
Note: When using PayPal, a Credit Card field should not be used. All sensitive payment details will be collected on PayPal’s site after the form is submitted.
4. Add PayPal Payments to Your Forms
Now that your form is created, the next step is to connect it to PayPal.
With the form builder still open, go to Payments » PayPal Standard. Here, you’ll need to check the box labeled Enable PayPal Standard payments.
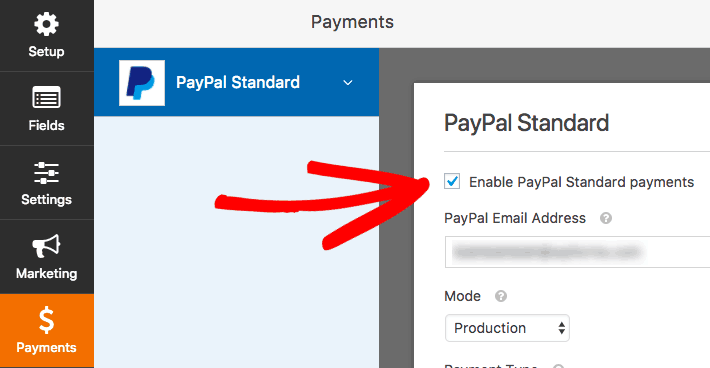
Here are the additional PayPal settings to fill out:
- PayPal Email Address: The email for your PayPal account, where payment will be sent
- Mode: Options are Production or Test / Sandbox
- Payment Type: Options are Products and Services or Donation
- Cancel URL: If users don’t complete payment on PayPal, this is the URL they’ll be redirected to
- Shipping: If you’re shipping a product to the user, you can choose to ask for and require an address field during PayPal’s checkout process
Additionally, there are two checkbox options at the bottom of these settings. The first is Don’t ask the buyer to include a note with payment. If you don’t need users to add a note in the PayPal checkout, you can check this box to disable it.
Another important thing to note is the mode field. If you have successfully integrated PayPal on your website and want to accept the payment then you can select production mode, else, select Test mode to check of the PayPal is integrated properly.
The second checkbox is to enable conditional logic. This is useful if you’d like to let your users choose between paying with Stripe or PayPal in your form.
When you’re ready, be sure to click on the Save button to store your payment settings.
5. Set Up Conditional Logic for Payments
WPForms PayPal addon settings also include the option to set up conditional logic. Conditional logic allows you to create “smart forms”, automatically changing content or behavior in the form based on a user’s selections.
To set up conditional logic for PayPal payments, you’ll need to open the form builder and go to Payments » PayPal Standard. Under the options you set up earlier, check the box labeled Enable conditional logic.
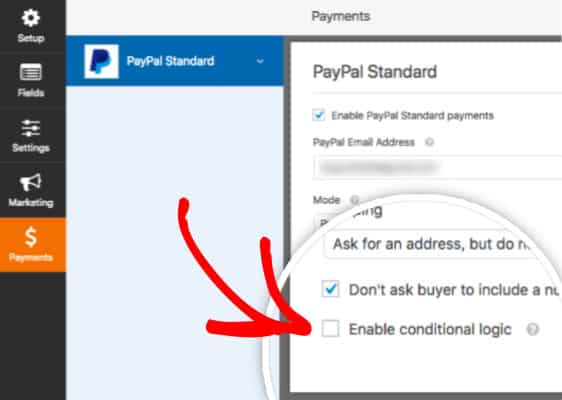
Once this box is checked, some additional options will appear. Within these options, you’ll be able to set your rule(s) about when the user should be sent to PayPal to complete the payment process.
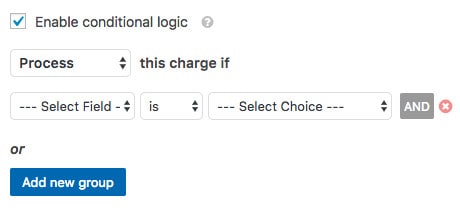
The options will include:
- Process: Determine what should happen if the conditions that you set up are met (options include Process and Don’t Process).
- Select Field: Choose the field within your form where you’d like to apply this rule.
- is: Choose the type of comparison you’d like to use (options include is, is not, empty, not empty, contains, does not contain, starts with, ends with, greater than, and less than).
- Select Choice: Determine what value you’d like the field to contain in order for this condition to apply.
Like I have told before that we are using WPForms on our website and also on all our client’s websites. We have integrated PayPal With conditional logic on our website to accept the payments. Below is the example.
To check the live functionality of PayPal addon with condition login that we have implemented on our website you can simply click on the link below.
Here in this page you can see a WordPress form with condition logic and PayPal gateway enabled.
By default the Sponsered post is selected in the drop-down tab with few fields that need to be entered by the user and the total cost for the post will be displayed at the end.
However, when you select a Review post from the dropdown you will find the automatic change with the cost of the post, and also the fields that need to be filled by the user will also change and reduced.
This is a simple and live example of conditional logic that can be applied to collect the payments via PayPal.
If you have some doubts we have tried to cover them below in Frequently asked question.
Frequently Asked Questions
How do I test PayPal payments in my forms?
The best way to test out your forms is to submit an entry and follow the same steps as your users. We recommend setting up PayPal’s Test Mode before adding your form to a live page, which allows you to test transactions before accepting actual payments.
What happens when a PayPal payment form is submitted?
When a user submits a form with PayPal integration, they will immediately be taken to the PayPal website to complete payment.
At the same time, the form’s notification emails will be sent as soon as the form is submitted.
How do I know when the user completes their payment on PayPal’s site?
Until the PayPal payment is completed, the Entries page will display a Pending status for that entry. Once payment has been made, this status will change to read Completed.
Wrapping Up
It is clear that PayPal can be easily integrated on the WordPress website with the help of WPForms to collect online payments. This tutorial must have helped you to know How to Collect PayPal Payments on WordPress site.
However, before accepting the payments you should have a verified PayPal account. The important thing to remembers is that you need the WPForms Pro license to take the complete advantage of PayPal integration on your website.
WPForms is offering a 50% discount on Pro license. Below is the link is given to activate the discount. You don’t need any coupon code to activate the deal.
Purchase WPForms Pro License at 50% discount (Limited Time Offer)
If you have doubts about integrating PayPal on your WordPress website then feel free to ask in the comment section below this article.
We will be happy to assist you and even we will update it in our frequently asked question for other readers. If you find that the discount link is not working kindly leave us a comment and we will update the link with fresh discounts.
If you liked this article, then please subscribe to our YouTube Channel for WordPress video tutorials. You can also find us on Twitter and Facebook.


