Do you have a WordPress website where you want to accept recurring payments from your clients? If that is the case then this tutorial will tell you How to Accept Recurring Payments With WPForms Using Stripe on your WordPress Site.
Whether you have an online store or a blog where you want to accept recurring payments from your clients for subscriptions, WPForms can do all that for you.
I have seen most of the bloggers integrating additional third-party WordPress plugins to enable subscription on their website. Well, installing multiple plugins will definitely make your WordPress website slow and difficult to manage.
So it is a win-win situation to use your WordPress contact form plugin to carry out multiple tasks for you on your website.
WPForms contact form WordPress plugins offer multiple functionalities to take your blog to the next level. Here In this tutorial, we are not focusing only on Accepting Recurring Payments With WPForms Using Stripe on your WordPress website.
If you are really interested to know other features offered by WPForms then just have a look at our WPForms In-depth Review.
Accept Recurring Payments With WPForms Using Stripe
Stripe is the most powerful and flexible tools for internet commerce. Whether you’re creating a subscription service, an on-demand marketplace, an e-commerce store, or a crowdfunding platform, Stripe’s meticulously-designed APIs and unmatched functionality help you create the best possible product for your users.
WPForms Stripe addon will help you easily integrate the Stripe payment gateway on your WordPress website to accept recurring/subscription payments.
Before we proceed further a little information about WPForms. WPForms is the best and free to use WordPress contact form plugin offering multiple functionalities. The Lite or free version of WPForms offers limited functionality.
If you want to unlock more feature you need to go for the premium license. If you want to enable the payment options then you require the WPForms Pro license.
Requirements: You will need a Pro license level or higher to access the Stripe addon.
Also, Stripe requires your site to have SSL (https) enabled on the page where you’re adding a live payment form, as this allows you to securely send credit card data to Stripe.
The regular pricing of WPForms Pro is $399/year. However, they are offering a flat 50% discount to Bloggersutra readers.
Grab WPForms Pro License with 50% off ($199/year)
Before wasting time let us now go ahead with integrating Stripe payment gateway with WPForms to accept subscription payments with WPForms.
1. Connecting Stripe to Your WordPress Site
Before we get started, we need to install WPForms on your WordPress website. WPForms can be installed like any other WordPress Plugin. But for the installation of Stripe Addon, you require the WPForms Pro license.
I would personally advise you to buy the WPForms Pro License (50% Off) and download the plugin from your WPForms account and install it manually. Below tutorial will help you in the installation of WPForms automatically and manually.
Once you have done the installation, activate the plugins using the license key available in your WPForms account.
The next step is to install and activate the Stripe Addon. To install and activate Stripe Addon, Go to WPForms » Addons » Stripe Addon. Click on Install addon and then activate it.
One the Stripe Addon is ready to go, You’ll need to go to WPForms » Settings in the left menu of your WordPress site. From there, click on the Payments tab.
Your payment tab will be looking similar to what is given below in the image. It will show you multiple options to select from.
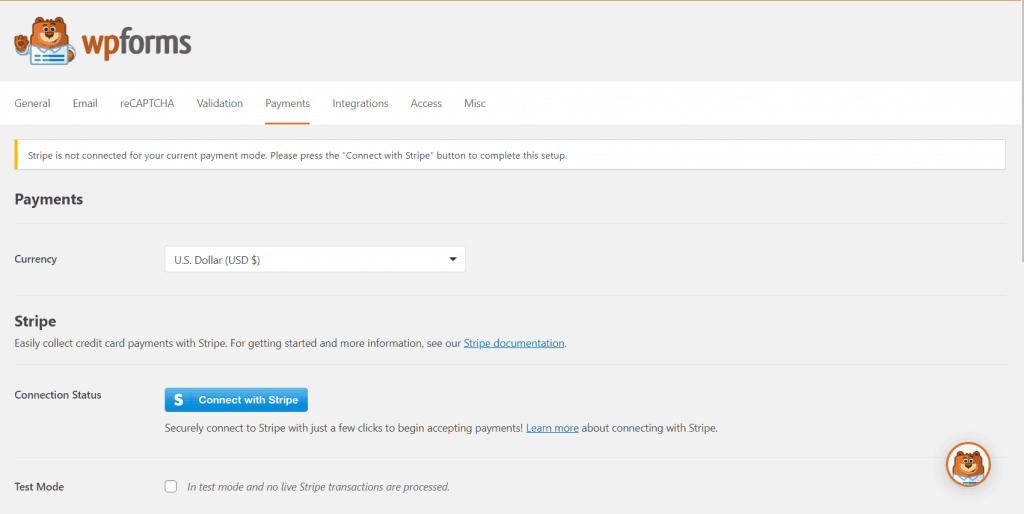
In the above image, you can see the message saying ” Stripe is not connected for your current payment mode. Please press the “Connect with Stripe” button to complete this setup”.
If you’d like to adjust the currency, go ahead and select the option you need from the Currency dropdown before proceeding.
Once you have selected the currency scroll down to the Connection Status and click on Connect with Stripe.

After clicking you will be redirected to Stripe payment gateway where you need to authorize the connection between your forms and Stripe by putting your Stripe account login credentials.
Once you’ve agreed to these requirements, you’ll be redirected back to your site’s admin area. Here, you should see that Connection Status has a green checkmark.
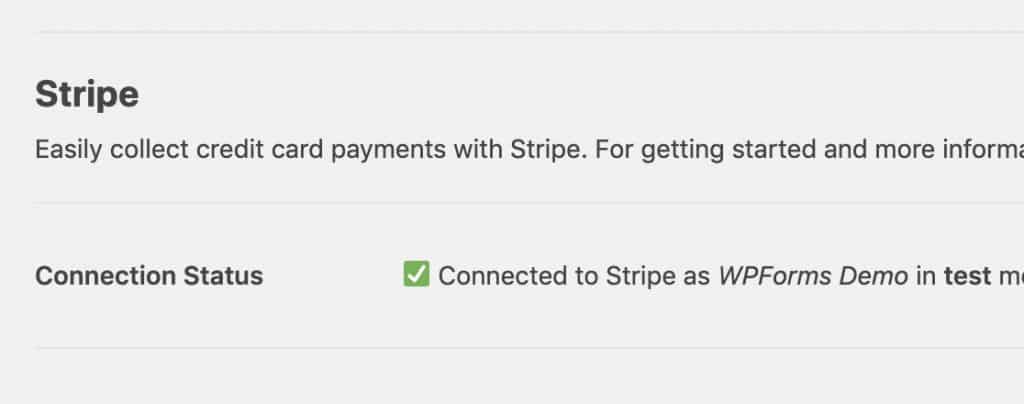
Note: Test and Live modes must be connected separately. If you’re currently using Test Mode, please be sure to repeat this connection process with the Test Mode option unchecked so that you’re ready to launch your forms when needed.
2. Adding Stripe to Your Forms
Once you are successfully connected to the stripe payment gateway, you need to add the stripe recurring payment mode to your form. We will show you how to integrate stripe with your forms.
Head over to WPForms » Add New page. This will launch the WPForms form builder interface. Select the order/billing form or donations form from the predefined templates or create a blank form.
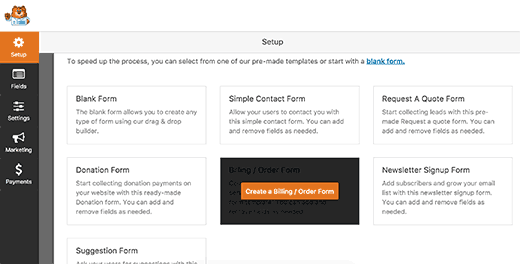
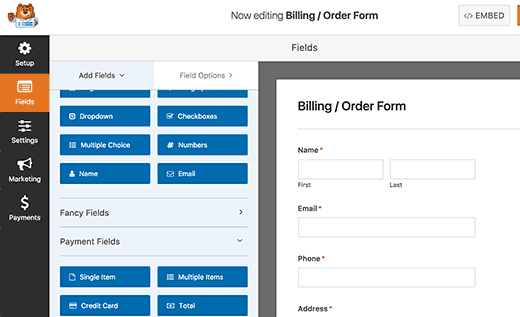
Here we have selected the order/billing form. You can add new form fields by clicking them from the left column. You can also edit a form field by simply clicking on it.
Once you are satisfied with the form, you need to click on the Payments » Stripe tab.
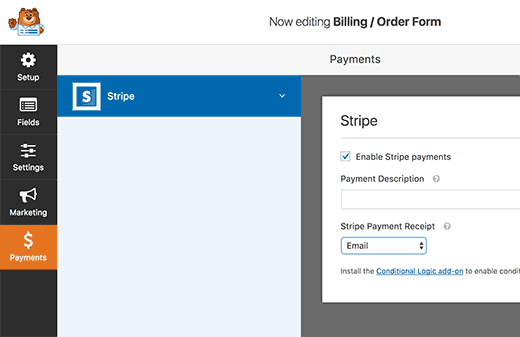
To enable stripe payment on your form you need to check the box next to the ‘Enable Stripe payments’ option and enter a description for the payment. You can also select to send a payment receipt.
3. Enabling Recurring Subscription Payments
Since you want to set up recurring donations so you have to continue customizing.
To do this, scroll down a bit more on the Stripe settings panel and click the checkbox labeled Enable recurring subscription payments under the Subscriptions section.
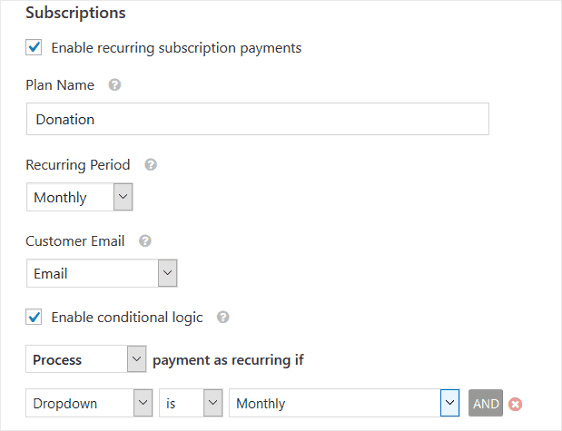
You will also have to configure the following:
- Plan Name: this is the title of the subscription and will appear on the Stripe transaction.
- Recurring Period: choose how often people will be able to make recurring payments. For instance, weekly, monthly, yearly, etc.
- Customer Email: by selecting Email from the dropdown menu, WPForms will be able to send a notification to the customer once they submit their form. Being able to contact people via the email they input on the form is required for Stripe’s recurring functionality to work.
Lastly, you’ll need to set the conditional logic rules since you give people the option to make recurring donations or a one-time donation.
To do this, first select the checkbox Enable conditional logic.
Then, to make things super simple, configure the rule to say: Process payment as recurring if Dropdown is Monthly.

Once you are done with the settings simply save your form and you are done!
You can now simply add your order/billing form via adding a shortcode of the payment form to collect stripe payments on your website.
Else, you can click on the add form button on your post edit page and simply select and insert the payment form to your new post or existing post.
We would recommend you to create a payment page on your website to collect the payments. However, you can create the form to collect payments from your existing posts too.
You can now save or publish your page and click on the preview button to see your form in action.
You May Also Like,
| WPForms Comparison | Winner | Details |
| WPForms vs Formidable forms | WPForms | Read Comparison |
| WPForms vs Visual Form builder | WPForms | Read Comparison |
| WPForms vs Jot Forms | WPForms | Read Comparison |
| WPForms vs Caldera Forms | WPForms | Read Comparison |
| WPForms vs Type Forms | WPForms | Read Comparison |
| WPForms vs Everest Forms | WPForms | Read Comparison |
| WPForms vs Gravity Forms | WPForms | Read Comparison |
| WPForms vs WuFoo | WPForms | Read Comparison |
Final Thoughts
Most of the bloggers find it difficult to integrate the recurring payments on their blog. Ther are multiple ways to do it but I will recommend you go with WPForms + Stripe combination if you wish to collect payments via contact forms.
WPForms make it very simple to accept the recurring payments through the stripe payment gateway. All you need is the WPForms Pro license. WPForms is offering flat 50% off on all their licenses to Bloggersutra readers.
So don’t miss the opportunity and grab the discount now. Start collecting payments on your WordPress websites with WPForms.
Grab WPForms Pro License with 50% off ($199/year)
If you have any questions or difficulties in integrating the WPForms stripe payment gateway on your website then feel free to ask us by commenting on this article. You can also write us through the contact us page.
If you liked this article, then please subscribe to our YouTube Channel for WordPress video tutorials. You can also find us on Twitter and Facebook.


