How to Manage Your MailChimp Email Subscribers from WordPress? Mailchimp is one of the most popular email marketing and newsletter platform trusted by millions. It can be easily integrated with third-party plugins to give you full control over your account.
Mailchimp can be easily integrated with WordPress websites with third-party plugins. But these plugin gives you the limited control over your MailChimp account and you have to manage the account directly from the MailChimp account panel.
Formidable Forms is one such WordPress plugin that gives you full control to manage your contacts directly from the WordPress admin panel. The plugin can be easily integrated with the MailChimp account and provides you the seamless features.
Also Read, Formidable Forms In-Depth Review
Now you can add MailChimp ready forms anywhere on your site even widgetized areas! With your MailChimp account connected to Formidable Forms, you can collect new MailChimp subscribers on any post or page.
List of Powerful MailChimp Features:
- Automatically tag new & updated subscribers.
- Choose between single or double opt-in subscriptions.
- Use a form field to subscribe to users to MailChimp groups.
- Add users to a MailChimp list or audience during form submission.
- Send data from fields in your signup form to custom fields in MailChimp.
Let’s now directly jump on how to integrate MailChimp with Formidable Forms to manage your email subscribers directly from WordPress.
Manage Your MailChimp Email Subscribers from WordPress
Formidable Forms allow you to subscribe to visitors to the MailChimp list and update the subscriber’s information whenever a form is submitted. To integrate MailChimp with Formidable Forms you need to have a MailChimp account.
MailChimp offers a free email marketing account for up 2000 contacts. If you are a beginner then you can go with the free account and can upgrade it in the future.
Open Free MailChimp Account
Once you have successfully opened the account, you need to integrate it with Formidable Forms. You must follow the step given below to connect MailChimp with Formidable Forms and manage your MailChimp email subscribers from WordPress.
Step 1: Install and Activate Formidable Forms Plugin
Formidable Forms can be easily installed like any other WordPress plugins. If you have difficulty in installing WordPress plugins then below is the detailed tutorial to help you.
Installing Formidable Forms is easy follow the simple steps given below.
- Login to your WordPress Admin Panel.
- Look for the Plugins menu at the left of the screen.
- Click on Plugins >> Add New.
- On the search bar type Formidable Forms.
- Install and Activate the Formidable Forms Plugin.
If you are looking for the in-depth tutorial for creating WordPress contact form in 5 minutes the click on the link below.
The plugin which you installed is the free version and has limited functionality. You need to purchase the license to explore and use all the features.
Purchase Formidable Forms Pro License
To validated licence key just follow the simple steps.
Validate Formidable Forms License Key:
- After the activation of WPForm plugins. Go to Formidable Forms >> settings.
- This option will be available to you at the left sidebar of your page. Here, you can see the text field to verify the license key. Put the license key in the text field and click on the button “verify key“.
Step 2: Install and Activate MailChimp Addon
Formidable Forms are available in both a free and premium version. Mailchimp addon is available with the Basic plan. If you want to take the full advantage of MailChimp with Formidable Form then you must go with the premium version of the plugin.
Buy Formidable Forms Premium Version
Once you have successfully validated the premium version, In your WordPress admin, go to Formidable → Add-Ons and click the ‘Install’ button for the MailChimp WordPress plugin.
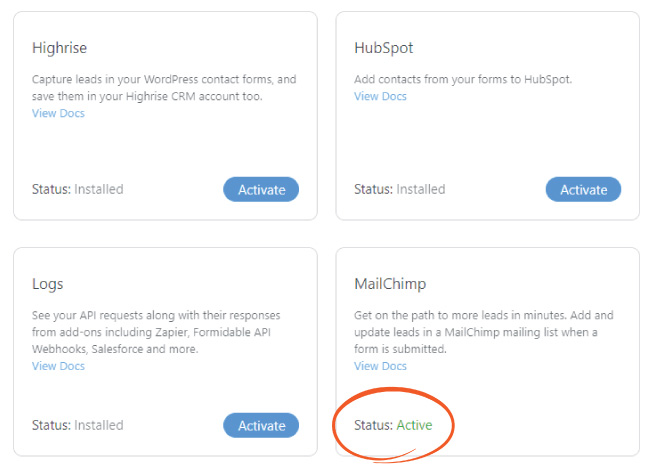
Since the MailChimp Addon is successfully activated, you need to set up the MailChimp Signup Form.
Step 3: Set up a MailChimp Signup Form
Before you set up the MailChimp signup format is important to connect Formidable Forms with your MailChimp account. MailChimp can be easily connected with the help API keys.
You can find your API key by logging into your MailChimp account and going to Account → Extras → API Keys. Click ‘Create A Key’ if you don’t have one set up already.
Now go to Formidable → Global Settings → MailChimp and Insert your MailChimp API Key.
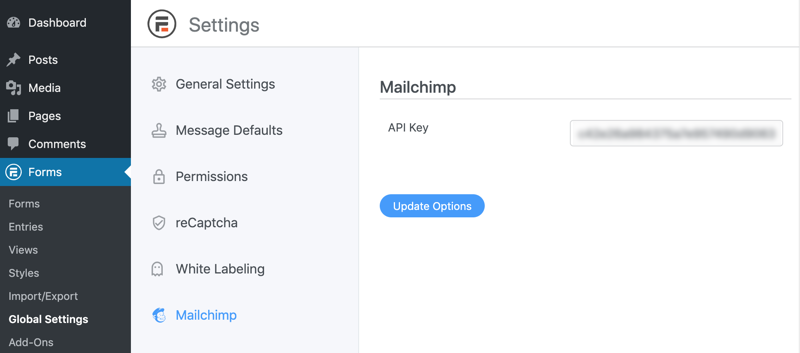
Now Formidable forms are successfully connected with your MailChimp account. The next step is to create a Form that will be used to subscribe users to a mailing list.
Before that, you have to create a mailing list or mailing group from your MailChimp account. This will give you the flexibility to choose the mailing list individually for your Formidable subscription forms.
Setup Subscription Form
1. Go to Settings → Actions & Notifications → MailChimp.

2. Select the MailChimp list that you would like to add subscribers to. Select the Email Address and any other required options. The options that show up here are determined in your MailChimp list’s settings that we have discussed earlier.
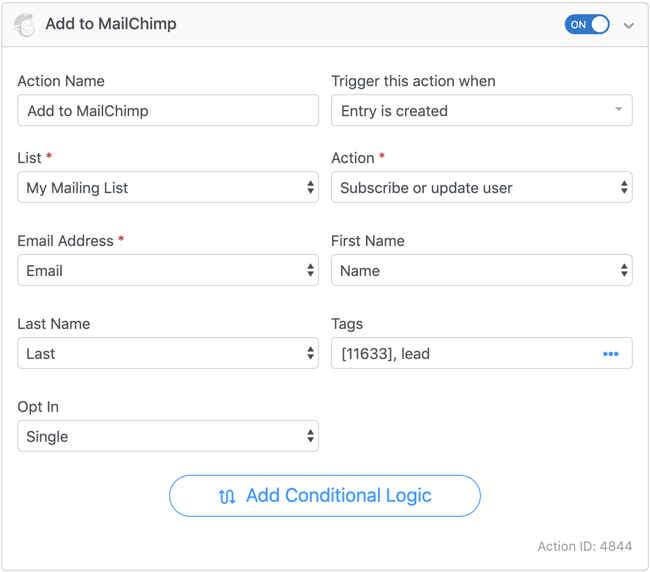
Let’s now discusss the relevance of each field.
Action Name – This is basically the name of your form depending on the task it will carry out after submission. The name is just for your understanding and should be named depending on the task your form is going to do.
Trigger This Action When – Select ‘Create’ if you would like the user to be added to the mailing list when they submit the form. Select ‘Create’ and ‘Update’ if you would like to update the user’s details in the mailing list when his/her entry is updated.
Tags – Add a comma-separated list of tags to include on the subscriber. Learn more about how to add tags to a subscriber.
Opt-in – If you would like to add the user’s email address to the mailing list automatically, select ‘Single’. Select ‘Double’ if you would like the user to confirm their subscription prior to being added to the mailing list.
Conditional logic – can be used to add a user to the mailing list only if specific conditions are met. Please note that Conditional Logic is only available in the Pro version of Formidable Forms.
MailChimp gives you the flexibility to create separate groups within your account and filter the subscribers according to the groups. On top of that Formidable Forms allows you to directly add subscribers to these groups immediately after form submission.
Let’s now see how to setup a group field with Formidable forms.
Set up a Group Field
- Set up a group on your MailChimp account.
- Once you have set up a group in MailChimp, go into your form and add a field for the group. If you don’t want this field to be seen, you can select a default value and set the field visibility to the administrator.
- Go to your form Settings → Actions & Notifications → MailChimp.

4. Select the MailChimp list that you would like to use to add subscribers. Select the Email Address and any other required options. If your MailChimp group was set up correctly, it will appear as an option. In this example, the group is ‘Signup Source’. Match up the group with the field that you created in Step 2. Select the field value that should cause the subscriber to be added to each group. Every option in the group does not have to be selected.
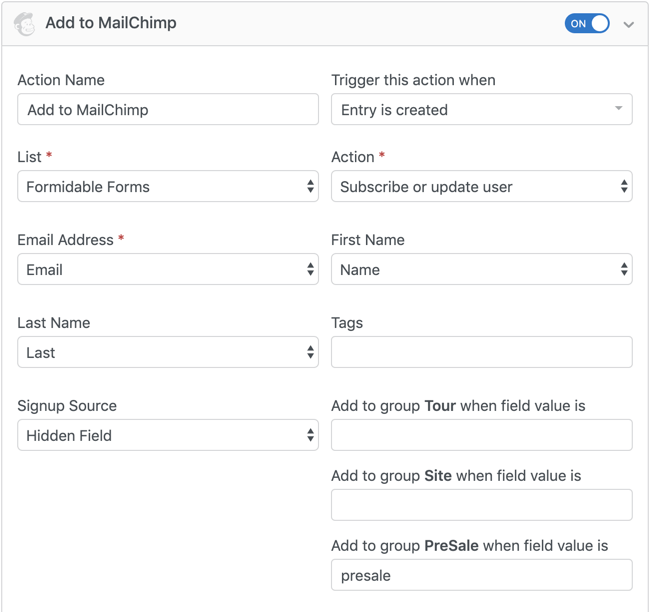
5. Click on update button.
Add tags to a subscriber
After your MailChimp form action is set up, you will see a Tags option. This field accepts values from a field, or any tags typed directly into the setting. When adding multiple tags, separate each one with a comma. A few examples of valid tags include:
- lead,from website
- [25],[26]
- [25],lead
Unsubscribing a user
If you would like to create a form where users could unsubscribe from your MailChimp mailing list, please follow the instruction below.
- Create a form and add an email address field. You could build an unsubscribe survey.
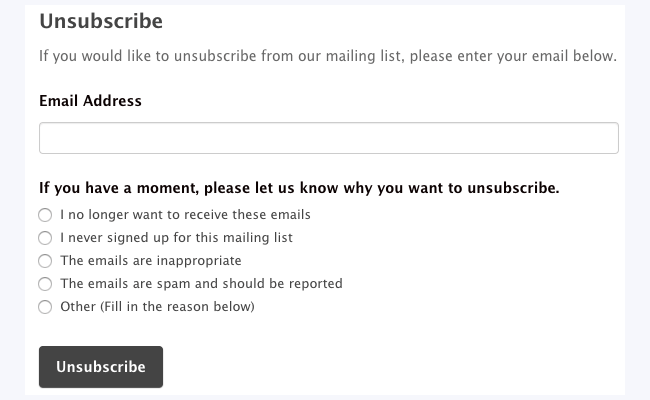
2. Go to your form Settings → Actions & Notifications and select the MailChimp icon.
3. In the Add to MailChimp form action, set the Action to Unsubscribe address.
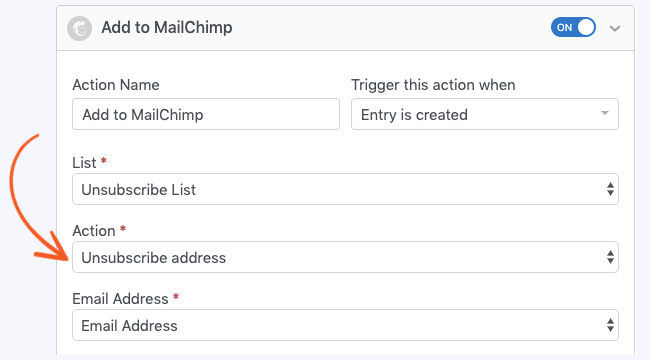
This is how a user who wants to unsubscribe to your email list can easily do it.
The subscribes lists which will be created after the form submissions can be directly accessed from Formidable Forms panel or you can do it from the MailChimp account. Any updates done in any one of the accounts will be automatically reflected in the other account.
Also Read,
- How to Create Calculators in WordPress Site With Formidable Forms
- How to Preview Responses Before Submitting a WordPress Form
- How to Automatically Export WordPress Form Submissions to CSV with Formidable Forms
Final Words
Formidable Forms is the most popular WordPress Forms plugin which allows you to Manage Your MailChimp Email Subscribers from WordPress. Simply using the MailChimp API keys the plugin can be easily connected with your MailChimp account.
It also allows you to directly add the subscribers to the MailChimp account lists, groups. Also, you can filter the users with the help tags.
MailChimp Addon comes with the basic plan of Formidable Forms. If you have still not purchased the premium plans then click the link below and buy it without hesitation.
Purchase Formidable Forms Pro License
If you have any doubt in integrating Formidable Forms with MailChimp Feel free to ask us by leaving a comment at the end of this article and we will be happy to assist you.
If you liked this article, then please subscribe to our YouTube Channel for WordPress video tutorials. You can also find us on Twitter and Facebook.
