How To Create an Multi-Step Form in WordPress? Forms are the most important asset of every website, they not only helps your visitors to connect with you but also increase the lead generation by converting your visitors into customers.
It is always important to provide a form that can be easily filled. In most cases, the users get irritated with scrolling down while filling the form and also makes it difficult to preview the form after it is completed.
In such cases, you must offer multi-step forms to increase engagement. The multi-page forms eradicate the hassle of lengthy scrolling and improves the user experience. Thus multi-step forms increase the chances for form conversions and reduce form abandonment.
Multi-step forms can be easily created with WPForms contact form plugin. is the best and complete Drag and Drop WordPress form plugin I have come across. If you are owning a website then WPForms is the must-have WordPress plugin.
The plugin is from the creators of WPBeginner, Syed Balkhi. They do have other exciting WordPress plugins like Optinmonster and MonsterInsights that can actually take your business to the next level.
WPForms is rated 5 stars by more than 5000 users were in Contact form 7 is rated 4 stars by 1400 users. These statistics make it clear that WPForms is a more popular and trusted contact form plugin.
The plugin comes in free and paid version. If you really want to take your website to the next level then you must go ahead with the premium plans. WPForms is offering a flat 50% special discount to Bloggersutra readers.
If you want to know the complete features of WPForms then read our In-depth WPForms Review.
Let’s see What are Multi-Step Forms & Why They are Essential?
Why Use a Multi-Step Form on Your Website?
The multi-step or multi-page form is a form that can gather data more efficiently in quality and in quantity than a form usually does. This kind of form offers lots of form fields that are dynamic in nature to collect the accurate user data. The data thus gathered can be directly used to generate more leads or to convert your subscribers into customers.
The basic advantages of Multi-Step forms are:
- Increased conversions
- Improved user experience
- Encourage focus
- Reduce form abandonment
- Collect only what you need
For example, a detailed survey form is generally created in a multi-page format. Why? There are some really appealing reasons to create a big form in the multi-page format.
- If a form contains many fields, the user needs to scroll down to fill in the data. This might annoy the user and he might leave the website in between.
- With multi-page form navigation, if the user can track their progress, the chances are that the user ends up filling out a lengthy form instead of leaving it off.
- If a form is divided well into different sections (pages) based on the nature of the content, it helps users to jump between different subsections of pages simultaneously.
- And there is one undeniable fact and that is that paginated forms (forms marked for the page numbers) have a high conversion rate.
What can you do with multi-step forms? Take a look:
- Quizzes or exams
- Registration forms
- eCommerce forms
- Job application forms
- Website signup forms
- Medical in-take forms
- School enrollment forms
- Surveys (especially longer ones!)
Multi-Step forms are the necessity for all the websites. WPForms is the one such best WordPress plugin offering to create feature rich Multi-Step forms in simple steps.
However, it may also depend on personal preferences and some people opt for other plugins according to their needs. But I can tell you some unanimously valid reasons why WPForms can be considered the best.
- Clean and advanced form builder interface that let’s build lengthy professional forms within minutes
- Creates any kind of form layout – either two-column, multi-column, hybrid column, tabular, etc..
- Advanced visual designer to customize form CSS styling whether colors, sizing, spacing (padding/margin), borders, border-radius (rounded corners)
- Take on larger forms – Multi-step or multi-page forms
- Not just a form builder – a complete database application creator (display, edit and filter form entries on the frontend, allow different permissions to different user roles)
So, let’s take a look at how to create a multi-step form in WordPress.
How to Create a Multi-Step Form in WordPress?
Before we start creating multi-step form in WordPress you need to install and activate the WPForms wordpress plugin on your website. We would recommend you to go ahead with WPForms Premium with 50% discount to take complete features advantage.
Now since you have a premium version of the WPForms, now let’s go ahead with Creating a Multi-Step Form in WordPress with WPForms.
Step 1: Install and Activate WPForms
WPForms can be easily installed like any other WordPress plugins. If you have difficulty in installing WordPress plugins then below is the detailed tutorial to help you.
Installing WPForms is easy follow the simple steps given below.
- Login to your WordPress Admin Panel.
- Look for the Plugins menu at the left of the screen.
- Click on Plugins >> Add New.
- On the search bar type WPForms.
- Install and Activate WPForms Plugin.
If you are looking for the in-depth tutorial for creating WordPress contact form in 5 minutes the click on the link below.
The plugin which you installed is the free version and has limited functionality. You need to purchase the license to explore and use all the features.
Purchase WPForms Pro License at 50% discount (Limited Time Offer)
Before the creating the file upload forms, you must purchase and validate the license key.
To validated licence key just follow the simple steps.
Validate WPForms License Key:
- After the activation of WPForm plugins. Go to WPForms>> settings.
- This option will be available to you at the left sidebar of your page. Here, you can see the text field to verify the license key. Put the license key in the text field and click on the button “verify key“.

Since WPForms is now successfully installed and activated, let’s go ahead with Creating a Multi-Step Form in WordPress.
Step 2: Create a Form in WordPress
WPForms allows you to break any form into multiple parts or steps. For the purpose of tutorial we will be creating a simple form and then converting it to multi-step form.
Next, go to WPForms then click “Add New” to create your first form. On the setup screen, name your form and choose the Simple Contact Form layout.
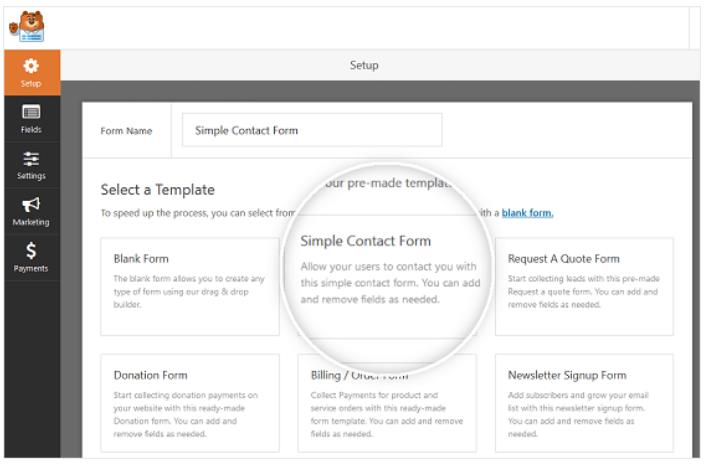
WPForms will make a basic contact form. Here, you can add extra fields to your contact form by hauling them from the left-hand panel to one right-hand panel.
You can click on the fields to edit them. You can also use your mouse to drag and drop the field order.
If you want to add a new field, simply select from the available fields on the left sidebar.
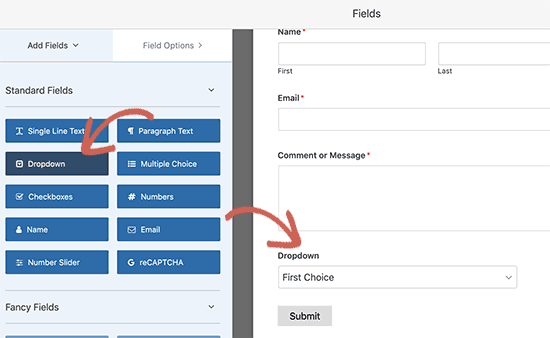
At that point, click on the field to roll out any improvements. You can likewise tap on a form field and drag it to revamp the request on your contact form. When you’re finished redoing your form, click “Save“.
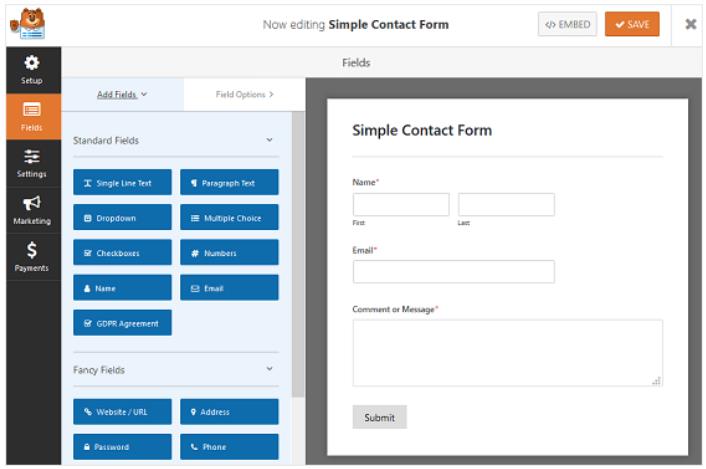
Since you have created a simple contact form using WPForms but if you want to create a complex form then you can do that using the pre-designed templates. The various pre-designed templates that come with the plugin are:
- Request a quote form
- Job application form
- Order form
- Survey form
- Poll form
- User registration form
These forms tend to be much longer than a simple contact form and will likely require multiple steps to complete if you ask for a lot of information.
Now let’s take a look at how to split your form into multiple parts.
Step 3: Create a Multi-Step Form
The form you have created in the previous step can be easily splitted into multiple pages using Page Break form field.
To do this, drag the Page Break form field, found under Fancy Fields, from the left hand panel to the right-hand panel.
Place the field where you want the form to split.
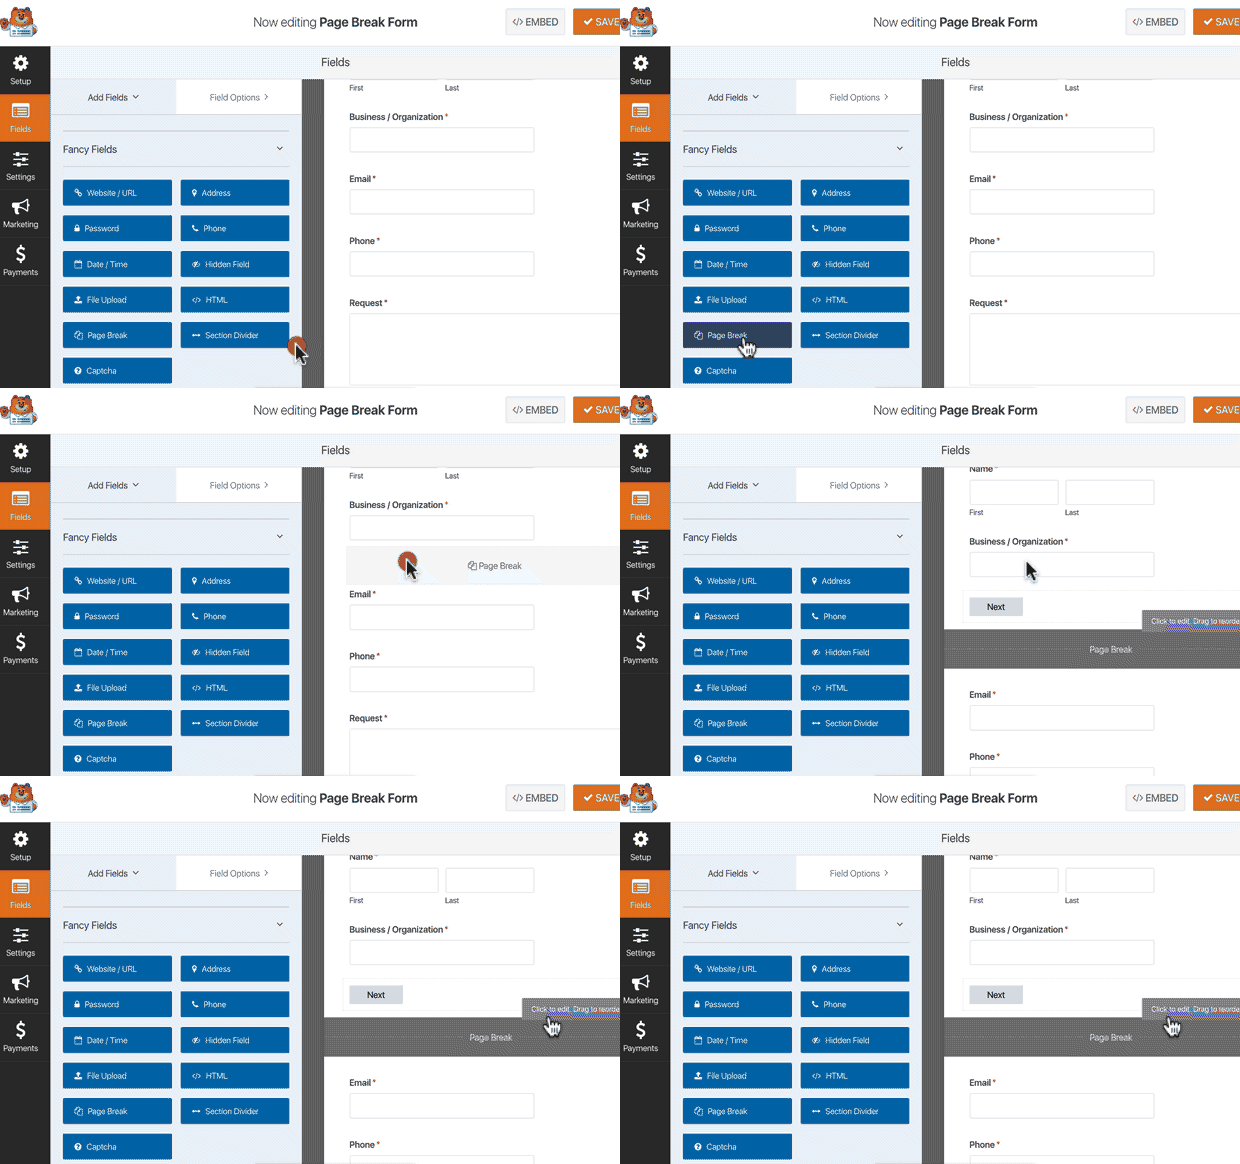
Add Page Break form field everywhere on the form where you want to split it. Additionally, you can add additional fields in every page break field.
You must take the relevant data from the users from the multi-step form. You can always take additional data in the future after the user completes and submit the form initially.
Creating lengthy form can lead to form abandonment. So always make your form short with important informations.
Step 4: Customize the Progress Bar
Creating a progress bar indicator with the multi-step form allows your visitors to track the percentage form they have filled and how much is still left.
To make things super easy on you, WPForms comes with three different breadcrumb style indicator bars for your multi-step forms:
- Connectors: shows a connecting bar and page titles of each part of your multi-step form.
- Circles: shows one circle and page title per page on your multi-step form.
- Progress Bar: indicates the progress of the form as the user fills it out.
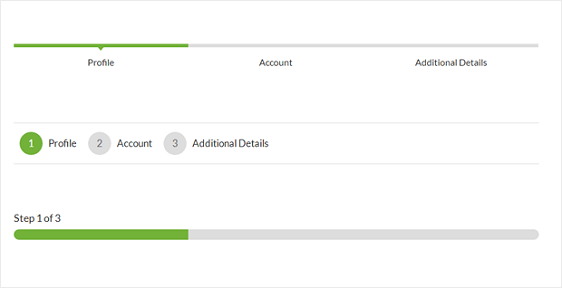
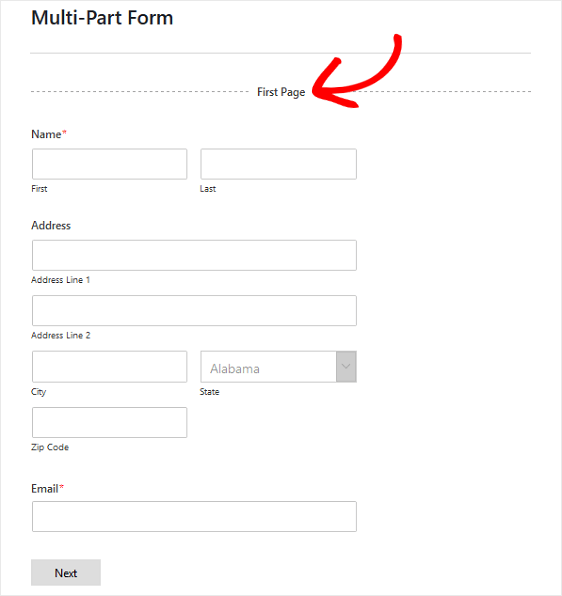
To customize the progress bar and page title of the first page of your multi-step form, click on the First Page break section.
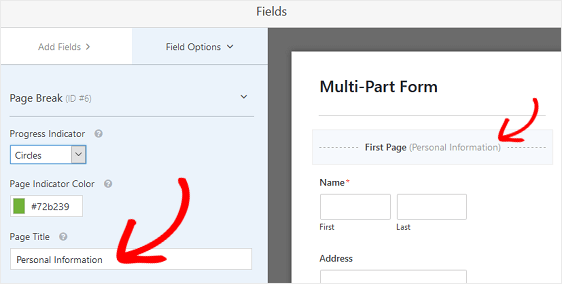
Once you choose the progress bar field, a new setting panel will appear to configure the progress bar. From the setting panel you can select the design of the progress bar and also change the title.
To customize the next page title and the button taking site visitors to the next page on your form, click on the Page Break section you created when you added the page break to your form.
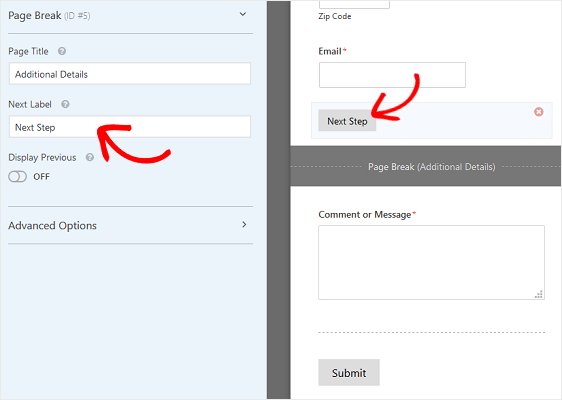
You can also toggle on the feature that lets you show site visitors a Previous page button.
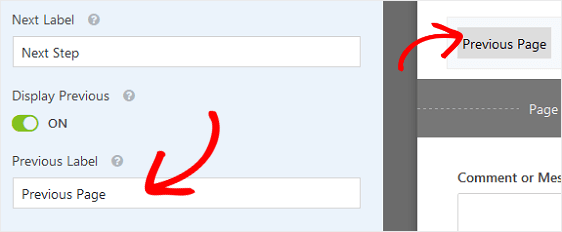
When you do this, you’ll have the chance to change the button copy too.
Once you’re done creating all of your page breaks and customizing the progress indicator, click Save.
Step 4: Configure Your Form Settings
Go to “Settings” then go to “General“. Here you can configure the following:
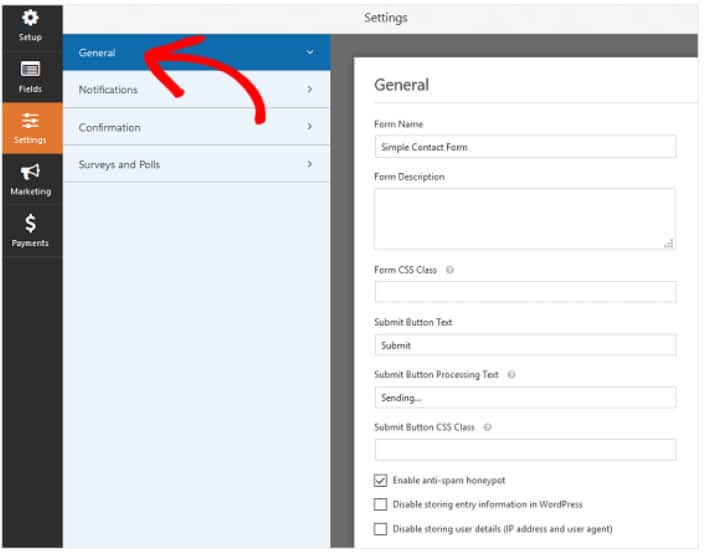
You will few option that can be directly configured for you contact form. Below are the details given for various field that can be configured.
- Form name: Rename your form if that you need to.
- Form description: Give your form name a depiction.
- Submit button text: Redo the copy on the submit button.
- Spam prevention: Empower the counter spam honeypot highlight to forestall spambots from submitting forms. This component is consequently empowered on all WordPress forms. If you choose to utilize another type of spam counteraction, just unclick this choice.
- GDPR Enhancements: You can disable the putting away of section data and client subtleties, for example, IP locations and client operators, with an end goal to conform to GDPR necessities.
Next is we need to configure and notification and confirmation setting for the contact form you have created.
Step 5: Configure Your Form Notifications
Notifications are an incredible method to send an email at whatever point a contact form is submitted on your site.
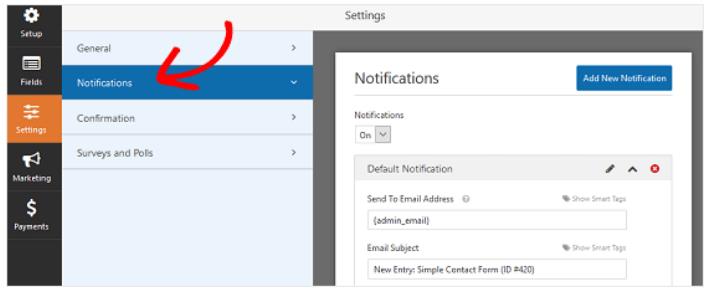
In fact, except if you incapacitate this element, at whatever point somebody presents a contact form on your site, you’ll get a notice about the contact form sent to the WordPress administrator.
If you utilize brilliant labels, you can likewise send a notice to the site viewers when they present a contact form, telling them you got their form and will be in contact in the blink of an eye. This guarantees viewers their form has gone through appropriately.
Step 6: Configure Your Form Confirmations
Form affirmations are messages that show to webpage viewers once they present a contact form on your site. They let individuals realize that their form has been handled and offer you the opportunity to tell them the subsequent stages.
WPForms has three affirmation types to browse:
- Message: This is the default affirmation type in WPForms. At the point when a site viewer presents a contact form, a message affirmation will show up telling them their form was prepared. Search here for some extraordinary success messages to help support client bliss.
- Show Page: This affirmation type will take webpage viewers to a particular site page on your website expressing gratitude toward them for their form accommodation.
- Go to URL: This alternative is utilized when you need to send webpage viewers to an alternate site.
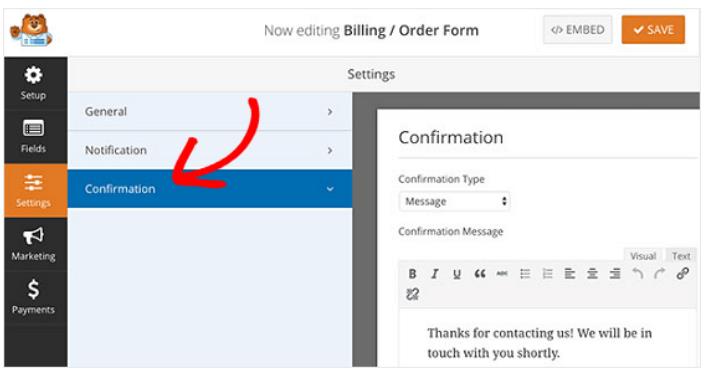
Then customize the confirmation message according to your taste, and click “Save”.
Step 7: Add Your Form to Website
After you’ve made your simple contact form, you have to add it to your WordPress site. WPForms permits you to add your forms to numerous areas on your site, including your blog entries, pages, and even sidebar gadgets. We should investigate the most well-known post/page implant alternative.
To start, make another page or post in WordPress, or go to the update settings on a current one. From that point onward, click inside the first block (the clear region beneath your page title) and snap on the Add WPForms symbol.
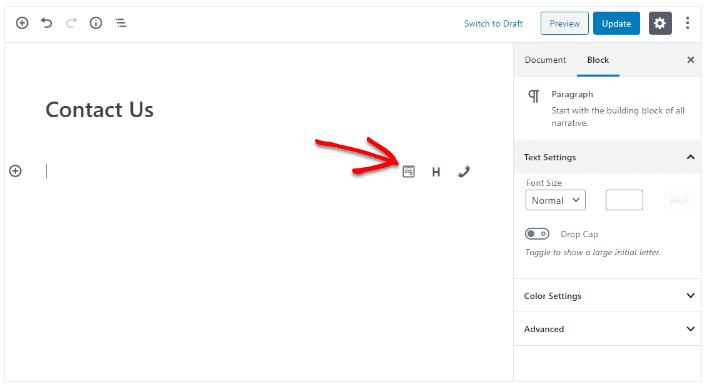
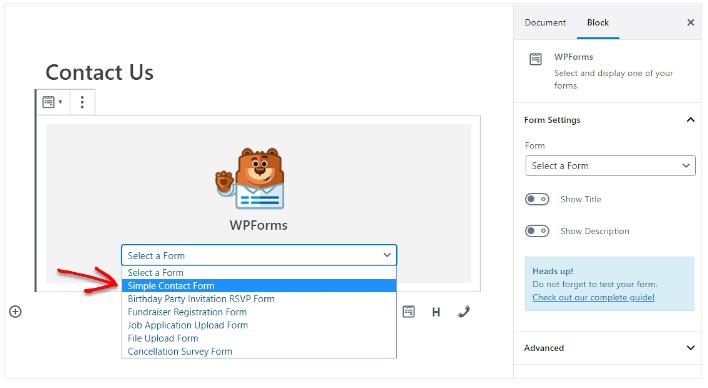
The helpful WPForms gadget will show up within your square. Snap-on the WPForms dropdown and pick which one of the forms you’ve just made that you need to embed into your page. Select your simple contact form.
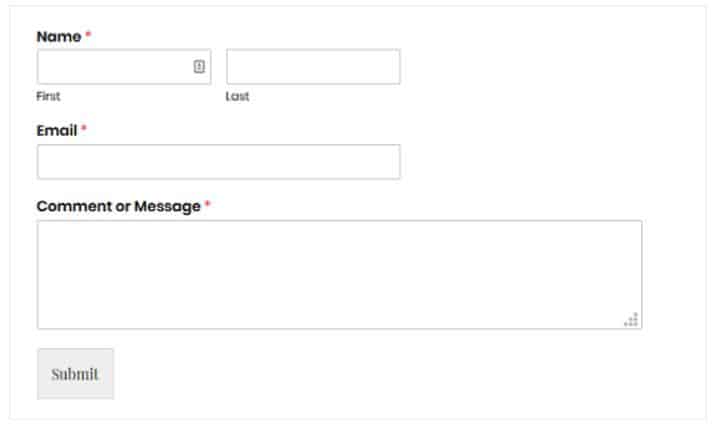
At that point, publish your post or page so your contact form will show up on your site.
Conclusion
It is very simple to create Multi-step forms in WordPress with WPForms. Undoubtly, multi-step forms are very useful for every website to colledt the information of visitors in the systematic manner.
WPForms offers many more features other than multi-step Forms. You must activate the premium license of the plugin to enjoy the complete features and take your business to the next level.
They are offering a flat 50% discount to all Bloggersutra readers. Click the link below to avail of the discount. You don’t require any coupon code, just click the link and discount will be applied automatically.
Grab WPForms with 50% discount now
If you have any doubt in creating a multi-page form with WordPress then you can leave a comment at the end of this article and we will be happy yo assist you.
If you like the tutorial then don’t forget to share it with your friends.
Alternatively, WPForms also have a very strong knowledge base and 24×7 support team to resolve all your issues.
Also Read,
- How to Install & Create Conversational Forms with WPForms
- How to Use Email Marketing to Skyrocket Your Sales
If you liked this article, then please subscribe to our YouTube Channel for WordPress video tutorials. You can also find us on Twitter and Facebook.


