Want your visitors to upload file attachments to your website, then this step by step tutorial will help you to make a file upload form in WordPress website.
Contact forms are the best way to collect the information from your visitors, but with an increase in digitization there is always a requirement of giving users the ability to add files and media to your site’s forms.
Apart from that if you are offering Customer support forms, Registration forms, Job application forms then a file upload field within the WordPress form is a must.
If you have still not started with your own website then this the right time to start your own WordPress website and improve its performance before getting it live.
In this article, we’ll show you how to easily make a file upload form in WordPress.
Before we proceed further with creating a file upload form in WordPress let’s first understand the important factors that make it necessary to have a file upload feature on our WordPress forms.
Why File Upload Field is Required on Your WordPress Forms?
File upload field is one of the best ways to get more information form your visitors and helps you to reduce form abandonment rate on your site, so your website can generate more revenue.
Whenever you require to collect any attachment or image from your website visitors directly from the front end, you require to have a file upload field in your forms.
Here are some of the most common times you might want to allow users to upload a file through your contact form:
- Job application forms with resume attachments
- Pictures as image files for giveaways
- User-submitted content forms
- Client services form
- Customer support forms
So to enable file upload on your WordPress website you require a contact form plugin that offers multiple feature and not limited to file upload.
WPForms is the most popular drag and drops WordPress plugin used on millions of websites. The plugin offers multiple features and file upload is just one of the features. If you want to know all the features of the plugin then you must read WPForms Review.
If you are already aware of the features of WPForms then let’s directly jump on How to Make a File Upload Form in WordPress.
WPForms makes it easy for your site visitors to upload all kinds of file types to your contact forms, including but not limited to:
- Documents (.doc, .xls, .ppt, and .pdf)
- Images (.png, .gif, and .jpg)
- Video (.mpg, .mov, and .wmv)
- Audio (.wav, .mp3, and .mp4)
For WordPress security reasons, the default file types that can be uploaded are limited. Here’s how to allow additional file upload types to your forms.
So, let’s go ahead and check out how to add the file upload field to your WordPress contact form.
How to Make a File Upload Form in WordPress
Like Google Forms, WPForms also enables you to upload files anywhere on the website. However, the file upload features come with the premium license and not as part of a free license.
The free license of WPForms comes with limitations, so if you want to make the effective use of WPForms then you must go ahead with the premium licnese.
WPForms is offering 50% discount on all premium plans. Click on the link below to avail the 50% discount.
Purchase WPForms Pro License at 50% discount (Limited Time Offer)
Now since you have a premium version of the WPForms, now let’s go ahead with installing and activating WPForms plugin on your website.
Step 1: Install and Activate WPForms
WPForms can be easily installed like any other WordPress plugins. If you have difficulty in installing WordPress plugins then below is the detailed tutorial to help you.
Installing WPForms is easy follow the simple steps given below.
- Login to your WordPress Admin Panel.
- Look for the Plugins menu at the left of the screen.
- Click on Plugins >> Add New.
- On the search bar type WPForms.
- Install and Activate WPForms Plugin.
If you are looking for the in-depth tutorial for creating WordPress contact form in 5 minutes the click on the link below.
The plugin which you installed is the free version and has limited functionality. You need to purchase the license to explore and use all the features.
Purchase WPForms Pro License at 50% discount (Limited Time Offer)
Before the creating the file upload forms, you must purchase and validate the license key.
To validated licence key just follow the simple steps.
Validate WPForms License Key:
- After the activation of WPForm plugins. Go to WPForms>> settings.
- This option will be available to you at the left sidebar of your page. Here, you can see the text field to verify the license key. Put the license key in the text field and click on the button “verify key“.

Since WPForms is now successfully installed and activated, let’s go ahead with creating a file upload form.
Step 2: Make a File Upload Form in WordPress
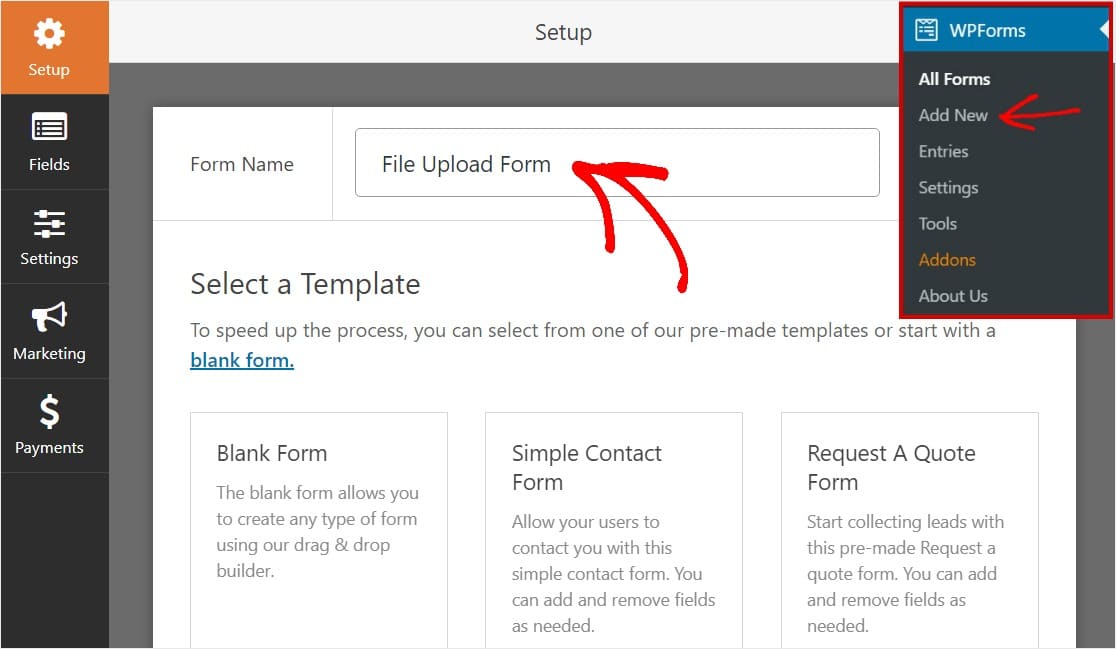
Go to your WordPress dashboard and click on WPForms » Add New in the left-hand panel to create a new form and name it depending on it’s purpose or the page on which you are going to use it.
WPForms comes with pre-defined file upload templates. You can scroll down to the Additional Templates section and type “File Upload Form”, then click on it to open the template.
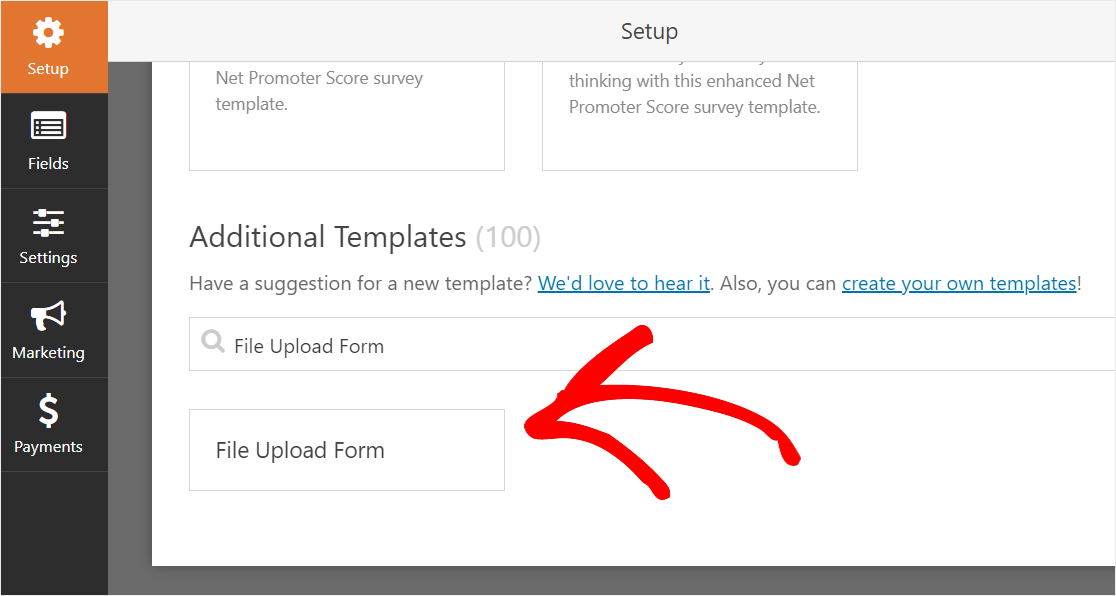
Make sure you’ve already activated the Form Templates Pack Addon to search for this form.
Now you can see the pre-built file upload form at the right of your screen and form drag and drop builder at the left. For example, you can add a payment field if you want to require payment on your file upload forms.
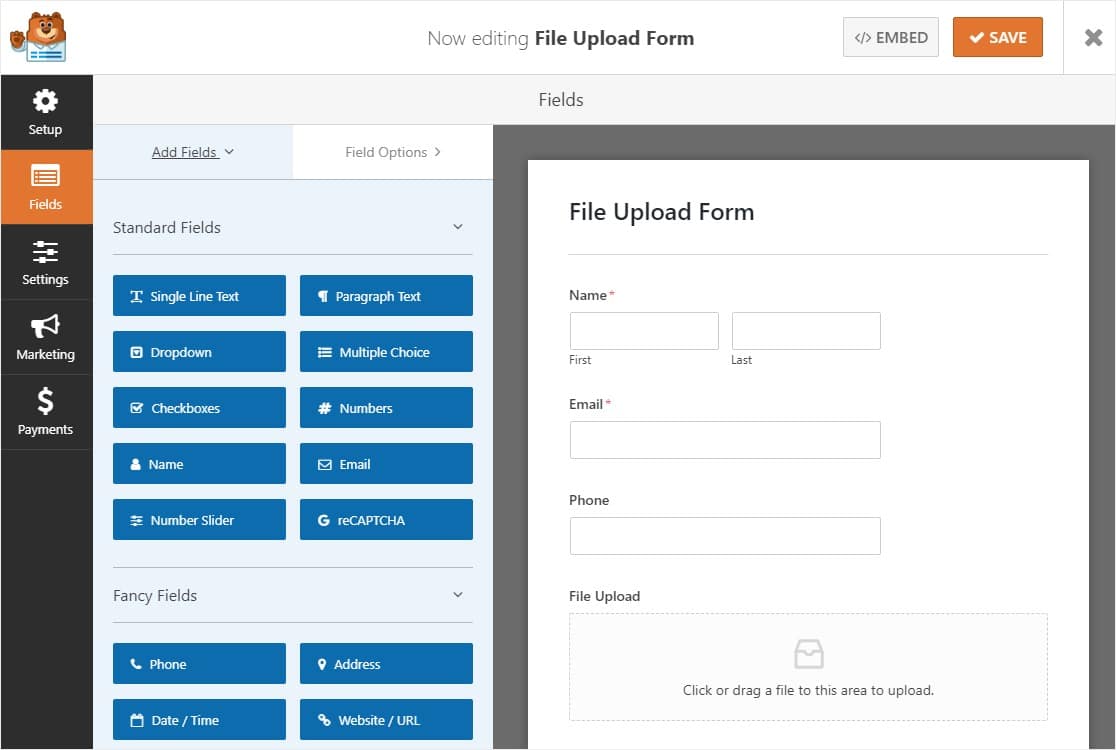
File upload feature can be added to any form that you create for your website using WPForms. Just drag the File Upload form field, found under Fancy Fields, from the left-hand panel of the Form Editor to the right hand panel.
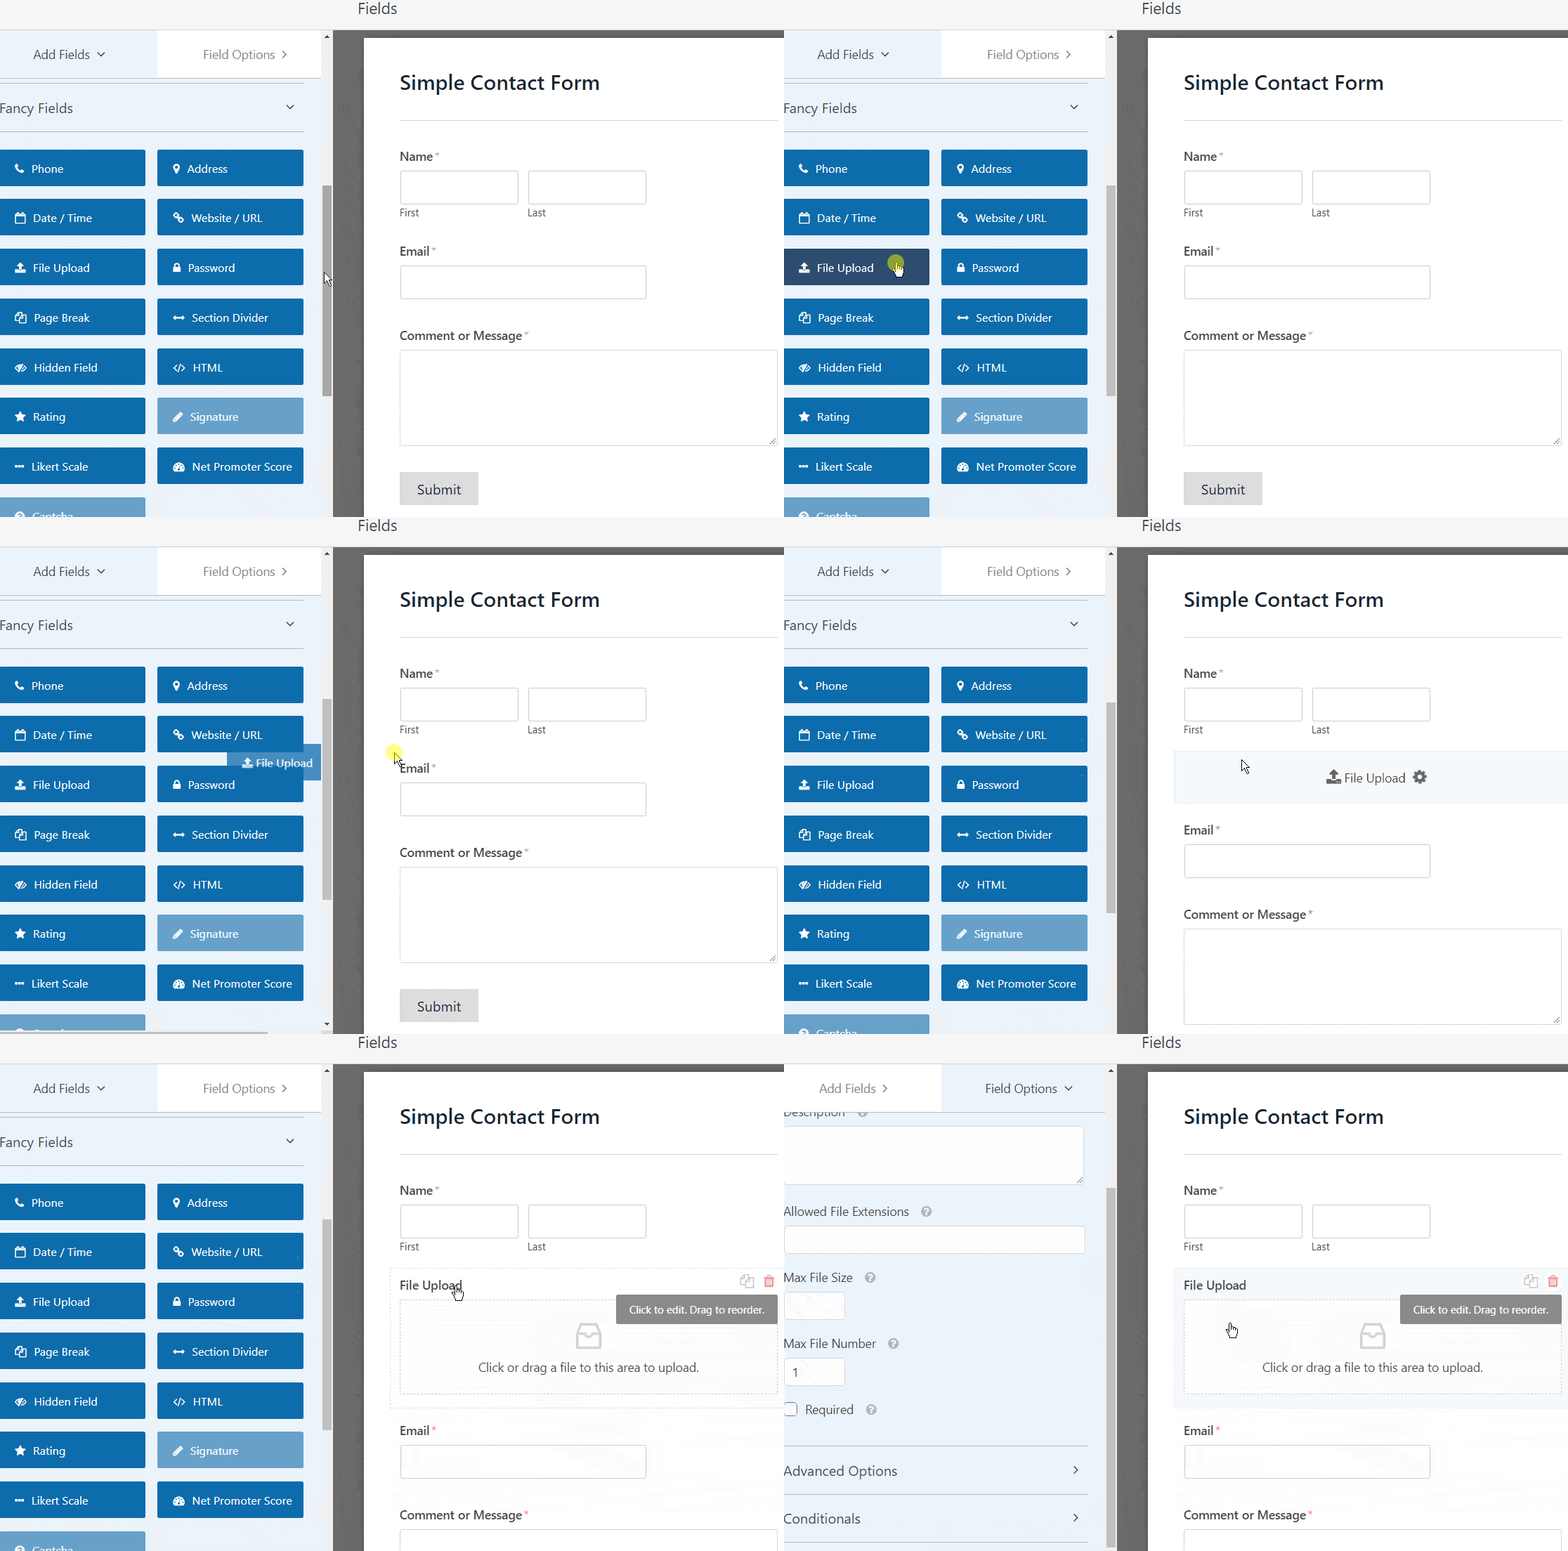
You can click on the File Upload field and also change the:
- Label
- Description
- Allowed File Extensions
- Max File Size
- Required
- Style
Where are uploaded files stored?
By default, all files uploaded by users are stored in the WPForms folder inside the Uploads directory of your site.
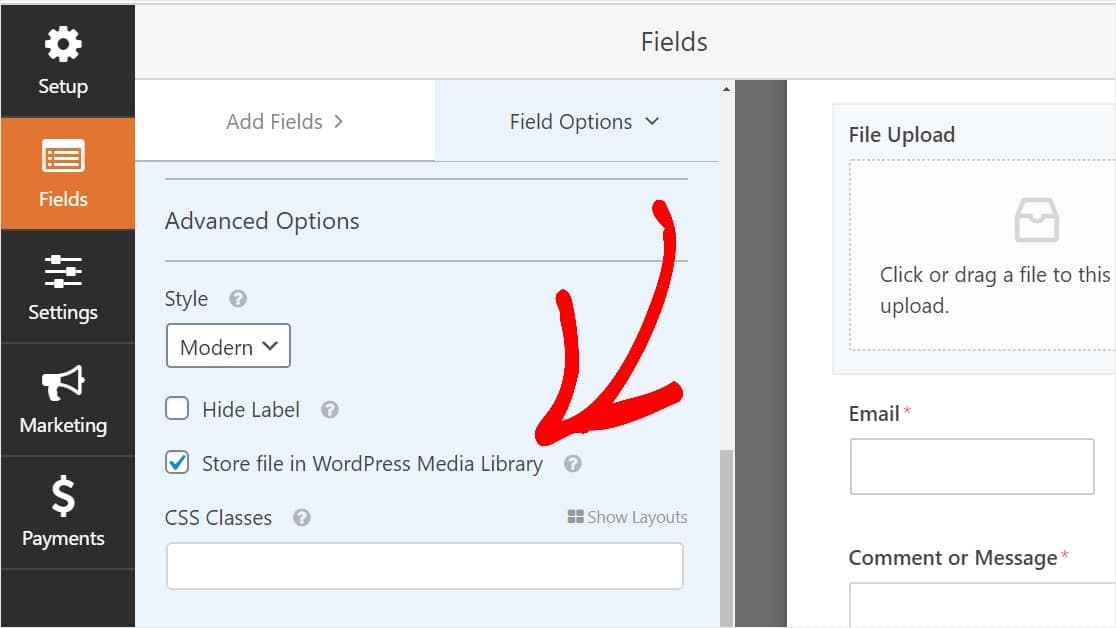
To make things easier, you can also store these files in your WordPress Media Library by selecting the Store field in WordPress Media Library checkbox under Advanced Options.
WPForms allows you to create multi-step forms also. You can add the file upload and payment field to multi-step forms too. But for this tutorial, we will stick to single forms only.
Now since you have successfully created your file upload form, now you need to customize the setting of the form. Customizing file upload form with WPForms is very simple. Let’s look at it.
Step 3: Customize File Upload Form Settings
To start customizing your file upload form you need to go to Settings » General.
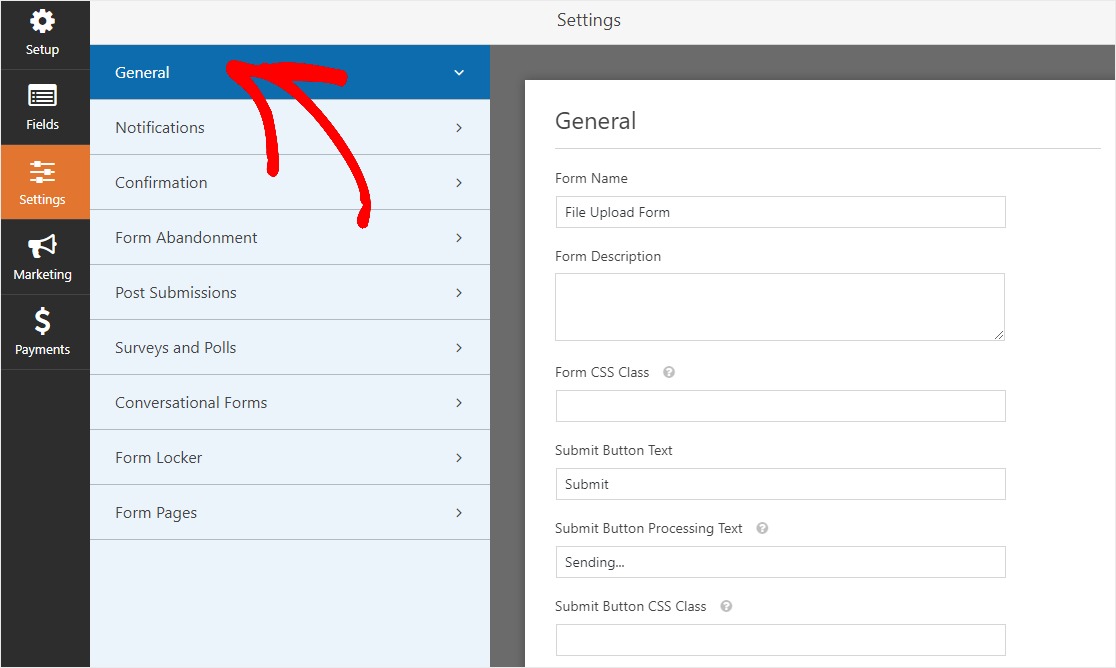
Here you can configure the following:
- Form Name
- Form Description
- Submit Button Text
- Spam Prevention — Stop contact form spam with the honeypot feature or Google reCAPTCHA.
- AJAX Forms — Enable AJAX settings with no page reload.
- GDPR Enhancements — You can disable the storing of entry information and user details, such as IP addresses and user agents, in an effort to comply with GDPR requirements.
And when you’re done, click Save.
Step 4: Configuring Form Notifications and Confirmation
Form notification and confirmation are again very important for every form you create for your WordPress website. The procedure of doing it is very simple and the same for all the forms that you create using WPForms.
How to configure Form Notification and Confirmation settings
Once you have done the above setting your form is ready to be publish on your website.
Step 5: Add Your File Upload Form to Your Website
WPForms lets you add your forms to multiple places on your website including your pages, blog posts, and sidebar widgets.
You can simply add the the form any where on the website from the file upload form shortcodes. Just paste the shortcodes anywhere on the website and your are done.
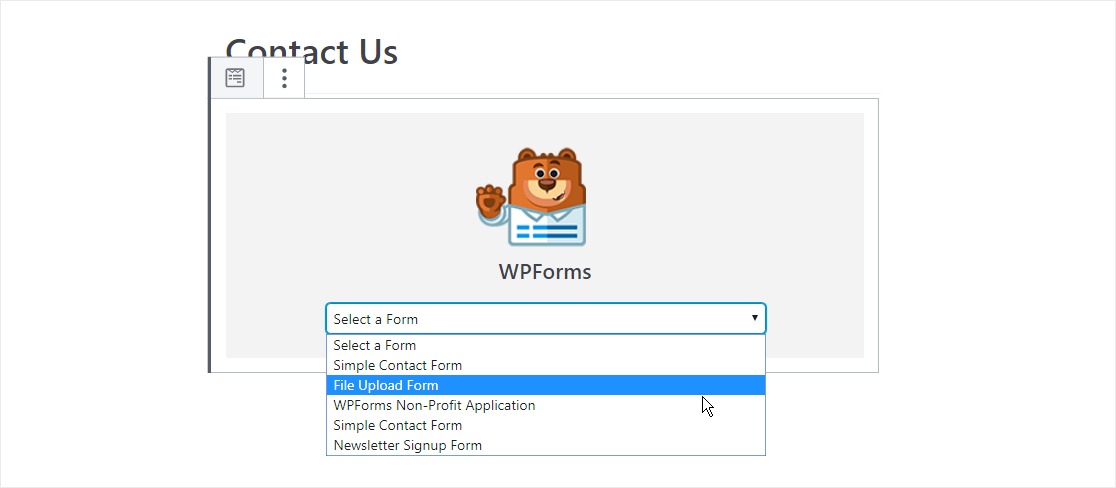
Additionally, for Gutenberg edditor click on the add content blog field and search for WPForms. Select the WPForms and it will integrated on your respective website page.
Click on WPForms dropdown and choose the file upload form that you wanted to be on this page.
Next, click on the blue button in the top right that says either Publish or Update, so your form will appear on your website.
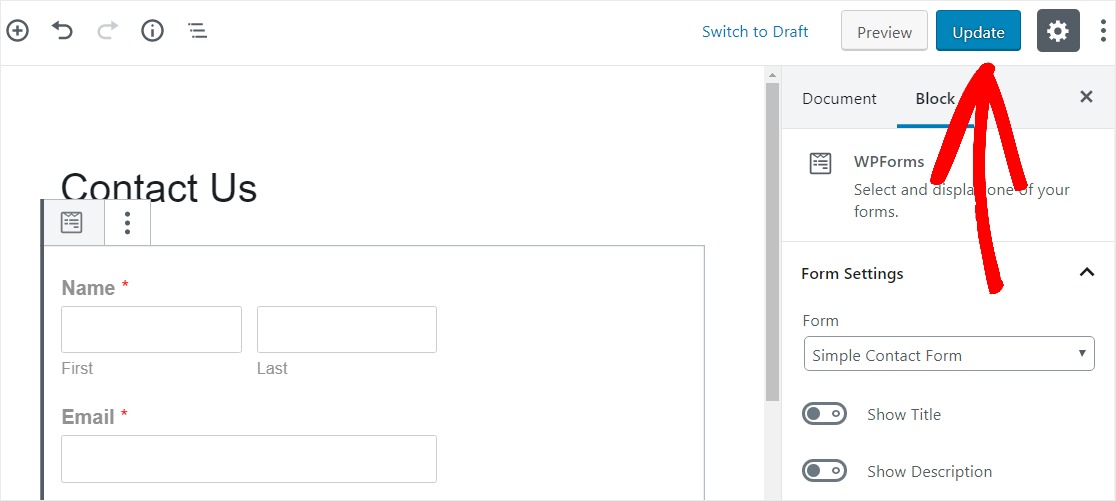
That’s it! Your file upload form is now on your website.
Step 6: View the Uploaded Files
WPForms stores each form submission as an entry. To view uploaded files, go to WPForms » Entries.
And from there, select the right form from the dropdown menu and click on View.
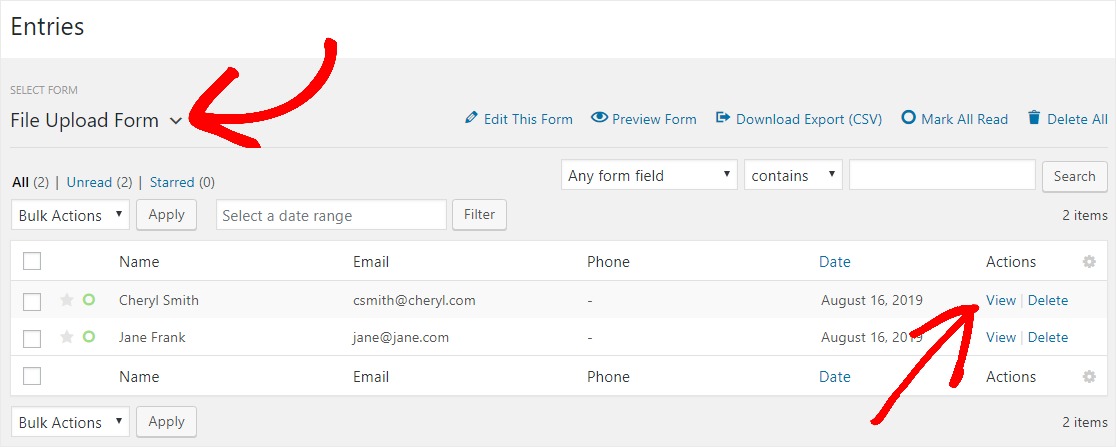
Next, right click the file to download the file, or click to view it in your browser.

You have successfully created and customized file upload form on your website. Now click the link below to take the first step towards creating file upload form on your WordPress website.
Final Words About File Upload Forms
WPForms is one of the best WordPress plugin offering multiple fetures at resonable price. File upload feature is the among the important feature required for every website.
WPForms makes it very simple to create file upload form and integrate it anywhere on the website with few clicks. It also gives you the flexibility to select where you want to store the uploaded files.
If you have still not purchased the premium version of WPForms, then go ahead and grab your WPForms copy now.
We have tried to cover the topic in details. However, if you still have any doubts in How to Make a File Upload Form in WordPress, then feel free to leave a comment at the end of this article and we will be happy to help you.
Also, don’t forget to share it with your friends so that they can also integrate this feature on their WordPress website.
Also Read,
- How to Install & Create Conversational Forms with WPForms
- How to Use Email Marketing to Skyrocket Your Sales
If you liked this article, then please subscribe to our YouTube Channel for WordPress video tutorials. You can also find us on Twitter and Facebook.
