How to Create a File Upload Form in WordPress With Ninja Forms? Contact forms are very important for every website to make healthy relations with their customers. But some times while contacting the website support team there might be a requirement to upload some documents or screenshots for better understanding and early resolution of the issue.
The requirement of forms is not only to create a media to contact the website but its more than that. It depends on the website and the type of business you are running. Sometimes you need to allow users to submit applications, Upload resumes, Spreadsheets, upload pictures, music files, video, or other documents that are critical to your business.
Most of the WordPress website asks its customers to upload the files to third-party servers and share the link with their customer support team. But if I tell you all this is possible with a simple WordPress form plugin. Adding a file upload feature for your users via your WordPress forms can solve a lot of paperwork overhead.
Ninja Forms is the most popular contact form plugin offering you lots of features and one of them is to create a File Upload Form in WordPress. It allows you to create the upload form in 3 simple steps.
Start You WordPress Blog From Scratch
Without taking much time lets jump directly on How to Create a File Upload Form in WordPress With Ninja Forms?
Create a File Upload Form in WordPress With Ninja Forms
Creating a file upload form with Ninja Forms is very easy You can allows you create the form in 3 simple steps or just 5 minutes.
Step 1: Install and Activate Ninja Forms Plugin
Ninja Forms can be easily installed like any other WordPress plugins. To make it more simple for you we have created a step by step tutorial on how to install WordPress plugins.
For installing Ninja Forms, follow the simple steps give below.
- Login to your WordPress Admin Panel.
- Look for the Plugins menu at the left of the screen.
- Click on Plugins >> Add New.
- On the search bar type Ninja Forms.
- Install and Activate the Ninja Forms Plugin
The plugin which you installed is the free version and has limited functionality. You need to purchase the license to explore and use all the features.
You can try our plugin risk-free for 14-days. If you don’t like it, you can ask for your money back – no questions asked.
Purchase Ninja Forms Pro License
Once you have successfully purchased the Ninja forms simply validate your license key from your Ninja Forms account to your WordPress dashboard.
Step 2: Install & Activate File Uploads for Ninja Forms
The Ninja Forms plugin allows you to create the simple contact forms. But if you want the additional features you need to activate the related Add-ons.
The plugin offers multiple Add-ons and each one of them designed for a specific task. In this tutorial we will be only covering the File Uploads add-on.
To install File Uploads add-on, first download the add-on from your account page under the Downloads tab. Then, follow these steps:
- In your WordPress Dashboard go to Plugins >> Add New.
- Choose the “Upload” option at the top of the page.
- Click “Choose File” and navigate to the “zip” file you downloaded from your account on NinjaForms.com
- Click “Install Now”
- After the installation finishes, click “Activate” and you will be ready to work with the add-on you purchased. Repeat this step for each add-on you have purchased.
Once you have uploaded and activated the add-on, this will add 2 new features to your WordPress website:
- A File Upload field that can be added to any form
- File Uploads settings under Ninja Forms in your WordPress dashboard for configuring the add-on and choosing where your uploaded files will be stored
Now we are ready to create the first file uploads form with Ninja Forms.
Step 3: Add File Upload Field to Your Form
Ninja Forms comes with pre-designed form templates. You can create a new blank form or select from the templates. File upload can be integrated with any types of form.
Just for the purpose of the tutorial we are integrating file upload with simple contact form where users can input their names and email address.
While you are populating the field you will now see a new field: File Upload. Just click on the field and drag it to your form where ever you want the field to appear in your form, as it is the field your users will be using to upload files.
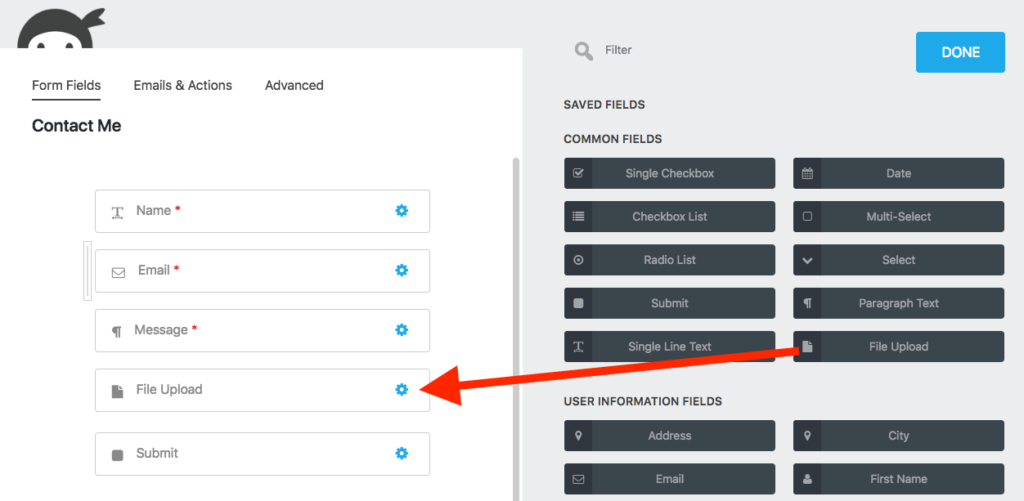
You now have a file upload form in WordPress! All that’s left to do is configure the form and publish it!
Step 4: Configure File Upload Form Settings
Once you have added the file upload field click on the gear icon next to the field to configure it. From here you can control the field label, file name, save location, and restrictions.
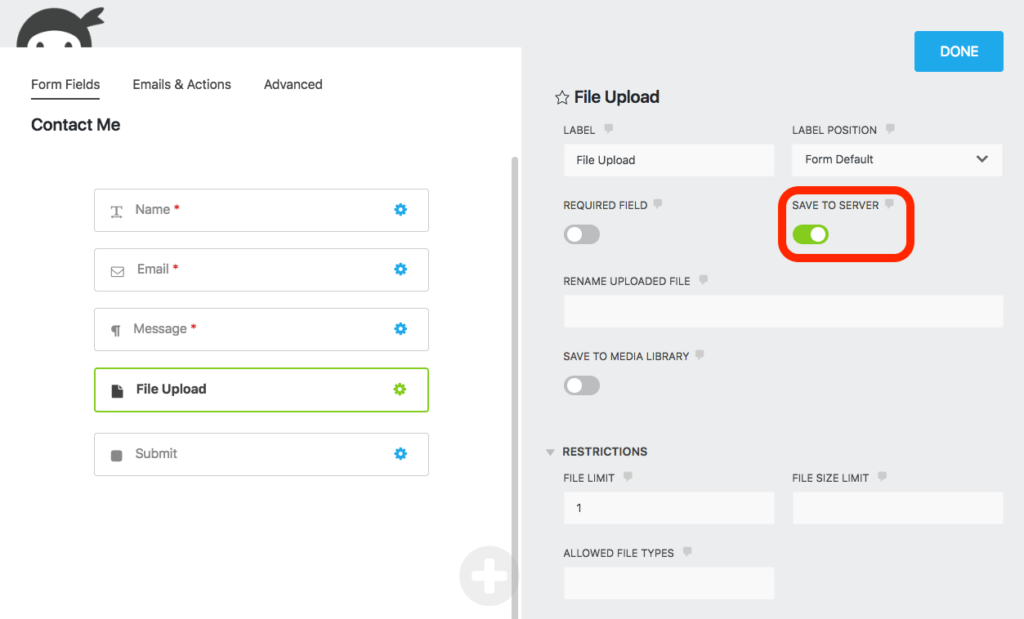
This is the simple upload form we have created. But when you know the type of form you want to create with the file upload field and on which page/post of your website you want to place it then name your form accordingly for easy understanding.
It might happen that you might require to create multiple forms for your website. So name the form that can easily make you understand it’s purpose over the website.
Under the restriction section make sure you also set a limit on how many files can be uploaded, the size limit of the file, and what file types you will allow.
Leaving the restriction field blank will upload all types of file. For the security of you website it is necessary that you should create the restriction on the type file formats that can be uploaded and up to what size.
Take note of the Save to Server option marked in the image above. By default File Uploads will save to your server. If that’s what you want, you can skip step 4. If you would prefer Dropbox or Amazon S3, check the next section!
Step 5: Enable File Storage in Amazon S3 or Dropbox
This option is totally optional. If your website is having huge traffic and you find lots of people using file upload option then you can save the uploaded files to Amazon S3 or Dropbox. Uploading the files to the server will use your server storage and might slow down the performance of your server.
So if you want uploaded files to be saved to Amazon S3 or Dropbox, configuration is a breeze.
In your WordPress dashboard under Ninja Forms >> File Uploads, click the External Settings tab. Here you will find the options to configure the setting to connect to either service using the settings provided.
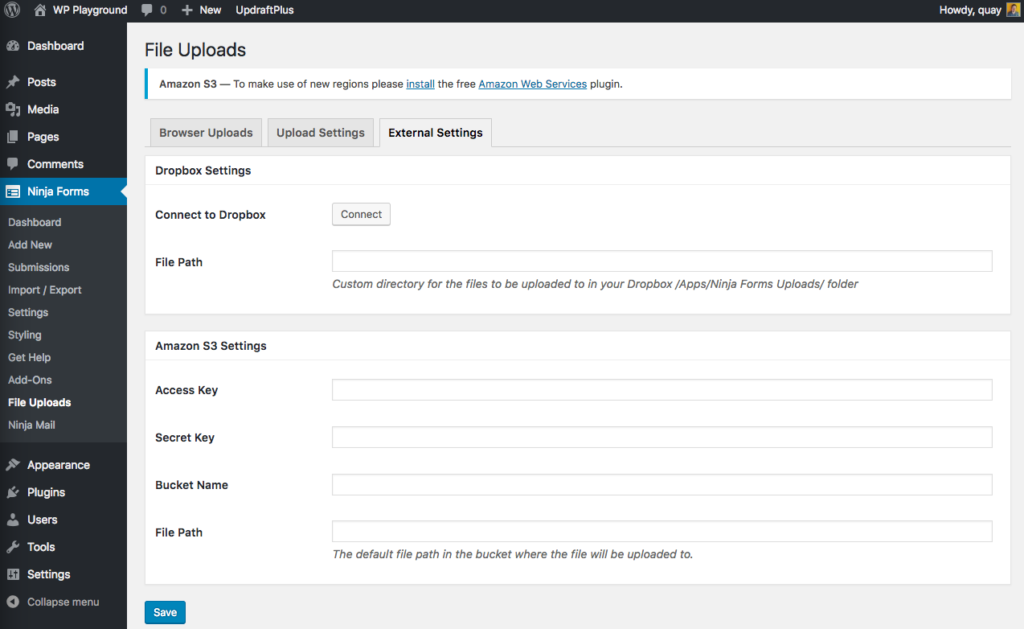
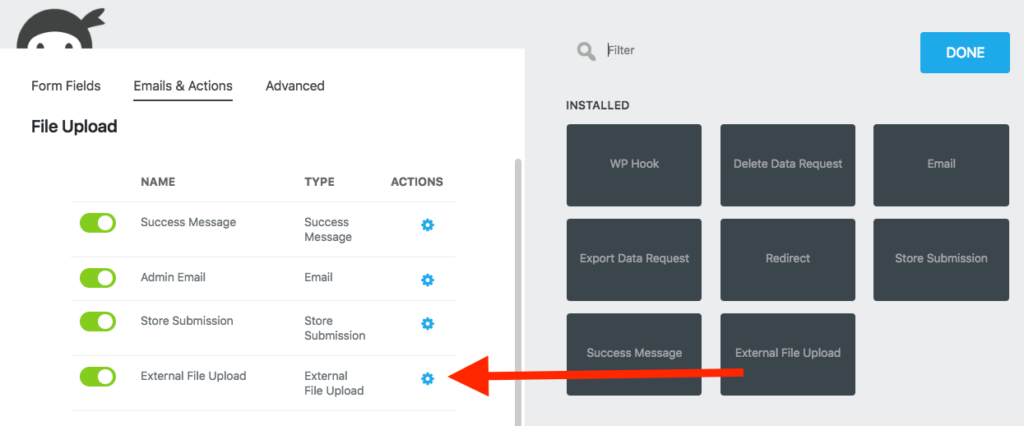
Now go back to your file upload form and under Emails and Actions, add an External File Upload field. Click into its settings and turn it on, and you’re set!
Step 6: Set up Email Notifications for the File Upload Form
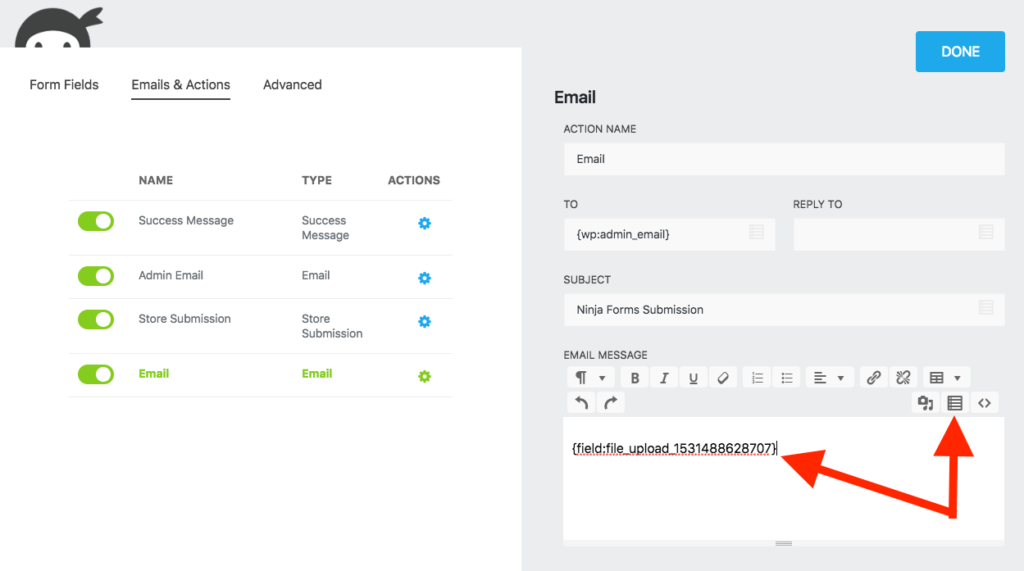
By default the email notification for the upload form are active. But you can still configure them according to your requirements.
Under the Emails and Actions tab, open the Admin Email action. In the Email Message body, you can select what options from the form will be sent in the email.
Step 7: Publishing File Upload Form
Like any other Ninja Forms it is simple to publish file upload form on your WordPress website. Just copy the shortcode and paste on the page/post where you want the file upload form to appear.
Wrapping Up File Upload Form With Ninja Forms
File upload is very important feature nowdays that is offered by most of the webmaster. Most of them use the third-party apps for the same. But with Ninja Forms it is feasible to create a complex file upload form in few clicks.
If you have still not purchased Ninja Forms then this is the right time to do it. Ninja Forms is offering flat 50% off on all their purchases and 20% off on all purchases of Add-ons.
The best part of Ninja Forms is that you just pay for the services that you want to get activated on your website. Unlike other form plugin where they charge you for a subscription plans with multiple features and not all of the them are useful on every website.
Click the link below to get 50% off on your first purchase of Ninja forms.
Creating a file upload form in WordPress doesn’t have to be a hassle. If fact, it shouldn’t take more than 5 minutes. But if you still have any doubts about integrating file upload forms on your website then feel free to ask us in the comment section of this article.
You Might Be Interested In,
- Get Your Business Online With A Full-Service Web Host
- 15 Best Small Business Web Hosting
- 16 Best Google Analytics Plugins For WordPress Compared
- 27 Best WordPress Plugins for All Websites in 2020 (Free & Paid)
- How to Score Perfect 100% on Google PageSpeed Insights for Your Website
If you liked this article, then please subscribe to our YouTube Channel for WordPress video tutorials. You can also find us on Twitter and Facebook


