OptinMonster Review
-
Features
-
Performance
-
Support
-
Ease of Use
-
Pricing
-
Integration
Summary
We can confidently say that OptinMonster is the best lead generation and conversion optimization tool. This tool is necessary for those who want to take their business to the next level. We give it 5/5 stars, here is the breakdown of our review score.
If you want to increase your email list and take your business to the next level then OptinMonster is the best solution for you.
Email marketing is the most reliable channel to make the connection between readers and customers. If you are in the search of the tool that can enhance the lists of signup of email and skyrocket your sales, then Optinmonster is the best tool for you.
Also Read, The Top 10 e-Commerce Mistakes You Should Avoid
Due to its great performance, it has gained a lot of market value. This tool is also known as generation leading tool in the current market. This tool allows rapid email list growth.
We have researched well and will describe in this review properly, why Optinmonster is best generation leading tool for WordPress powered websites.
Why Lead Generation plugin is Necessary?
Internet is full of websites offering free and paid email address as per your website requirement. But are these emails actually work? I have personally bought them and found them crap. Yes most of the emails won’t exists only and are fake.
To make your visitors as your potential customers your require lead generation plugin. WordPress plugin like OptinMonster help you segregate the users as per their interests and you can utilize it to send the email to them with the topic of their interest.
Sending users unsolicited emails is called spamming, and using spammer tactics will be detrimental for your business and your website. You have to tread carefully.
Email is the best online marketing tool and websites like Facebook also use them to communicate with their customers.
It is important to make your signup forms more attractive for more and more leads. The basic signup forms generally ignored by the visitors and you tend to loose them before making them your customers.
Without a lead generation plugin, 70-90% of people visiting your website today will never come back again. However, a properly-integrated and cleverly-used lead capturing plugin can help you convert those visitors into subscribers and paying customers.
OptinMonster Review: How it Helps to Grow Your Business
OptinMonster is not just a subscription form, it not only helps you create fancy and attractive subscription forms but also helps to grow your email list and increase sales and revenue.
What Are The Amazing Things in OptinMonster?
- It supports all types of opt-in forms
- It has built-in templates. All templates are unique. The theme based templates will give the form a totally different look
- Keep on enjoying the 74 opt-in themes at the time of review
- All the themes look professional
Just browse the several themes available and choose the best one for your form.
OptinMonster Key Features
Here, we will discuss the most amazing feature of this standalone email list builder tool. It offers the following features for your convenience:
- It offers drag and drop options to make your task easy
- It offers beautiful pop-ups
- It gives the user-friendly interface
- It works on detailed analytics to provide the required results
- It supports A/B testing
- It offers amazing scroll boxes
- It gives you customized checkbox option in the private field
- It engages more users by providing amazing full-screen welcome gate
Another great feature of OptinMonster is that it helps to reduce cart abandonment for your shopping websites.
OptinMonster New Features
Making things hosted isn’t all the OptinMonster team have been up to, though. To reward early adopters and keep the plugin competitive, the developers have added some other great new features, such as:
- more form types (blank, sidebar, and in-content/after post, full-screen entrance and exit gateways)
- purpose-built mobile forms
- more form appearance themes
- a canvas tool for creating the small window and full-screen custom popups, and welcome mat-style optins
- the ability to insert forms into posts and pages using shortcodes
- the ability to add animation and sound effects to forms as they load
- a manual optin trigger (i.e. to launch forms on mouse clicks)
- newly optimized code for faster loading times
- a testing mode for previewing forms
- a Yes/No form option for asking visitors a question
- success templates that are shown after a positive form interaction
- more controls for when and where popups are displayed
- an Adblock detection popup trigger.
OptinMonster Inteface
Optinmonster’s interface is amazing because of following specialties:
- The interface of Optinmonster is streamlined and just amazing
- It provides a user-friendly interface
- It makes the creation of opt-in so easy
- It makes your task easy by providing a set of tabs
- You don’t need to do page reloads in completing the process of creating a list
- Its built-in functionalities will never make you feel cluttered
- Optinmonster provides the most flexible and straight forward interface
How Optinmonster Increases User Engagement?
Optinmonster can increase the user engagement in several ways:
- It has an advanced page level targeting option to increase user involvement and user engagement
- Its popups, canvas functionality, full-screen welcome gate attracts the number of visitors
- It shows amazing floating bars to increase user attention
- It has slide bar opt-in forms which are the great source of user attraction towards this email list builder tool
OptinMonster Support
OptinMonster offers a good online knowledge base to resolve most of your problems. But if you still can’t resolve it then you can raise a ticket for your issue.
The another great support offered by their team is resolving issues directly by their professionals. All you need to do it is give them the admin login details of your website and they will resolve all your issues.
OptinMonster support is again a great reason to purchase and integrate this plugin on your website.
OptinMonster Plans & Pricing
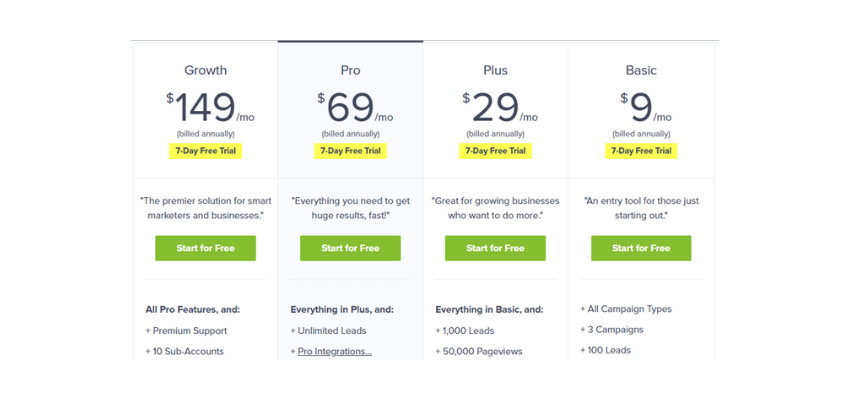
Let us discuss, what are the packages that Optinmonster offers and its benefits? Optinmonster is a web-based application and supports monthly basis packages.
Following is the details of packages of Optinmonster.
Basic Plan ($9/mo): This plan has limitations and suited for beginners.
Plus ($29/mo): This plan is appropriate to use when you only want to create lightbox popups.
Pro ($69/mo): When you need to use all the functionality of OptinMonster, you should use this package.
Growth ($149/mo): This is the best plan for large enterprises.
We recommend all our client to go for Pro Plan. As the plans supports all the features and multiple websites can be integrated in it.
Till now it is clear that OptinMonster is a mush have plugin for your website and business if you want to increase the leads and user engagements.
Let’s now concentrate on OptinMonster installation and creating your first campaign.
But before we proceed further it is important to purchase OptinMonster. You can get flat 50% discount on all OptinMoster plans.
How to Install & Activate OptinMonster on WordPress
OptinMonster is self hosted lead generation plugin. It means that you can directly configure your optin forms from the optinmonster admin panel instead of WordPress admin panel.
Once the form is fully activated and published you can simply make it live from the WordPress admin panel. This functionality helps you to make better optin and doesn’t slow down your website after integrating them on your WordPress website.
The installation procedure of OptinMonster is pretty simple. The installation is somewhat similar to other WordPress plugin but the important thing is that you need to connect the plugin to your OptinMonster account through API.
Step 1 – Install the WordPress Plugin
You can find the OptinMonster plugin from your WordPress admin by navigating to Plugins > Add New and search for OptinMonster in the plugin repository.
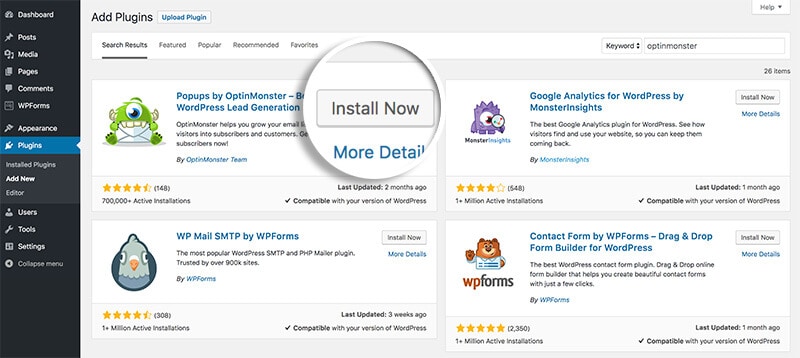
Click on the install button and wait for plugin to get installed.
Step 2 – Activate Plugin
Once the plugin installation is complete click on the activate button to activate the plugin.
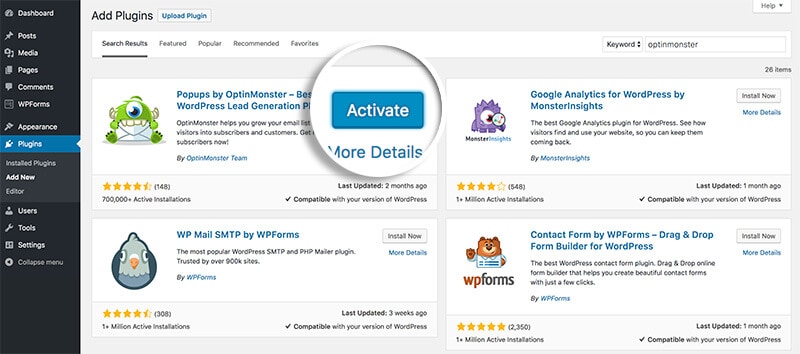
Step 3 – Setup Plugin
Navigate to the OptinMonster menu link, where you’ll be prompted to authenticate your OptinMonster account before proceeding.

To set up the plugin you need to connect the plugin to your OptinMonster account. If you have still not created your optinMonmoster account the click on this link to get 50% off on all OptinMonster Plans.
Once your account is activated you can locate your API Key on the API Credentials page at https://app.optinmonster.com/account/api/ by clicking your name at the top right, click My Account, and then selecting the API link from the top menu.
If this is your first time creating an API key or if you would like to create a new key, click Create New Key and give the new key a descriptive label such as the name of the website the key is for.
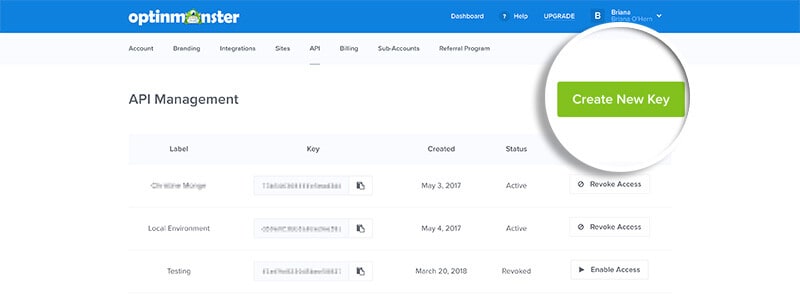
Once you have created a key, or if you would like to use an existing key, copy and paste the key into the API Key field in your WordPress admin. Then select the Connect to OptinMonster button to authenticate your account.

Once you’ve successfully authenticated your OptinMonster account, additional options will appear in the OptinMonster screen of your WordPress admin for you to manage your campaigns.
You should now see the following tabs:
- Campaigns
- API Credentials
- Support
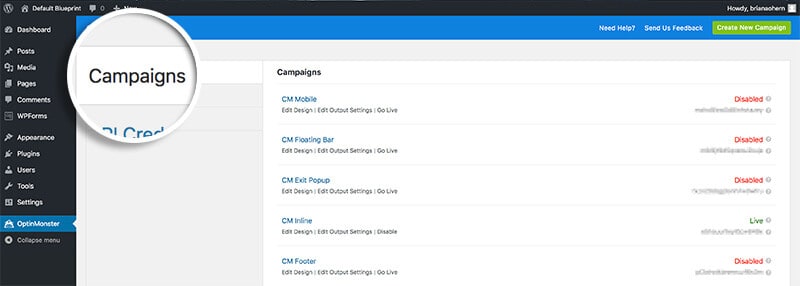
And you are done with installation and activation of OptinMonster plugin on your WordPress website. You can simply manage the campaign from the WordPress admin panel.
To understand the installation procedure better the OptinMonster team have created a video to help with the plugin installation.
The next question that must have clicked you mind is the procedure to create your first campaign. Well, it is very simple, you need to go to the OptinMonster control panel for creating your campaigns.
Let’s now see the creating the first campaign.
How to Create First OptinMonster Campaign?
Once you have installed and activated OptinMonster WordPress plugin you need to login to OptinMonster control panel to create your first campaign.
Step 1 – Create Campaign
Once you login into your OptinMonster Control panel you will be taken directly to dashboard. Click on the Create Campaign button on the top right of the page.
Once you have clicked it will ask you to select the type of campaign for your website.
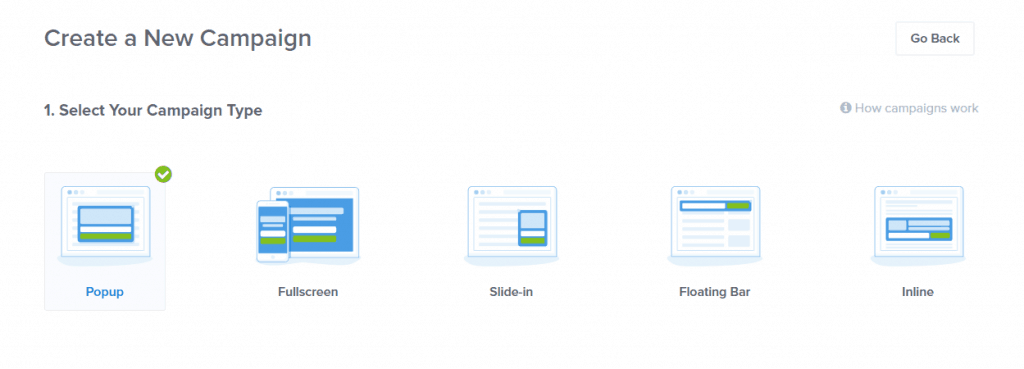
To provide the best user experience on your website OptinMonster offers following email optin forms and popup types.
- Lightbox popup.
- Fullscreen welcome mat window overlay (new).
- Slide-in.
- Floating bar (new).
- Mobile optimized popup (new).
- Inline/after post (new).
- Sidebar widget.
Step 2 – Select Template
You can select the type of campaign you want to start on your website. After selecting the campaign you can simply scroll down the page and click on the pre designed template to configure your template.
OptinMonster also allows you to create your custom template. But their pre-designed templates are beautiful and you can make some custom changes as per your requirement.

Thanks to recent updates to the editor, you can simply click on a form element to start modifying it. In fact, it’s fair to say that OptinMonster has a live front-end editor that rivals some of the best page builder plugins for WordPress.
Step 3 – Name Your Campaign
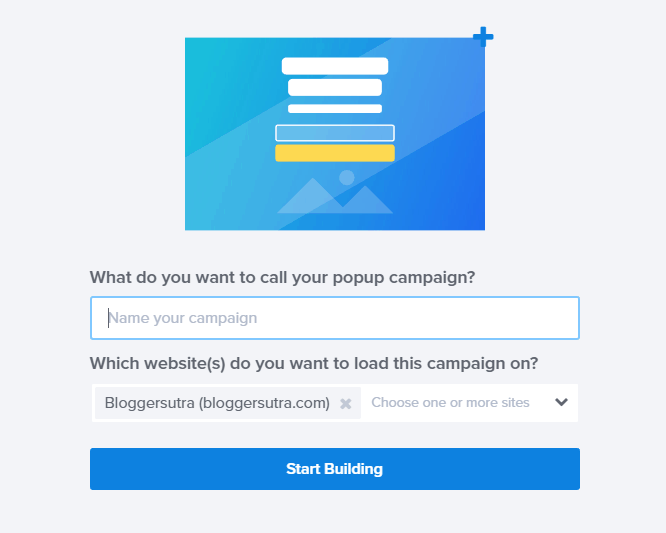
Once you have selected the template you will be taken to the next page where you will be asked to name your campaign. You can simply select the name of the campaign depending on the type and the where you want to display it on the website.
Additionally you will also be asked to select the websites on which you want to display the campaign. You can select multiple websites for a single campaign.
It’s important for our readers to know that Bloggersutra is using OptinMoster for its lead generation and we have seen drastic improvement after implementing it.
Step 4 – Design Campaign
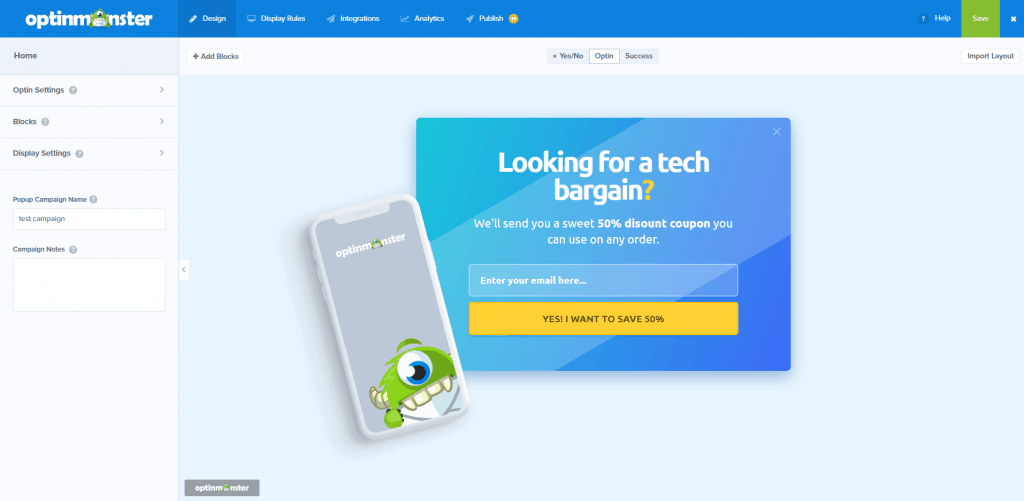
After naming and selecting the websites for the campaign simply click on to Start Building. Once you click on Start Building you will be taken to the online editor to edit your selected campaign.
Another recent addition to OptinMonster is the selection of new CSS3 animation effects, which can be triggered as a form is being displayed to help catch the attention of your visitors. You can now also add a sound effect to your forms that play when they load.
OptinMonster recent move to self hosted service have made it easy for users to edit and manage their campaigns online directly from OptinMonster account.
You can simply manage and edit the template with the options on the left of the screen. The editor also allows you to one-click edit the text within the template.
Step 5 – Configure display Rules
After carrying out necessary changes you can simply save the campaign and click on Display Rules on the top menu.
Over the Display rules, you can select the way your campaign should appear on your website. OptinMonster is regularly updating its display rules to get you better leads.
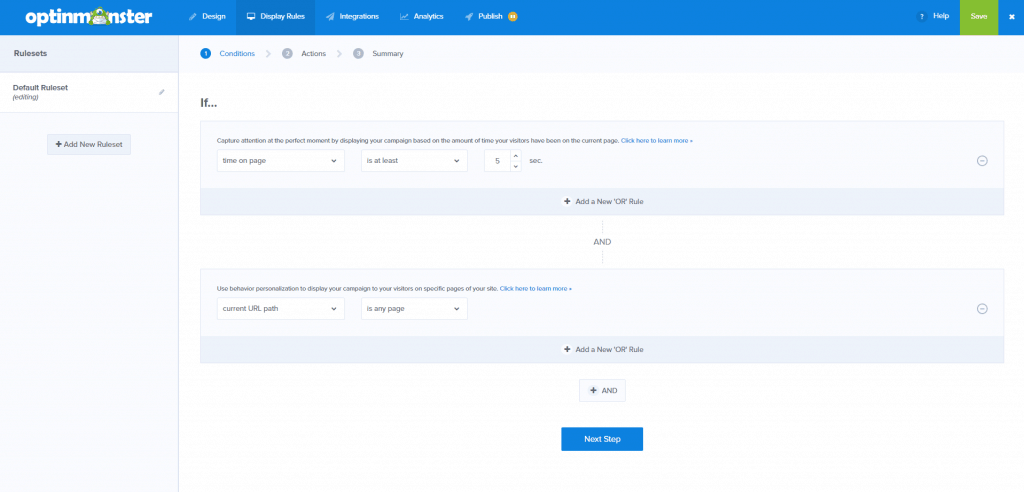
Some of the options that can now be used to control who can see your campaign or popup include:
- visitors browsing specific pages
- visitors who have viewed X number of pages
- visitors who have interacted with other campaigns or popups on your site
- visitors who are new vs returning
- visitors from a specific physical location
- visitors from a specific traffic source (Referrer Detection)
- visitors who are using Adblock.
You can select multiple display rules for a single optin form. But it recommended no to use many logic’s in a single form. Rather you can create multiple campaign and integrate them on your website.
By default “Powered by OptinMonster link” is activated on all the campaigns. But you can simply disable it from the design editing options.
Step 6 – Email Integration
After creating the display rules you can save the campaign and click on Integration button on the top.
OptinMonster can be easily integrated with the third party email marketing applications.
Few of the popular email marketing platforms that can be integrated are:
- Drip
- Constant Contact
- Mailer Lite
- Mad Mimi
- MailChimp
- Aweber
- ConvertKit
- Custom HTML integration.
Check out the list of complete third-party email marketing platforms that can be integrated with OptinMonster.
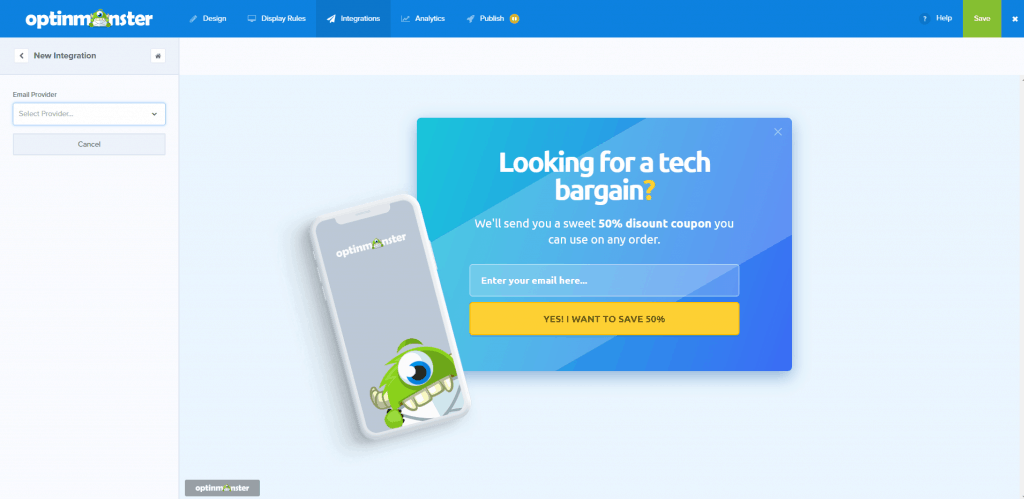
Select the email platform from the drop down list in the left corner of the screen.
Once you have selected it will ask you for the platform login details or the API key. Enter all the required information and you are done.
Step 7 – Connect Google Analytics
Save you campaign and click on the analytics button on the top.

You can connect your campaign directly to your Google analytic account. Simply add your Google analytic account connect your campaign.
Step 8 – Publish Campaign
Once it is connected to the google analytic account you can click on the “Publish” button on the top.
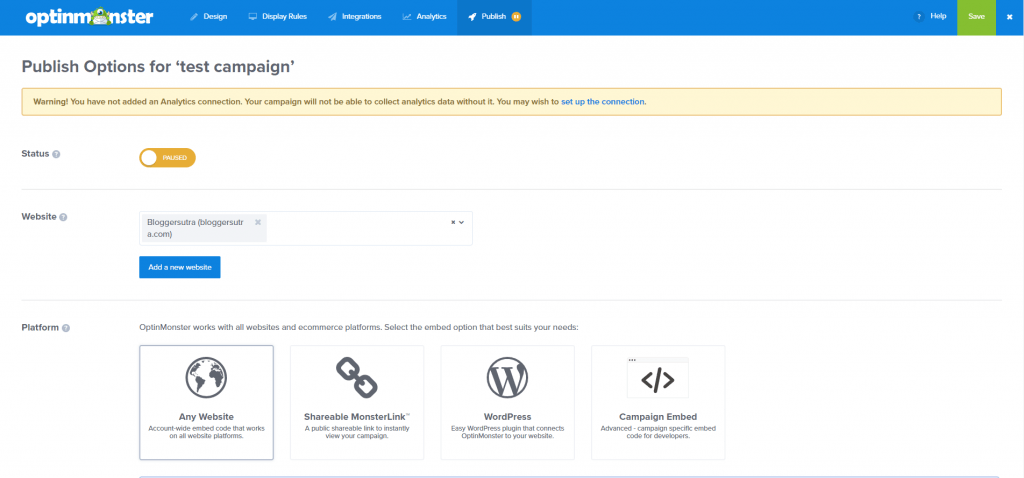
Till now the campaign is not published. You can click on the publish button to activate the campaign.
The code will be given for integrating the campaign with different platforms. For WordPress, we have already installed the OptinMonster plugin.
Step 9 – Activate Campaign on WordPress
To activate the campaign on your WordPress website, Go to the WordPress admin panel and select on OptinMonster tab on the left.
Refresh the list of the campaign and you will see your latest campaign within the list.
Click on “Go Live” button to activate the campaign on your website. OptinMonster campaign created by you is now live on your website. You can simply open the page as per your display rules and you will see the optin form.
In case you don’t see the opt-in form you can clear the cache and try again later.
If you want to deploy the form on a non-WordPress website, you can quickly copy the relevant code from your account area on the OptinMonster website.
Note: There’s a bunch of handy online documentation covering all of the most popular publishing platforms, as well as general instructions for other types of website.
You can also refer the video created be OptinMonster team for creating your successful campaigns.
Final Thoughts About OptinMonster Review
All the amazing features of Optinmonster are reasons to choose it over other email growth tool. You know, Email is the fastest and easiest way to reach the number of customers.
If you will not use Optinmonster, the visitor will never see your website again. Optinmonster increases chances of their again visit up to 70-80%.
Get the advantage of this paid solution that provides premium support through the ticket-based system. Choosing Optinmonster is the best way of getting consistent traffic and for generating quick income.
This software is cloud-based. The most amazing advantage is that you don’t need to hire a developer, through Optinmonster; you can develop lead capture forms without anyone’s help. Even some simple clicks can build the perfect form for you.
If you liked this article, then please subscribe to our YouTube Channel for WordPress video tutorials. You can also find us on Twitter and Facebook.
