How to integrate free SSL certificate on WordPress multisite? This is the most important question that comes to the mind of every webmaster who is hosting multiple wordpress websites and managing them with a single admin panel.
Almost 45% of the websites are on wordpress, because of it being the most popular content management system it is more vulnerable to hackers. Website hosted on WordPress are most targeted by hackers.
WordPress users are using lots of techniques to secure their website. Bloggersutra recommends malcare wordpress security plugin (read reviews) for securing your website from hackers and blogvault realtime backup plugin (read review) to back up your website.
Apart from using third-party plugins to secure your wordpress website the integration of Secure Socket Layer (SSL) certificate is also very important. You must also go through our ultimate wordpress security guide to make your website hackproof.
Secure socket layer (SSL) is very important for wordpress multisite setup as multiple sites are being managed by one admin, if any of the websites on the network gets infected then it will surely affect other sites too.
In this article, we will learn how to install free SSL on wordpress multisite to ensure the complete security across the network. We will use free SSL by Let’s Encrypt.
Let’s Encrypt Free SSL Certificate
In order to ensure the security across the wordpress multisite network, I will be using Let’sencrypt SSL certificate. Let’s encrypt is the free SSL certificate provider offering the same level of security as the paid SSL certificates.
It is very easy to integrate and you can find lots of documentation available on the internet to carry out the integration. It is also supported by most of the web hosting service providers.
If you have come across any other free SSL certificate provider offering the same level of security like Let’s encrypt then do leave a comment on this article and will consider writing a tutorial on that too.
Integrating Free SSL Certificate To WordPress Multisite
For the purpose of the tutorial, we are installing the let’s encrypt free SSL certificate on cloudways managed hosting. Cloudways is a fully managed web hosting provider hosting thousands of websites.
Cloudways is a platform that facilitates choice, simplicity, and performance. All this is backed by caring expert support so that you stay focused on what you do best, win as an individual and succeed as a business.
On the left-hand side navigation bar, navigate to the inbuilt Cloudways SSL certificate option and click on it integrate let’s encrypt.
Enter your email address and the parent domain name on which you wanted the SSL certificate to be installed.
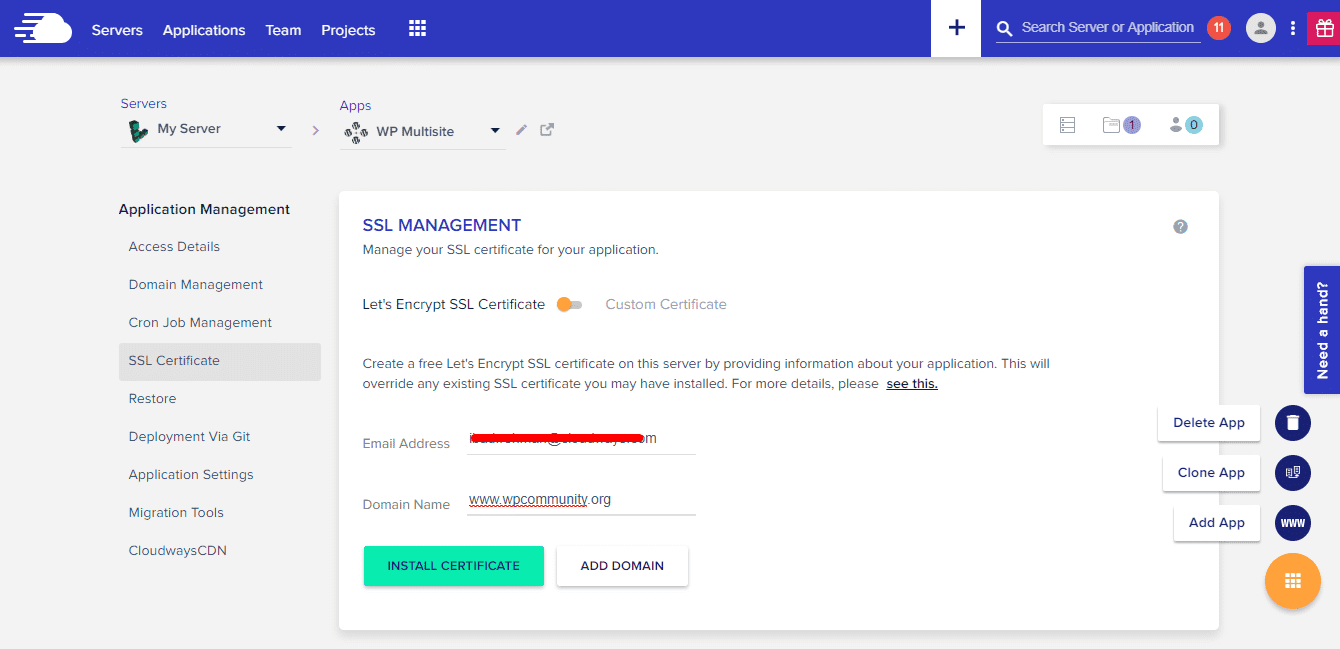
Click on the install certificate button and you are done. It will take some time for SSL certificate to get installed on your domain name. Once the SSL certificate is completely installed you can access your website on https.
Switching HTTP to HTTPS in WordPress Admin Panel
It is important that you change the WordPress Address (URL) and Site Address (URL) to https from the wordpress admin panel.
Go to Wordrpess admin panel -> Settings -> General Setting -> Change website url to https.
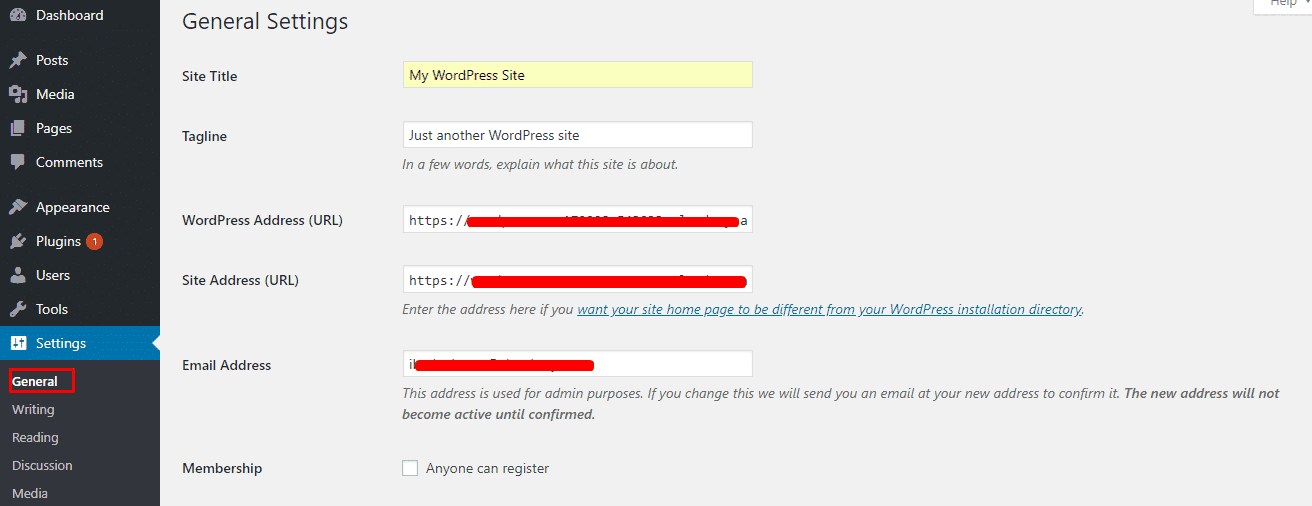
Click on the save button at the end of the page and complete the procedure.
Mix URL Identification
In the previous step, you had seen that I had manually converted the URL from HTTP to HTTPS. But there might be many broken links which needs to converted to https for the proper functioning of the website.
For this purpose, we will be using online tool JitBit. Simply paste your website URL and it will take some time to process your request.
In the result, you will now see the list of broken links that are still not converted to https.
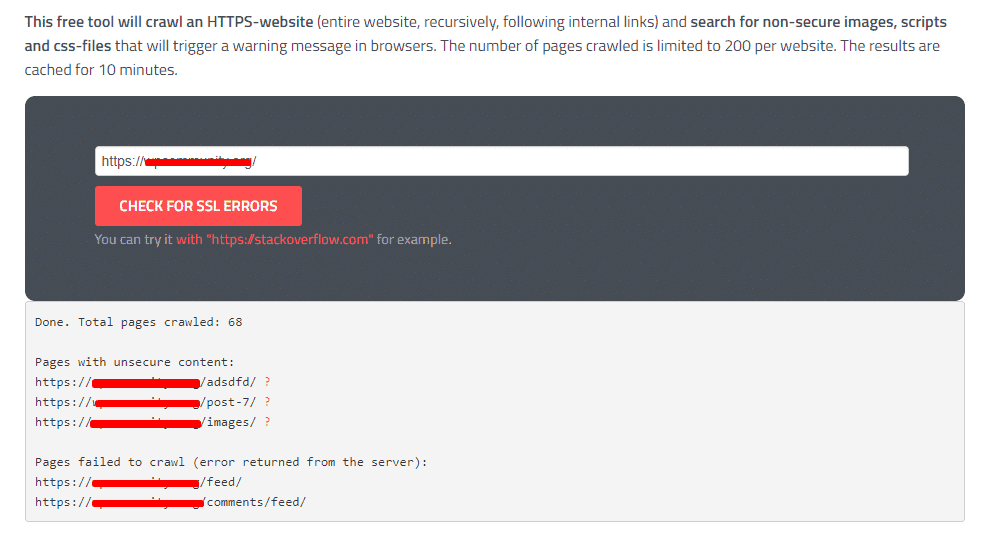
Result shows that there are few links that need to be changed. To fix this, go ahead and install a plugin WP Migrate DB.
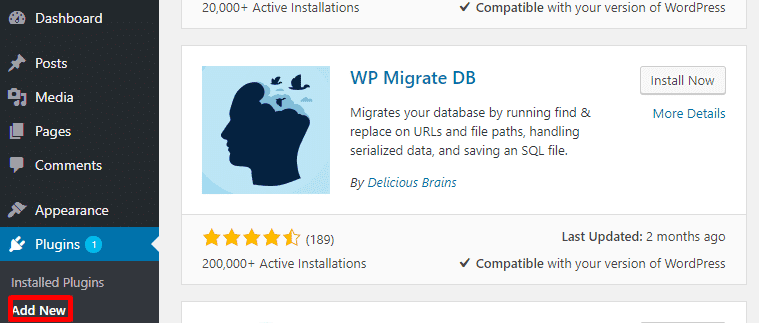
Once the plugin is installed, go to its settings and paste the old URLs under Find section and replace it with the new ones.
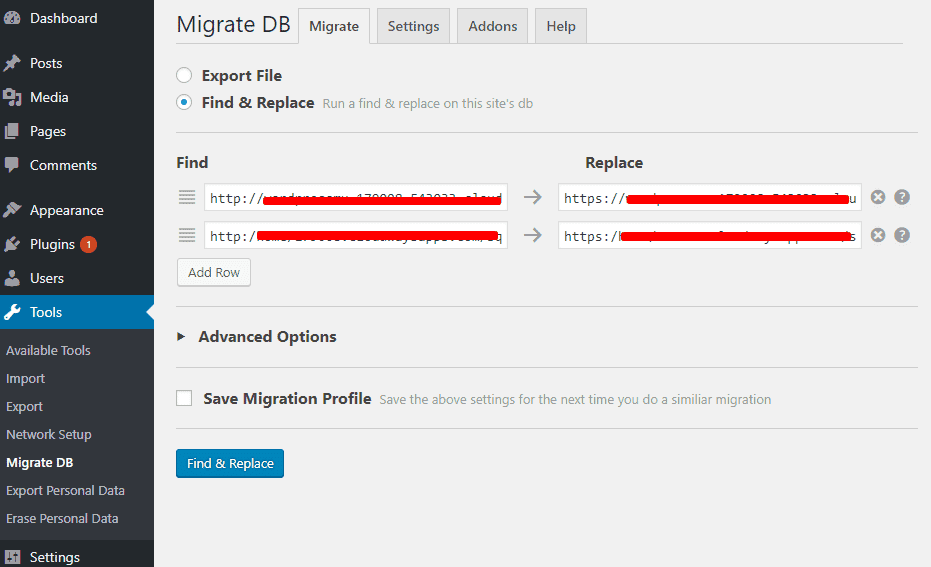
Add additional rows if needed and click on Find & Replace to save the changes.
Redirect From HTTP to HTTPS
It gives an overall bad experience to the user if they land on any broken URL link. So it is important that users should be forced to redirect automatically from HTTP to https link.
This can be achieved manually by making changes to the .htaccess file or automatically by free wordpress plugin.
Redirect by .htaccess File
To achieve this, we have to make a few changes in our .htaccess file. For those who do not know .htaccess. This is a configuration file for Apache web server.
Before we begin making changes in the .htaccess file, it is recommended to back up this file for restoring purposes.
Now access your .htaccess file from your root directory and open it in any text editor. Add the following lines of code at the beginning of the document.
RewriteEngine On
RewriteCond %{HTTP:X-Forwarded-Proto} !https
RewriteRule ^(.*)$ https://%{HTTP_HOST}/$1 [R=301,L]
That’s it! Save the file and upload it back.
Redirect By Really Simple SSL
Go to add new under plugin section in wordpress admin panel and search for wordpress plugin Really Simple SSL PRO. If you still have doubt about plugin installation the go through our step by step guide to install wordpress plugin.
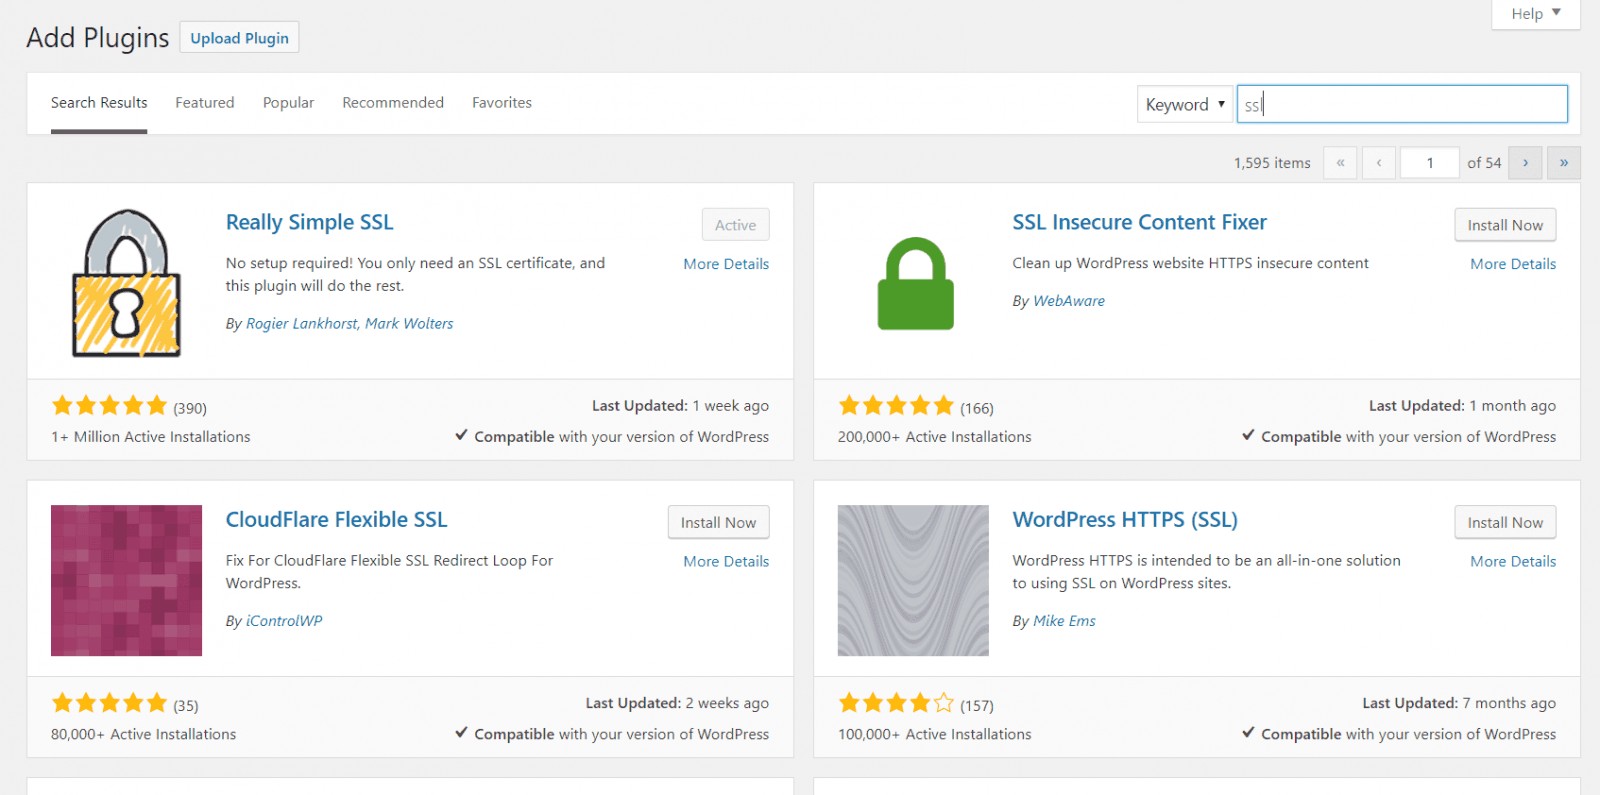
Click on install button and activate the plugin.
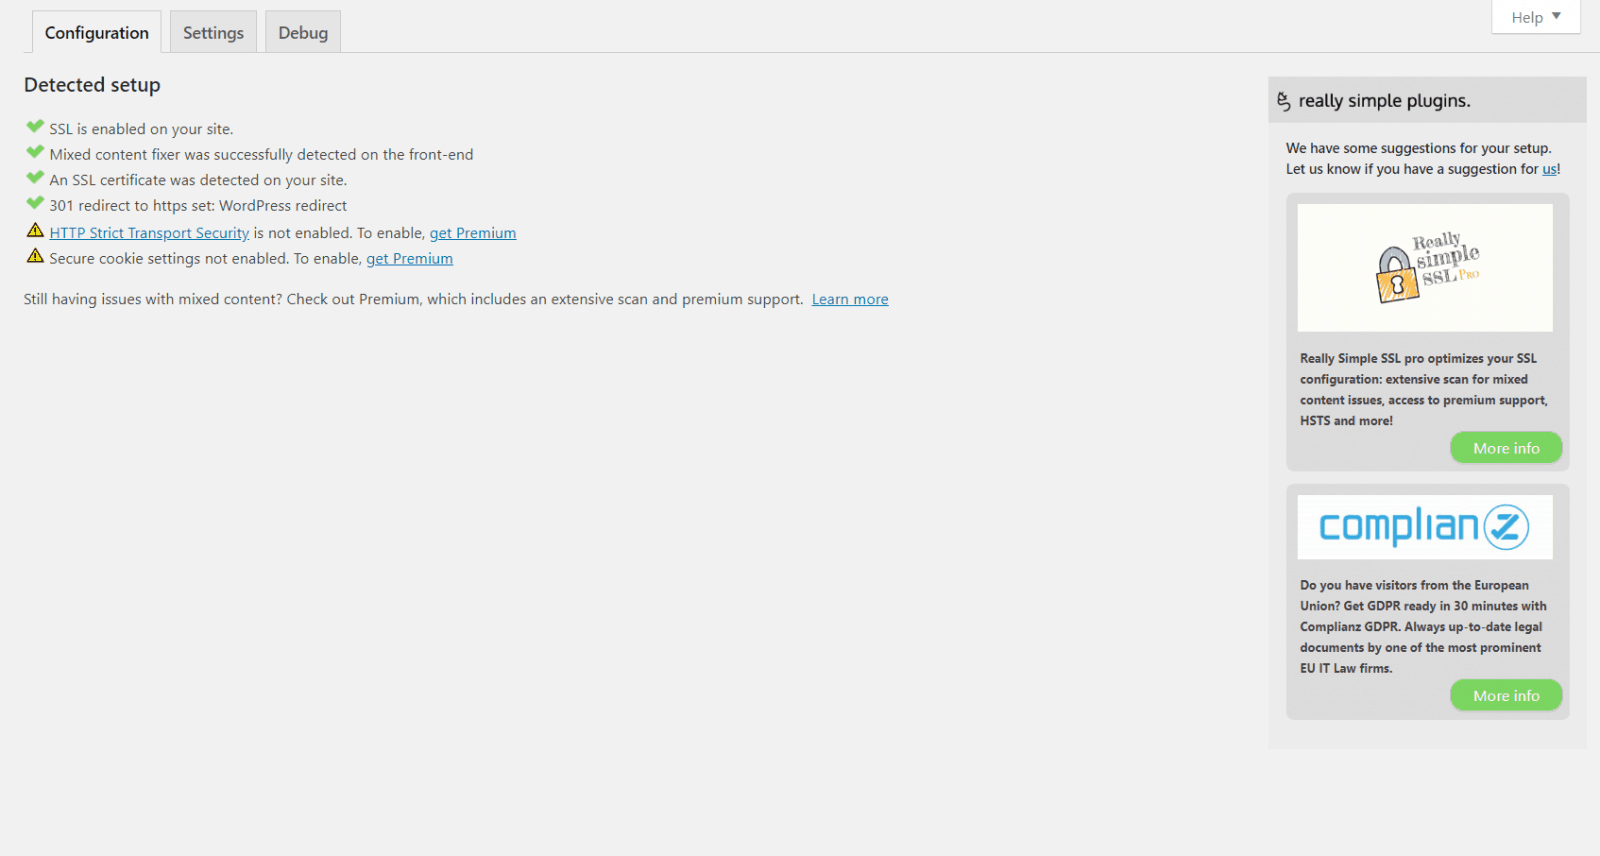
Go to the plugin admin panel under Settings -> SSL and simply activate the setting. All your links including the broken links will be redirected to https.
Google Search Console
Till now the google knows that your website is running on HTTP. You have to tell google manually that you have completely shifted your website to https.
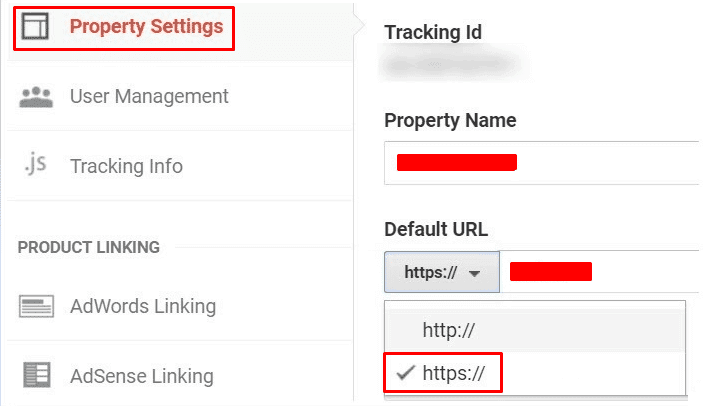
To update Google that now we are serving through HTTPS, log in to your Google Analytics dashboard and inside the admin area select your desired property and click on Property Settings.
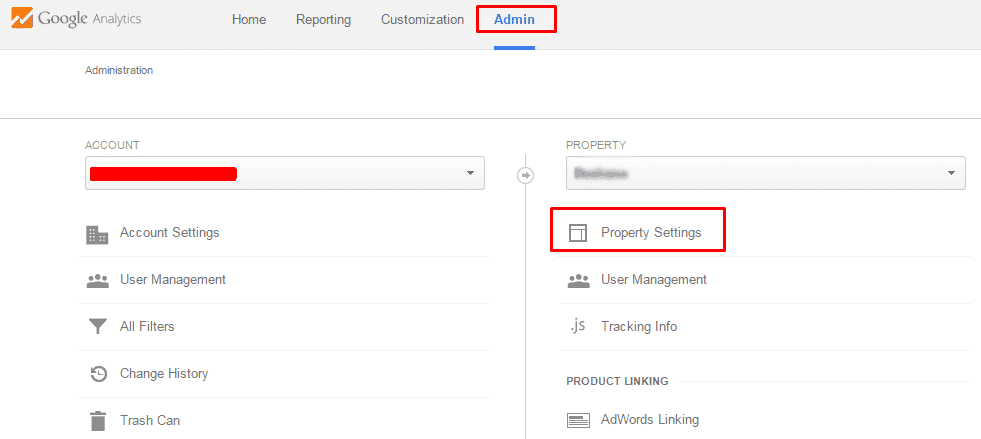
From the drop-down menu, change the Default URL from HTTP to HTTPS.
Now go back and click on View Settings tab.
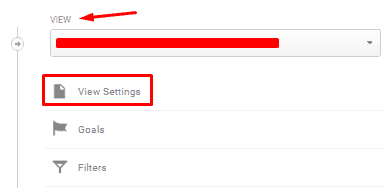
Over here change the Website’s URL from HTTP to HTTPS.
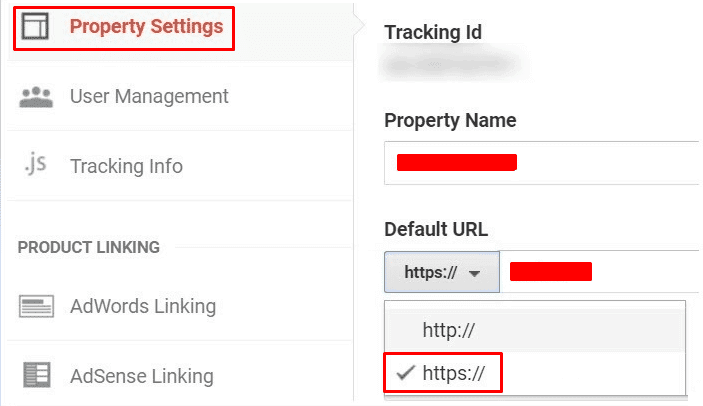
We are done updating Google to track our new HTTPS URLs.
Install SSL on WordPress Multisite Subdomain
Adding SSL on subdomains is easy with the Cloudways platform. Simply click on Add Domain button and start adding subdomains on which you want SSL certificate.
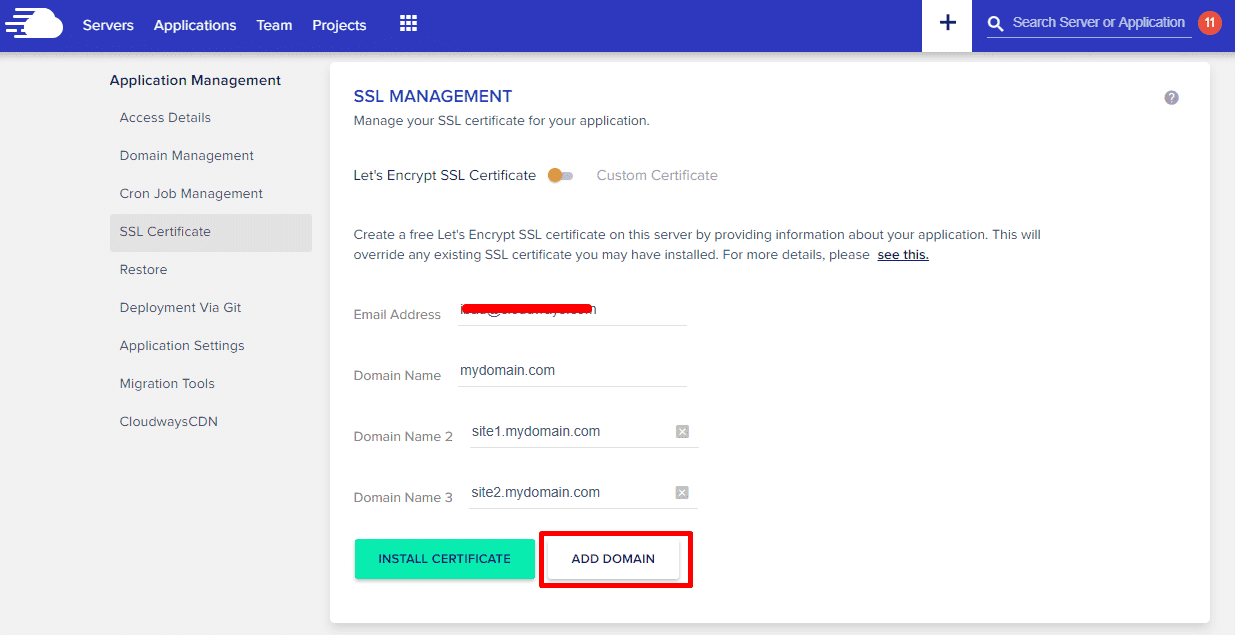
Clicking on the Install Certificates will bring a pop asking for permission to revoke existing SSL and re-install certificate with new subdomain list.
Benefits of SSL Certificate
SSL certificate provides additional security to your website and protects it from hackers. Apart from this it also helps to improve your search engine ranking.
Websites hosted on https are given more priority by google search engine than the websites on HTTP. It also gives a sense of security to the customers who are paying on your website.
The web browser doesn’t show any warning on the website that is hosted with SSL certificate. It provides a secure browsing experience and prevents your website from hackers.
You should also consider using malcare wordpress security plugin along with SSL. This plugin prevents your website from malware and attackers.
Also Read,
Final Words!
WordPress multisite give you lots of flexibility in terms of managing multiple websites from a single admin panel. Installing SSL certificate provides the security to all websites on the network.
SSL certificate helps to protect the identity of both the individual including username, password, credit card information and IP address. If anyone tries tapping in between he cannot decrypt this data as the key is only shared between the two trusted parties.
If you liked this article, then please subscribe to our YouTube Channel for WordPress video tutorials. You can also find us on Twitter and Facebook


