This WordPress Ultimate Security Guide will help you to Make Your Website Hackproof. If you pay attention to the media, you’ll hear about sites getting hacked all the time. Usually, it seems to happen to large organizations, like banks, e-commerce companies, and government departments.
As a humble website owner, you may think you’re safe. After all, you’re not a huge target. Why would anyone try to hack your site?
The truth is that sites of all sizes get hacked every day.
The media only reports on hacks against big organizations because these stories are considered more shocking. Attacks against large companies and governments are certainly worrying, but they’re in the minority.
Most hacked sites belong to small companies and individuals.
Large companies have security teams that work around the clock to keep them safe. Small operators rarely think about security. They make a more tempting target for hackers.
Let,s go ahead with WordPress Ultimate Security Guide to protect your website.
WordPress Ultimate Security Guide 2023
If you own a WordPress site, you’re a potential target. In this article, we’re going to show you what you can do about that.
The article is divided into two parts. First, we look at how you can harden your WordPress installation. The second part shows you how to harden your server to increase WordPress security.
1. Am I At Risk Really?
You can find out if your site has any security flaws with Gravity Scan. Gravity scan checks your site against a huge list of known exploits, and it checks multiple layers of the WordPress stack. It looks for flaws in your network, on the webserver, PHP, and WordPress itself.
You can get a quick picture of your risk level just by typing in the URL of your site and hitting Scan. This will tell you how many risks there are, but it won’t describe them.
To get the full details, you need to register your site and prove you own it. This is a security feature – if you could type in any site and see all the weaknesses, Gravity Scan would be a great tool for hackers!
Most websites trigger more than a few warnings. If any of your site’s components are outdated, you could see a ton of alerts. Don’t ignore them – these potential exploits are real, and they can cause havoc.
2. XML-RPC Attack
To illustrate the point, let’s take a trip back in time – all the way back to February 2017.
Back then, a “zero-day” weakness was discovered in the core WordPress files. It is related to XML-RPC, which is a WordPress API. XML-RPC is quite a neat feature – it allows people to publish content without having to log on to their site. Instead, they use a handy app that communicates with their server over the web.
XML-RPC has been around for a long time, and there are quite a few apps that use it. The WordPress security team has maintained the code quite well over the years. But somehow, a security weakness managed to slip through the cracks.
On the 20th of January, the WordPress team was contacted by Sucuri, who had discovered the problem. They rushed to fix it and released the patch in WordPress 4.7.2.
4.7.2 was released on the 26th of January. On the 1st of February, Aaron D. Campbell published a disclosure urging users to update their version of WordPress. In the post, he explained why the fix was important
By this point, many users would already install 4.7.2 through the admin panel. But the WordPress team wanted to ensure everyone knew about the exploit and updated it.
This was the first public announcement of the weakness. By this point, most users were safe. WordPress had pushed a fix, services, like Sucuri had added firewall fixes to prevent the hack, and managed hosting companies, had fixed their customers’ sites.
That still left a lot of sites exposed.
Within 48 hours of the announcement, there were more than 20 large-scale attacks underway. Over 66,000 sites were defaced. Even now, months later, there are thousands of defaced sites on the web.
Some of the defacements were politically motivated.
Others were an attempt to collect ransom…
In all cases, it caused a lot of disruption for the website owners.
The point of this story is not to point the finger of blame at the WordPress team. They acted fast. Sucuri acted responsibly in keeping the exploit secret until WordPress had fixed it. In fact, if we need to lay blame at anyone’s door, it would be the website owners.
Ultimately, you’re responsible for your site’s security. Companies like Sucuri and groups like WordPress can help – but, when users ignore their advice, WordPress can’t be blamed for the consequences.
This is not an isolated incident. Every day, thousands of WordPress sites get hacked through one exploit or another. It’s very rare that the security hole lies in a core WordPress file.
3. Why Do People Actually Hack Sites
When it comes to big organizations, it’s easy to understand why they would be hacked. Why do people hack banks? To steal money. Why do people hack government agencies? To steal secrets, or to cause chaos.
Why do people hack smaller websites? Here are some reasons:
- Defacement
- Ransom
- To spread malware
- To build a botnet
- Email Spam
- Phishing
- SEO (parasite SEO and backlink building)
Defacement is quite a common threat, and there are several common motives. Often defacements are political. An attacker will take over your site and use it to spread their message – often when that message is too controversial to publish legitimately.
Some defacements are little more than web graffiti – often they’re childish and vulgar.
While defacement is bad, ransom tactics are worse. An attacker will destroy or encrypt the site’s original content, and demand payment to fix it.
Hacked sites can also be used to spread malware. Drive-by attacks can infect a website visitor without any action on their part – apart from visiting an infected site.
A hacker can also take over your server and use it to launch attacks against other targets – it’s a popular way to perform DDOS attacks. Hackers call their collection of hacked machines a “botnet”.
Web hosts with email servers are another juicy target for hackers. Delivering millions of ads for little blue pills is hard – spam complaints prevent many emails from getting through.
One solution is to steal someone else’s email server and use their good reputation to get those ads into the victims’ mailboxes.
Phishing covers a wide range of tactics to trick people into handing over their personal data. Trading on someone else’s good reputation is an effective tactic – people are more likely to give their details to someone they trust.
Black hat SEOs sometimes hack sites to speed up the ranking process. They plaster their content all over a legitimate site with decent authority (parasite SEO) and blast it with backlinks from other hacked sites. Some hackers even offer hacked links as a service – of course, it’s highly illegal and puts their clients at risk.
So, there are lots of reasons why sites get hacked – these were just a few of them.
4. What to Do if Your Site Is Hacked
Recovering from a hack can be easy or hard – it depends on how prepared you are. If you have daily backups, you can bring your site back online in moments. If you don’t – well, you’re going to have a bad time.
Backing up your site isn’t hard – you can use a simple plugin, like My WP Backup Pro.
5. How To Get Your Site Back Online
Often, the first step is getting your hosting company to restore your site.
Hacked sites often spread malware, which is bad news for everyone. Malware-infected sites are blacklisted and often get shut down. Hosting companies want to maintain their reputation, and they’ll suspend an account that actively spreads malware (even if it’s unintentional).
If your hosting company has suspended your account, you’ll have to contact them first and ask them to restore your server. Until your server is online, you can’t do anything.
Most hosting companies offer their customers multiple contact methods. You can send them an email, phone their call center, or engage in instant messaging.
Simply explain that your site was hacked, and they’ll restore your account.
6. Identify Weaknesses Of Your Site
Before you fully restore your site, you need to understand what allowed the attack to happen – otherwise, your site could be re-hacked in moments. Your site has a weakness that hackers can use to take over, and you have to patch that weakness.
We’ll use a couple of tools to identify weaknesses. The first is the Gravity Scan, which we mentioned above. The second one is the Sucuri security plugin.
7. Install Sucuri – Ultimate Security Plugin
The Sucuri plugin has an impressive range of features – including a set of post-hack actions. You can even install it after your site has been hacked and use it to remove the infection.
WordFence is another popular security plugin, but Sucuri just manages to beat it in terms of features and performance.
Installing Sucuri is as easy as it gets:
1: Log on to your admin area.
2: Navigate to the “Plugins” page.
3: Click on “Add New”.
4: Type “Sucuri” in the keyword field.
5: Click on the “Install Now” button next to the Sucuri Security plugin.
6: Click on the “Activate” button that appears.
7: Generate an API key by clicking the “Generate API Key”
8: Select an email address and click on “Proceed”
Sucuri should generate the API Key successfully – which completes the installation.
8. Scan Your Site for Malware
Next, we’re going to scan the site for malware payloads. These are particularly vicious scripts and programs that attack your users’ computers. When Google detects malware on your site, it decreases its ranking from the SERPs (Search Engine Result Pages). Readers who use the Chrome browser will see a big red warning when they try to visit your site – so it’s vital to clean up any infection fast.
Here’s how you can remove the malware:
1: Click on “Malware Scan”:
2: Click on “Scan Website”:
The malware scanner will start scanning each page of your website, as well as the files on your server.
Behind the scenes, Sucuri’s servers are scanning your site over the web – this way, it’s incredibly difficult for a clever hacker to circumvent the scanning process.
The plugin also plays a role in the scanning process, checking for corrupted .htaccess files.
If your site is malware-free, you’ll see a list like this:
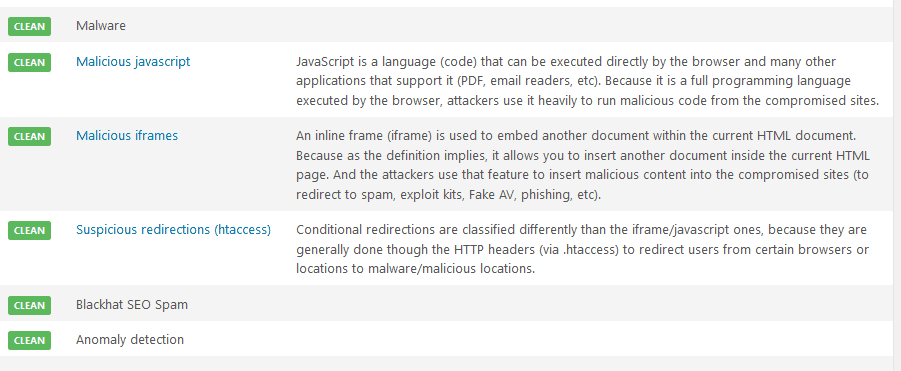
If there are any infections, you’ll see a description and instructions to remove the problem. Sucuri provides a “malware clean-up” service for paying customers – it’s worth upgrading to a paid account for the extra support they provide.
9. Check the Core File Integrity Of Your Site
WordPress’s core files are the heart of the system – if they get infected, it’s really bad news. Sucuri can detect any malicious code inserted into your core files.
Go back to the dashboard by clicking on the “Dashboard” tab.

The core files status is displayed at the top of the dashboard screen:
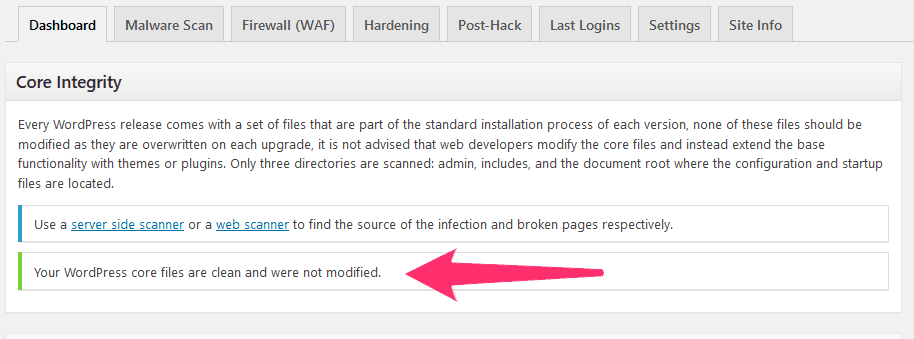
If your core files are clean, you will see a green-tabbed message like the one above. If not, you’ll have to replace the core files. Just follow the instructions on the screen to reinstall the file from the source.
10. Check the Audit Log for Altered Files
So far, we’ve scanned for malware and altered core files. But there are other ways hackers can mess with your site – they can corrupt plugins or themes, and they can also add new scripts to your server. These scripts act as “back doors” giving the hacker easy access to your server in the future.
If you know the approximate time of the attack, it’s easier to zero in on the changes that occurred. Otherwise, it will take a little longer – not too long, though.
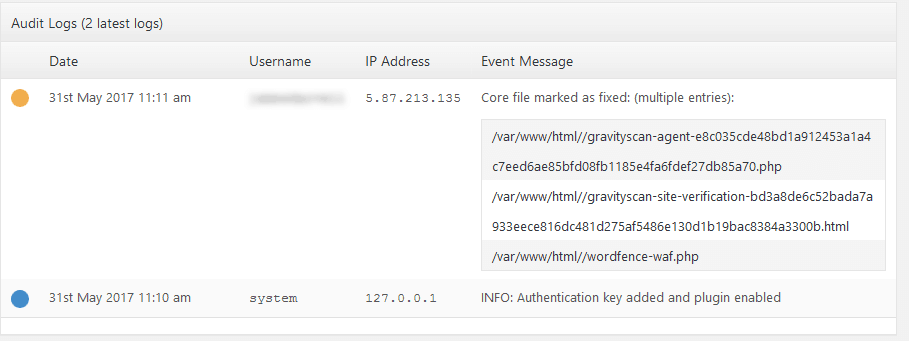
The audit logs are also displayed on the dashboard screen, directly beneath the Core Integrity section:
11. How to Find Your IP Address?
This is a list of the most recent changes. Pay close attention to any files which have changed over the last 7-30 days. If you don’t remember changing these files yourself, there’s a chance they have been corrupted by a hacker.
Also, look for unfamiliar IP addresses. 127.0.0.1 is the server’s own IP address – any changes with this IP were performed by your host machine.
Also, changes from your own IP address are probably OK.
If you don’t know your own IP address, you can find it by searching Google. Just type in “What is my IP address?” and Google will show you:
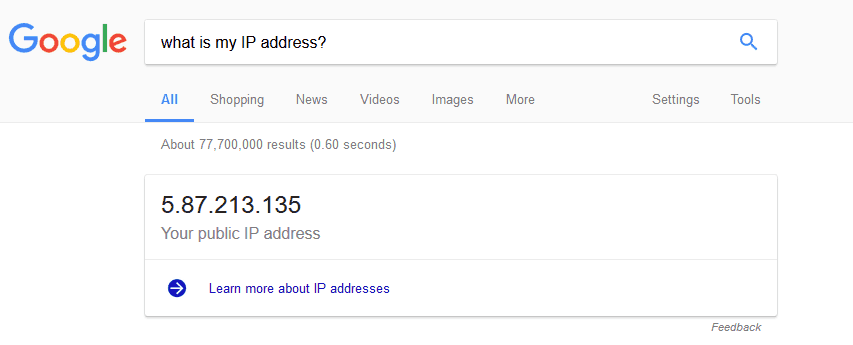
This address can change over time – your ISP may give you a different IP address every few hours, or even more frequently. If you have a fixed IP address, it will remain constant.
Fixed IP addresses are unusual for residential customers, but some ISPs do use them.
12. How To Check for Suspicious Accounts
If your site has been hacked, there’s a good chance that the hacker has gained access to a user account. They may have stolen your password, or they could have created a new account with admin privileges. Thus it is always preferred to change your login URL in the first instance.
Sucuri can show you a list of the most recent logins – if you see any suspicious activity, you can remedy it by removing the account or changing the password.
Click on the “Last Logins” tab:

If you have just installed the plugin, you will only see logins since the installation. If a hack is currently in progress, you may see a new login or two.
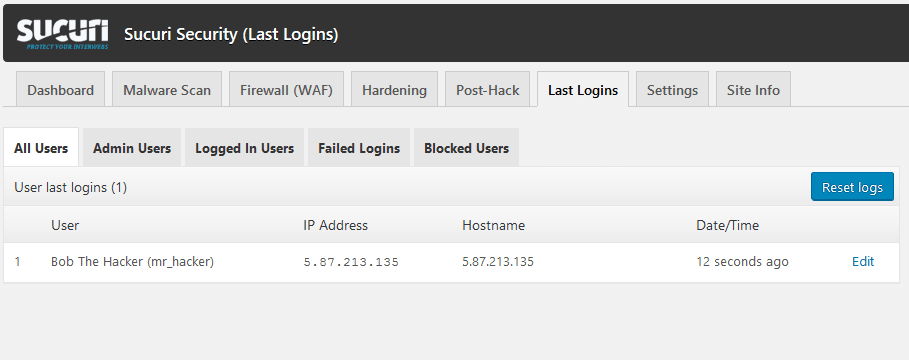
In the future, Sucuri will identify future logins, and this screen will be more useful.
If you do see unusual logins, then it’s a sure sign that your accounts have been compromised.
13. Fixing Your Site
After you have identified the hack, you should restore your site from a backup – if you have one. If you don’t, you’ll have to manually remove the hack.
While it’s not too hard to repair a hacked site by hand, it will certainly teach you the value of backups!
Your security plugin can remove infections from the core WordPress files – you’ll have to repair corruptions in the database by hand. The plugin can find and delete backdoors and malware, and it can tell the malware-tracking sites that you have cleaned the infection.
14. Get Rid Of Suspicious Users
Delete any strange accounts that have been created through the WordPress admin panel. Click on the “Users” link on the left menu:
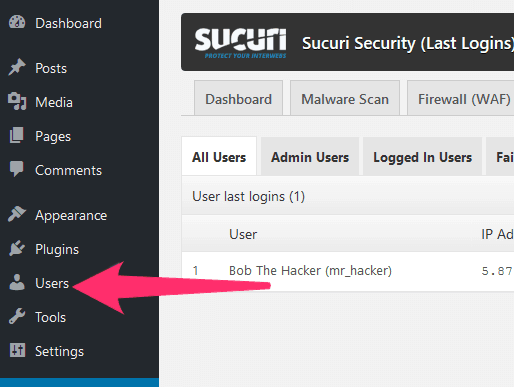
You’ll see a list of user accounts:

Hover over the bad account, and a couple of links will appear:
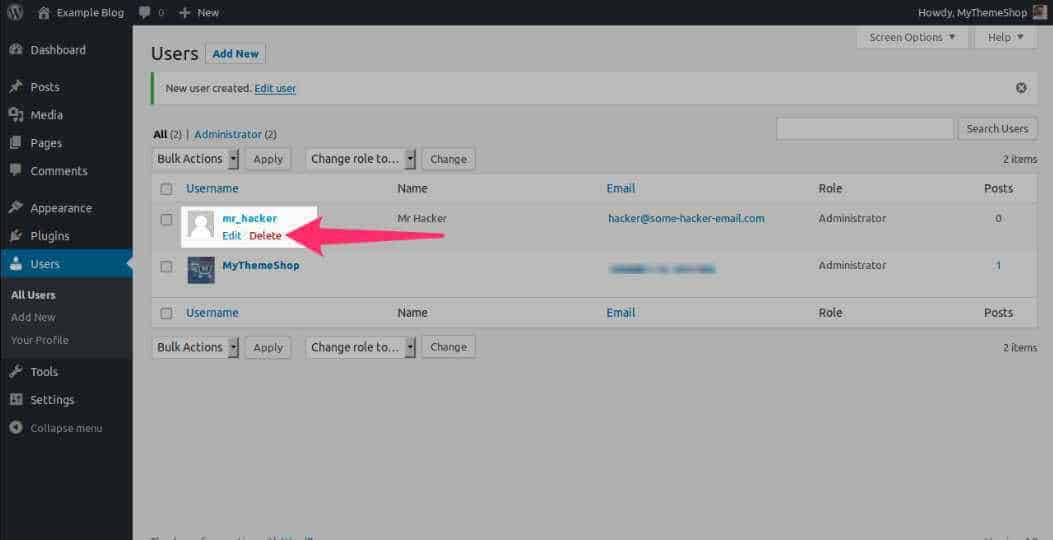
Click on “delete”.
WordPress will ask you what you want to do with content created by this user. Select “Delete all content”:
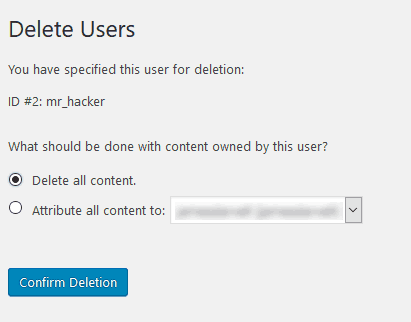
Click on “Confirm Deletion” to delete the account.
15. Restore Back Corrupted Files
Do this for any suspicious accounts you see on the list.
Go back to the Sucuri Dashboard, and look at the list of core files. Check any modified files on the list:

Go to the “Actions” drop-down menu, and select “Restore source”:

Check the box that says “I understand that this operation cannot be reverted”. Then click the Proceed button:

Sucuri will download the official version of the core files and replace the corrupted local versions. This will take a few seconds.
16. Suspicious Database Entries To Be Removed
WordPress content is stored in the database – and this includes content a malicious hacker adds to your site. Cleaning your site requires a little database surgery.
In most cases, your site will use a MySQL database or MariaDB (they both have the same interface, so it makes no difference which one is installed.)
Your Database server has a text-based client tool – which is a little scary to use if you aren’t familiar with it. Most hosting companies provide “PHPMyAdmin” – a graphical database management tool.
You can usually find a link to it on your hosting account panel, under database management. You’ll also see the username and password you should use to log on.
When you open the PHPMyAdmin link, you’ll see a screen like this:
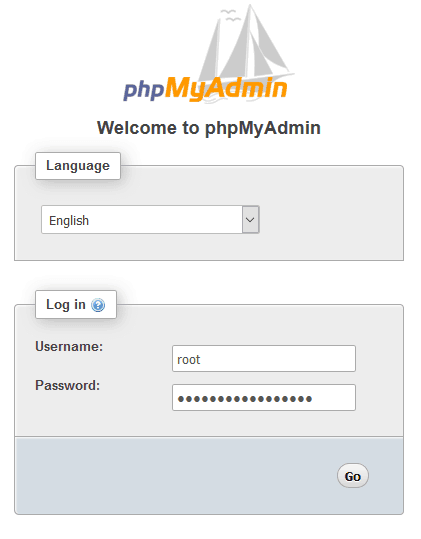
Use your login credentials, and you’ll arrive at the main dashboard:
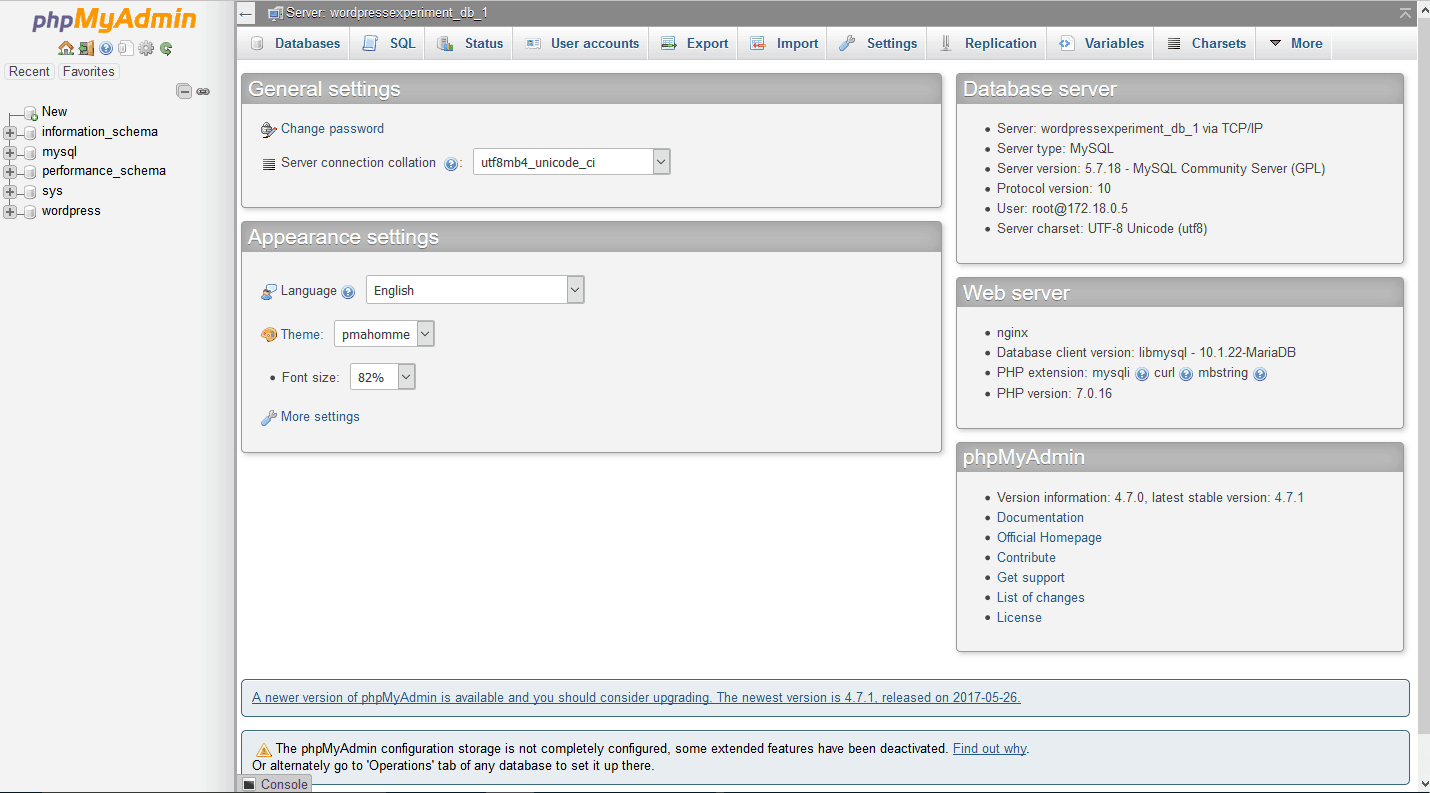
On the left, there’s a list of databases. Your WordPress database will be amongst them – it’s usually called “WordPress”. Click on it now, and you’ll see a list of all the tables that WordPress uses:
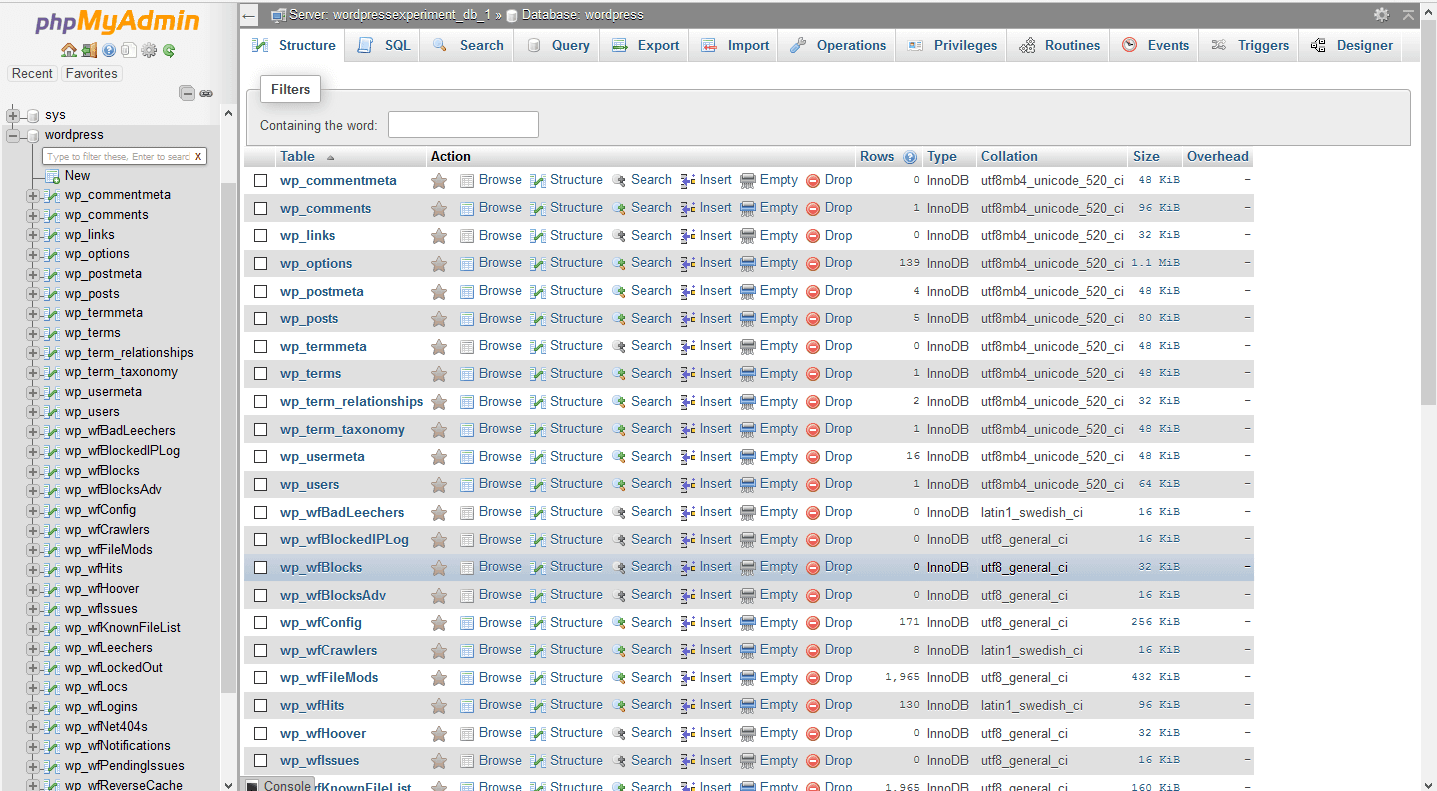
Let’s make a quick backup before we break anything that can’t be fixed. Click on the “Export” tab:

Click on the “Custom” option near the bottom of the form:

Lots of new options appear! These options allow you to tailor the export script to your requirements. We’re going to use some of these options to make our lives easier if we ever have to use the backup.
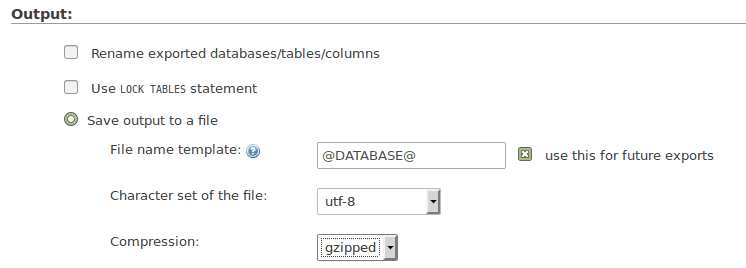
Scroll down to the “output” section, and set the compression to gzipped – this will make the file smaller, so it’s faster to download or restore:
The next thing we want to do is tell the database to delete the old data when we import the backup – otherwise, you’ll get a weird combination of the backup and the altered data, and the job will become much more confusing and messy.
We do this by telling the database server to “drop” the tables – in other words, to delete them. These commands should appear at the start of the script. The rest of the script will recreate the tables and then import the backup data.
Scroll down to the “Object creation options” section and tick the box that says “Add DROP TABLE”:

Leave the rest of the settings as they are. Click on “Go”:
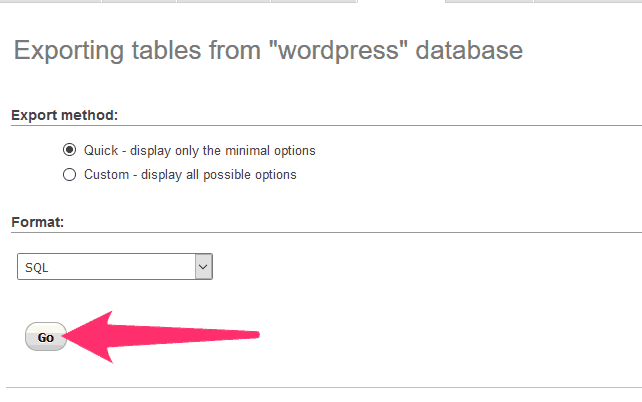
PHPMyAdmin will create a text file in the SQL database language, and your browser will ask you what you want to do with it. Download it to a safe location on your PC.
If you make a mess of your database, you can import this file and it will restore the database.
17. Searching For Malicious Data
Editing the database is a little tricky, and it’s easy to damage your site. So you should always make a backup before you change anything. If you skipped this step, go back and do it now!
We’re going to use the data that Sucuri found and add a list of common search terms. During the malware scan, Sucuri searches for known text strings that indicate an infection. Some of these strings come from corrupted files, and some of them are in your database.
Make a list of Sucuri’s findings in a new text file. Just copy the suspicious strings, not the full listing.
Add any spam words and the URLs of any spam sites you found during the scan.
Now add the following phrases:
base64_decode
eval
preg_replace
gzinflate
str_replace
These are PHP functions that are frequently used by hackers. But they can also form a part of a plugin’s legitimate code. So we have to be careful not to only delete records that are genuinely infected.
Sometimes it’s hard to know if a record is legitimate or not, so you should test each deletion to make sure your site still works. Make changes one step at a time and save a backup before you delete anything.
Now you have a list of search strings, we’re going to search for them one by one.
First, navigate to the “search” tab:

Copy your first search string into the top field (words or values to search for):

Select every table in the database (you can click on “select all”):

Hit “Go”, and PHPMyAdmin will search through every table to find a match. If it can’t find any records, you’ll see a page like this:
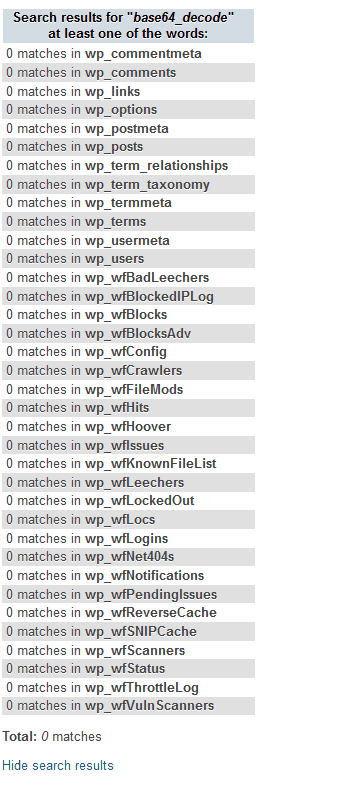
Otherwise, you’ll see a number of matches for each table with the corrupted string, like this:
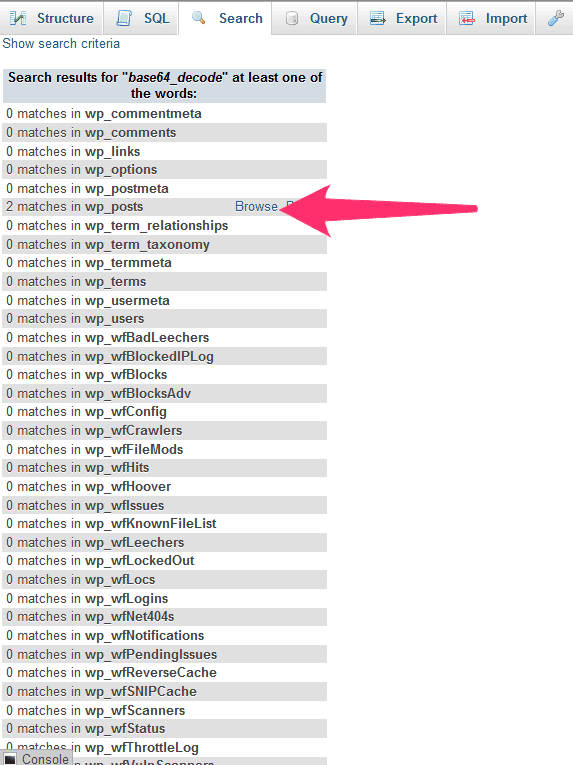
Click on the browse link to open the table and view the corrupted records:

At this point, you need to open each record and see if it is a valuable record that has been corrupted or an entirely useless malicious record. In the example, both of the records are posts.
You can either delete the records (if they are useless) or edit them to remove the malicious code.
Each row has a pair of links – one to edit:

… and one to delete:

Click on the edit link and read the record contents before you make a decision. If you can’t find any useful content, then it may be a purely malicious record. Or it could be a record that belongs to a plugin.
The table name will give you a clue, but if you’re unsure, you should make a database backup before proceeding.
Delete any records that seem useless, and test your site. If it still works, great! Otherwise, you’ll have to delete the database and restore it from your backup.
If you find this stage too overwhelming, you should get someone to help – preferably a security expert who knows what they are looking for.
18. Resetting The Passwords
The Sucuri plugin has a feature to reset your user’s passwords – it’s located in the “Post-Hack” section:
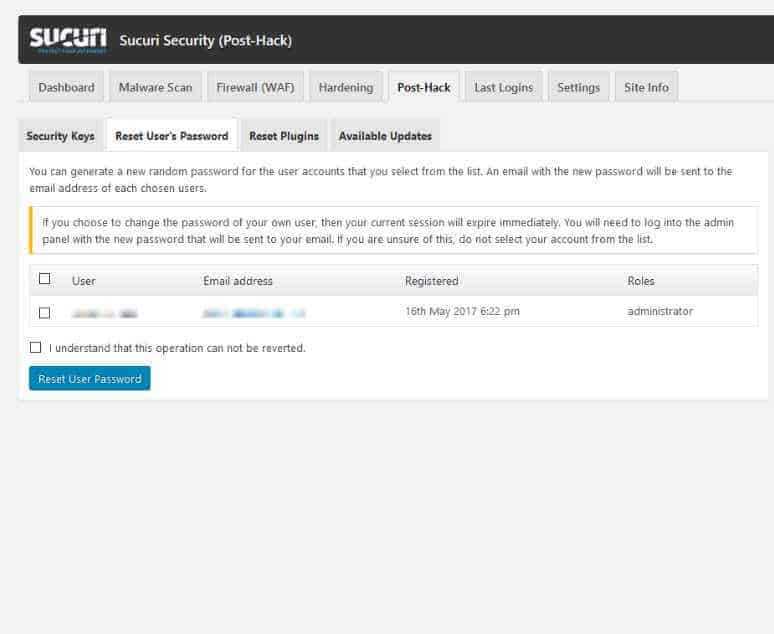
When you reset passwords, Sucuri will generate a new secure password for each user. It will send a copy to each user’s email address. And it will terminate your current session (if you reset your own password).
Don’t reset your password using Sucuri if you can’t receive emails from WordPress! If you don’t have a mail service installed on your server, WordPress can’t send emails.
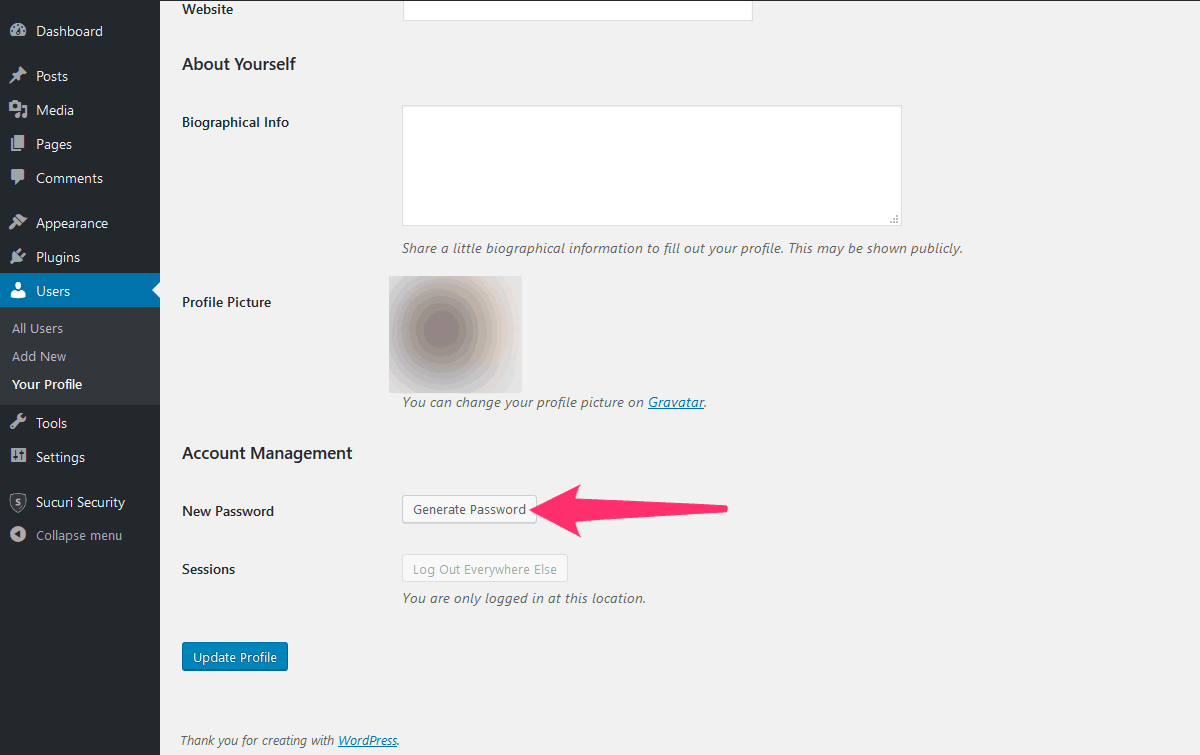
Instead, use the “Generate Password” option in your user profile:
19. Remove Backdoors From Site

Hackers often add backdoors to your server after they hack your site – these are malicious scripts that give them instant access to your machine.
Sometimes these backdoors live in an entirely different directory from your WordPress site. So you’ll have to scan your entire web root directory tree to find them.
The “webroot” is the directory that Apache uses to serve web content – it’s usually named “public-HTML”, “web-data”, or something similar. You should be able to find the full path for your webroot on your hosting panel, possibly within the file explorer.
Some hosting companies make the scanning job easy for you – they provide a tool to scan your directories from the admin panel. HostGator regularly scans their clients’ files and will send an email if they find anything suspicious.
Sometimes you have to do it by hand. Here’s what you need to do:
To scan your files efficiently, we’ll need SSH access. SSH allows you to log on to a command-line interface and run Linux commands directly on your host machine.
The command line can be a little scary to people who only know graphical interfaces. But it’s actually pretty simple – and it offers great flexibility and power.
Most hosting companies give you SSH access, although some don’t. If your hosting company does, you’ll find your SSH credentials on the control panel. The exact location depends on your host – most companies do things their own way, so we can’t tell you exactly where to look. If you can’t find it, use their help system.
Some hosts give you a “serial terminal” – which is like SSH, but it uses a different technology to access your server. In either case, the command line interface is the same.
To access SSH, you need an SSH client on your machine. Mac and Linux machines come with built-in SSH clients. If you’re using Windows, the PuTTY client is a good free choice.
Log on to your server with your credentials – these are usually visible in your C-Panel or admin panel. You’ll need your username and password. Make a note of your webroot while you are there.
Mac and Linux users can start an SSH session through the regular terminal window. Just type:
ssh [email protected]
or
ssh [email protected] (replace the IP address with your server's IP address).
PuTTY is a little more complex, as you have more options.
When you open the application, you’re greeted with this screen:
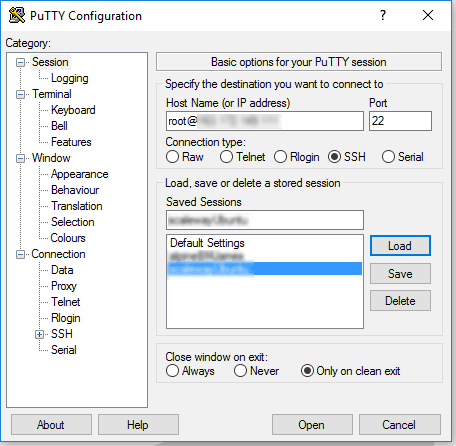
Enter your username and server address in the box titled “Host Name (or IP address)”. Use the format [email protected] – or use your server’s IP address.
If you hit the connect button right now, PuTTY would connect to your server – but it would disconnect after a minute of inactivity. Most SSH servers disconnect automatically if they don’t receive any activity for a while. This can be very irritating – PuTTY has a solution. Click on the “Connection” tab on the left-hand side:
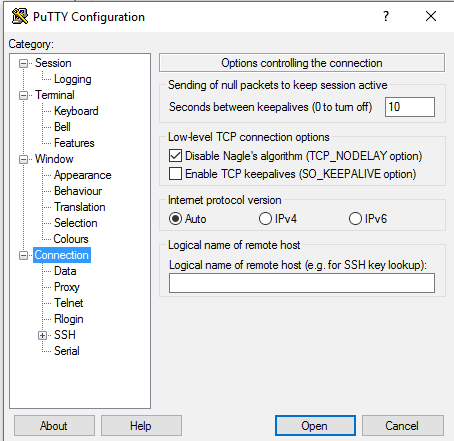
There’s a box on the right called “seconds between keepalives”. Type 10 in this box, and PuTTY will send a signal to the server every ten seconds. The signal is just a null character, which tells the server you’re still alive and want to continue the SSH session.
Now just click on the “Open” button at the bottom of the screen, and you’ll get a new terminal window. Just type in your password when you are prompted, and you’re good to go.
OK, so you’ve managed to log on to your server through SSH. You can now execute commands as if your keyboard were plugged into the server machine!
We’re going to use a standard Linux program called grep – it searches in files for string patterns.
There are millions of different backdoor scripts at large on the web, and it’s impossible to guess which ones are infecting your site. But there are some common “fingerprints” that will detect most of them.
These are PHP functions that hackers tend to use. However, legitimate code sometimes contains these functions. So you need to be careful that you don’t delete any files that serve a useful purpose.
Here’s a list of suspicious PHP functions:
gzuncompress
base64
create_function
str_rot13
system
eval
exec
stripslashes
assert
preg_replace (with /e/)
move_uploaded_file
Here’s a command that will find the files containing these strings, along with their modified date:
grep -rl "word" /path/to/web-root/ | xargs stat -c %z': '%n
Replace “word” with one of the suspicious functions from the list above.
The options flag (-rl) tells grep to output the name of the file – this is “piped” into xargs. Xargs is a special program that builds and executes new commands – in this case, we’re using it to create “stat” commands for each of the files that grep found. The “stat” command fetches information about a file, such as the time when it was created or updated.
We pass some options to stat (-c %z’: ‘%n). This rather arcane-looking string is really quite simple – it tells stat to output the modified date, followed by a colon and the file name.
This will produce output like this:
2017-05-26 15:15:53.937914632 +0000: /wordpress_experiment/wordpress/wp-includes/js/wp-api.min.js
2017-05-26 15:15:53.937914632 +0000: /wordpress_experiment/wordpress/wp-includes/js/tinymce/tinymce.min.js
2017-05-26 15:15:53.937914632 +0000: /wordpress_experiment/wordpress/wp-includes/js/customize-preview.js
2017-05-26 15:15:53.937914632 +0000: /wordpress_experiment/wordpress/wp-includes/js/thickbox/thickbox.js
2017-05-26 15:15:53.937914632 +0000: /wordpress_experiment/wordpress/wp-includes/js/twemoji.js
2017-05-26 15:15:53.937914632 +0000: /wordpress_experiment/wordpress/wp-includes/customize/class-wp-customize-nav-menu-setting.php
2017-05-26 15:15:53.937914632 +0000: /wordpress_experiment/wordpress/wp-includes/customize/class-wp-customize-nav-menu-auto-add-control.php
2017-05-26 15:15:53.937914632 +0000: /wordpress_experiment/wordpress/wp-signup.php
Each line lists the modified date followed by the full path of the file.
So, what good is this list?
Well, it’s a complete list of files that contain a suspicious function – it may be an innocent plugin, or it could be an evil backdoor. The modified date is the real clue.
If you last installed a legitimate plugin three months ago, then a more recent file is definitely fishy. If it was modified around the same time as the hack, then it’s almost certainly a backdoor.
By working through the list of common “suspicious functions”, you should be able to find most backdoors. But removing them can be tricky.
Sometimes a backdoor is inserted into a useful file – such as a template or plugin file. If that’s the case, you’ll break the template or plugin by deleting it. You need to open the file in an editor and remove the bad code.
This can be quite a daunting task, especially if there are dozens or even hundreds of infected files. It’s often easier to simply delete the infected code and replace it (by reinstalling the themes or plugins). If you find yourself lost and confused at this stage, it may be time to call in a professional.
20. Patching Holes
Now you’ve fixed the corrupted code and data, it’s time to test your site to ensure it’s really clean. Even if you have completely cleaned it, you still have security holes to fix. Hackers were able to exploit your site in the past, and they can do it again.
Head over to Gravity Scan and scan your site. Follow their instructions to confirm your site ownership, and review the scan results in detail.
You’ll get a fairly comprehensive list of security weaknesses – and these are probably how your site was hacked in the first place. We’ll have to fix these before you can consider your site secure.
The first step is to update WordPress to the latest version. Make sure you update any installed plugins – if the updates cause problems, deactivate them for now. In a later section, we’ll look at how to resolve conflicts between plugins.
A gravity scan may raise some red flags concerning your hosting environment. Maybe you’re using an outdated version of the Apache server, or your PHP installation is insecure.
Fixing these issues is a little more involved, and you may need to speak to your hosting company to fix them.
21. WP-Config
After you’ve upgraded WordPress, you need to change the settings in your wp-config.php file. This file is full of important security data, and there’s a high risk that your attacker knows your current settings.
You need to change these settings:
- Your security keys
- The salts
- The database password
The WordPress team has provided a useful tool for the first two steps. Just load https://api.wordpress.org/secret-key/1.1/salt/ in your browser, and copy the code:

The code is randomly generated – you’ll get different values every time you reload the page. You can cut and paste this code directly into your wp-config.php file.
Changing the database password is a little more involved. First, you need to change the settings in your database. Then you need to change the user credentials in the config.php file.
We’ll use PHPMyAdmin to access the database. You can list a database’s users by clicking on the “user account” tab (it may say “users” instead):

There are several users – several of them are created when MYSQL is installed for the first time:
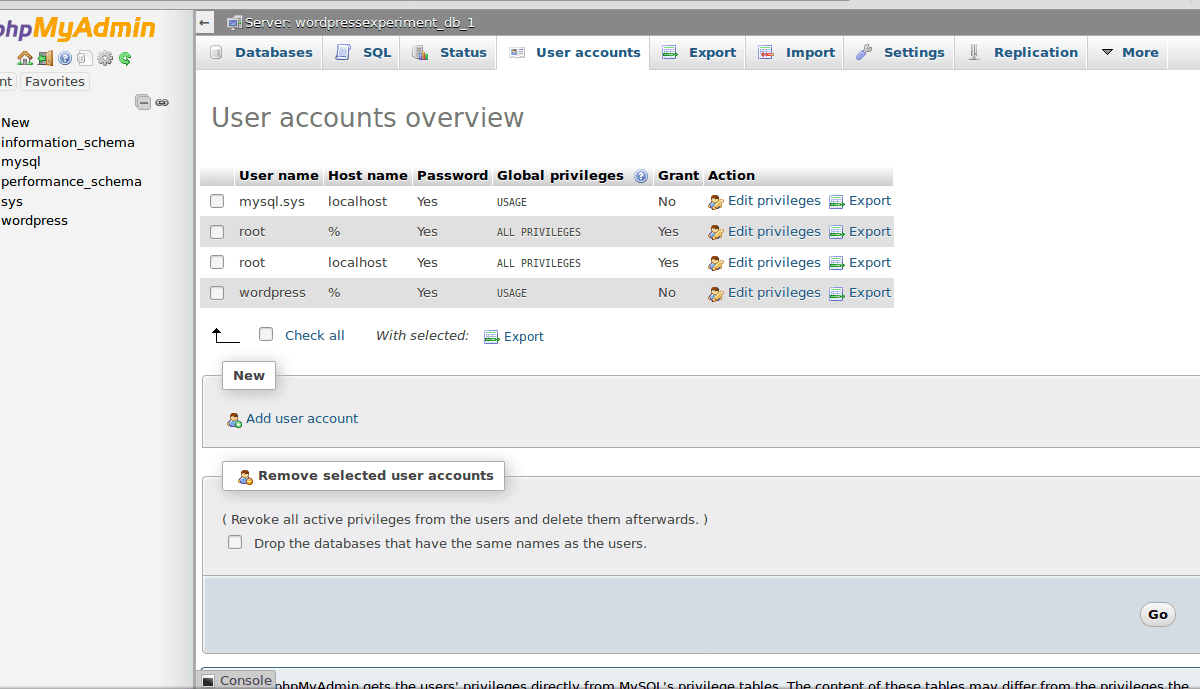
Look for the user account that’s listed in the wp-config.php file – this is the one that WordPress uses:

Click on the link that says “Edit Privileges” (next to the WordPress user):

Click on the button that says “Change Password”:

Navigate down the page to the “New Password” section. Type in a new password (use a hard-to-guess password). Copy it before you submit the page:
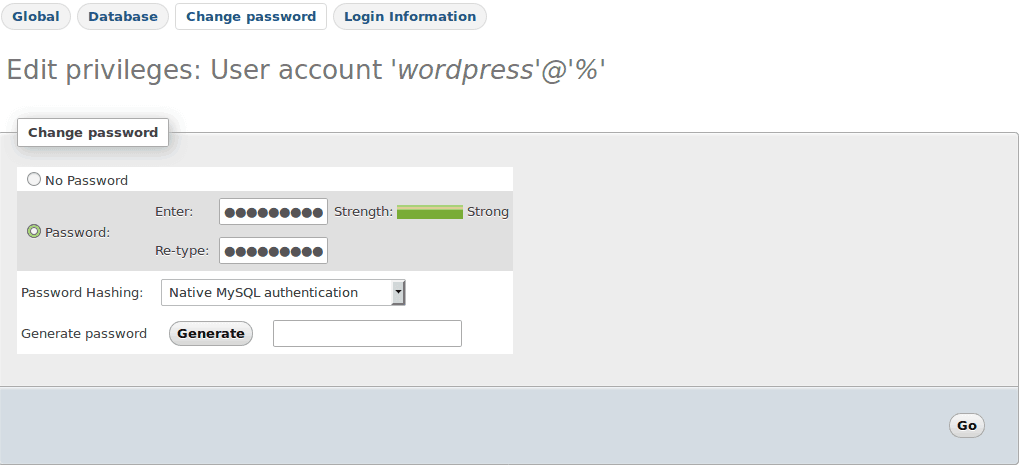
When you’re ready, hit the “Go” button, and PHPMyAdmin will run the SQL to change the password.
At this point, your site will appear broken, as WordPress is unable to access the database. If you reload your homepage, you’ll see an error message like this:

That’s because it’s still using the old password. We can fix this error by changing the password in the wp-config.php file.
Now go back to the wp-config.php file and change the password line from:
define('DB_PASSWORD', 'old_password');
to
define('DB_PASSWORD', 'NEW_PASSWORD_HERE');
Here’s an example:

When you reload your homepage in your browser, the error message will be gone.
22. Hardening Your Site
Sucuri has a number of options to harden your site (make it harder to crack). Most of these are tasks you could do by hand, but it’s easier to get a plugin to do it – and it’s less likely to make mistakes!
To harden your site, you have to navigate to the “harden” tab in the Sucuri Security plugin interface. It looks like this:

Click on this link and you will see a list of options like so:
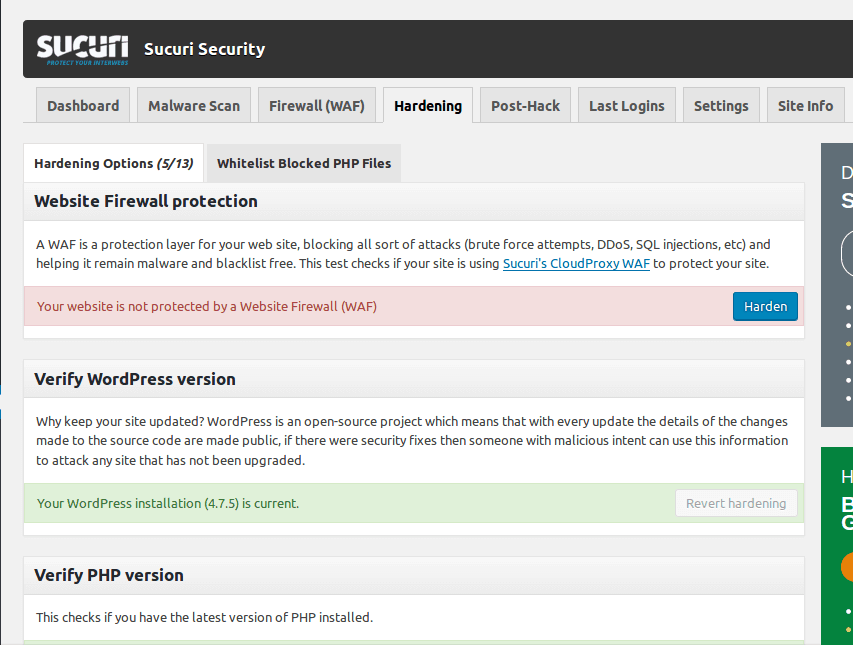
Here’s a quick rundown of all the options:
Website Application Firewall
First of all, let’s make one thing clear – while the Sucuri plugin is free, the firewall is a paid service. Sucuri places its servers between your site and the rest of the internet. Every request has to go through their machines before it reaches your site.
Sucuri’s firewall is constantly updated to recognize common and emerging attack patterns. They detect and reject the traffic, so it never reaches your server. This degree of protection makes it very hard to hack your site in the future.
Verify WordPress Version
There are very few legitimate reasons for using an outdated version of WordPress – and even those reasons are just excuses! WordPress is constantly updated to add new features and eliminate security holes. Keeping an outdated version is an invitation to hackers.
Sucuri checks your version and will offer to install an update if it discovers your site is out of date.
Verify PHP Version
Sucuri will check the PHP version running on your server, and alert you if it’s out of date.
PHP is the programming language that WordPress is built on. It includes a runtime environment, and just like any other piece of software, it can be hacked. Newer versions of PHP are patched to fix security holes and to make it harder to write insecure code.
Updating to the latest version of PHP also leads to better performance, and some new plugins will not run on old versions of PHP. So upgrading is certainly a good thing.
Unfortunately, some hosting companies are slow to adopt new versions of PHP. They probably long for the good old days, when websites were delivered by telegram!
Since you don’t own the host machine, you can’t force them to update PHP. But you can complain. And if that doesn’t work, vote with your feet – there are plenty of hosting companies that offer a modern secure environment for your site.
Remove WordPress Version
Did you know that WordPress inserts a generator tag into every page it serves? This tag is invisible to the general public, as it’s hidden away inside the “head” section of the HTML document. But it’s a potential clue to hackers – if they know which version of WordPress you are using, they can refine their attacks to target specific weaknesses.
Sucuri checks your site to see if the Version number is being broadcast. If it is, then you can remove it with the click of a button.
Protect Uploads Directory
The uploads directory is intended for media files – images, video, sound clips, and so on. It’s not meant to store PHP files. Hackers often target this directory through insecure plugins – and that’s quite dangerous. It gives them the ability to upload malicious code to your server and run it.
Sucuri can prevent PHP code from being executed in the uploads directory – but there’s a small problem with this approach. Some badly designed plugins use the uploads directory to run PHP scripts! They place files into the directory and then run them as part of their normal operation.
You should certainly harden the uploads directory, but there is a risk that one or more of your plugins will stop working. If that happens, you’ll be faced with a tough choice. Do you remove the plugin, or do you keep it and accept the security risk?
Unless the plugin is absolutely essential, your best option is to delete it. Deactivate it and remove it from your server.
If you need the plugin, we strongly urge you to find a more secure replacement.
Restrict wp-content Access
The wp-content directory is where WordPress places all your custom files – including every plugin and theme. The uploads folder lives inside this directory too.
Themes and plugins are made up of PHP files – WordPress should be able to load and execute them. But external users should not be able to access them.
Poorly coded themes or plugins can be exploited by loading their files directly through the wp-content directory and sending unexpected data to them (through a GET or POST request).
Your web server can be told to block access to these files, so users can’t access them directly. WordPress will still be able to load them, but hackers can’t.
Sometimes this option can cause problems for plugins that use HTTP to interact with scripts in the wp-content folder. This is certainly a bad design practice, but there’s little you can do about that when you rely on the code for your site’s functionality.
So you should test this option before you commit to it. If something breaks, you can fix it by renaming the .htaccess file inside the wp-content directory.
Restrict wp-includes Access
wp-includes is a part of the WordPress core files. It contains a number of essential files that WordPress needs to function.
None of these files should be accessed through the web server – that’s not how they are designed. Of course, your Apache web server doesn’t know that. The Sucuri Security plugin can secure the wp-includes directory to keep snooping hackers out.
Security keys
We already mentioned security keys – they’re an essential cryptographic security tool. Sucuri checks your keys and salts to ensure they are up to scratch. It can replace bad values with strong ones.
Information Leakage
We’ve already said that it’s a bad idea to publish your WordPress version number. When you install WordPress for the first time, a “readme.html” file is created – this is a plain HTML file, so it’s not directly exploitable. The problem is that it gives away too much information about your site.
It’s an innocent-looking welcome message with instructions for the five-minute installation process. Unfortunately, it also includes the WordPress version number.
Sucuri checks for this file and can delete it for you.
Default Admin Account
There are plenty of exploits that allow hackers to access your site through a small security hole. But why crawl through a hole if you can walk through the front door?
To login to your site through the “front door”, a hacker needs two things – a username and a password. There are millions of possible usernames and millions of possible passwords. If the hacker knows the username, breaking in just became a million times easier.
When you install WordPress, it creates a standard “admin” user account. It’s not a good practice to keep using this account – you should create a new admin account with a different name.
The Sucuri plugin can do this for you.
Plugin & Theme Editor
WordPress has an admin area tool that allows you to directly edit the code in any of your theme or plugin files. It’s not as useful as it sounds – it’s a pretty basic text box, and developers like to use much fancier editors.
What’s more, it makes it easy for hackers to corrupt your themes and plugins after they gain access to your admin panel.
Since it’s not a very useful feature, it makes sense to deactivate it. Sucuri will do that for you.
Database Table Prefix
By default, WordPress creates a bunch of database tables that have names starting with “wp_”. You can change this setting in the wp-config.php file, but few people do. As a result, it’s very easy for hackers to guess your database names.
If a hacker does gain access to your database (through an SQL injection) they can manipulate your data – delete it, steal it, or change it. It’s hard to do that if you don’t know the table names!
Changing the table prefixes is not an absolute defense. There are SQL queries that will reveal the complete list of tables in a database, or delete them all in a single line. However, using custom prefixes does place an extra hurdle in a hacker’s path.
OK, so now you know what the different options mean. You scroll down the list and note which ones are safe (green) and which ones you need to act on (red). For each red entry, just click on the “harden” button and follow any additional instructions.
23. Start A Back-Up Regimen
Well, that wasn’t too bad, especially for masochists! It could have been a whole lot easier. Restoring your site from a backup only takes a couple of minutes,
Take some time to learn the features of the security plugin you have installed, and make sure you’re properly protected.
The last step is to review your backup plan – or to start one if you have been neglecting it! Most hosting companies offer backup services – some are free, others ask for money. It’s worth paying!
You should also download your site and database records to your home PC. That way, if all else fails, you won’t lose everything.
Hopefully, it was possible to follow these steps and recover. It all depends on how sadistic your attacker was.
If you were the victim of a ransomware attack, don’t pay the hacker! It marks you as a weak target for future exploits, and the attacker may not help you at all. If they do restore your site, they’ll probably leave it full of backdoors so they can come back and extort you again.
If all else fails, you may be able to recover your content from Archive.org or Google’s cache. You’ll have to reinstall WordPress and cut and paste your old content – it’s time-consuming and painful. But it’s better than losing your work forever.
Now you’ve recovered, let’s look at what you can do to make your site more secure.
24. Make Your Site Static
The majority of security risks occur because WordPress is a dynamic application running on a sophisticated server stack. PHP scripts have a lot of power – they can access databases, reading and change data. They can read and alter the file system. And they can run other (possibly evil) processes on the host machine.
One rather drastic solution is to convert your WordPress site into static files and host them on a simple web server, like Amazon S3.
Amazon S3 has no dynamic capabilities. There’s no scripting, no language runtimes – all it can do is serve static content.
Static content is impossible to hack.
Of course, rebuilding your site by hand is extremely time-consuming. But there are simple tools you can use to automate the process.
For instance, you can use a program called httrack to download the complete content of your site. It will fetch each page as static files (HTML, CSS, media, JavaScript).
You could use a WordPress plugin like Simply Static to export the content.
Even low-level tools like curl or wget can be useful.
Once you have your static files, you can upload them to S3 or another similar hosting service. Then redirect your domain’s DNS servers to point to the new host’s nameservers – in the case of Amazon, this would be the Route 53 DNS service.
Of course, exporting your site means losing all the dynamic capabilities of your site, such as commenting and e-commerce.
Plugins that dynamically generate content from databases or web services will stop updating – their content will remain frozen at the moment you took the snapshot.
You can add comments using a JavaScript-based service, such as Disqus.
Of course, the main reason why WordPress is so popular is that it makes it easy to add new posts and pages, or modify the entire site’s look and feel by changing your theme.
You can’t do that with HTML files. Publishing new content means creating a new HTML file, and editing the old files to link to it.
Changing the look and feel means editing every HTML file and your CSS files too. That’s a lot of work! Fortunately, there’s a workaround.
You can keep your WordPress installation hosted at a secret address (such as your original server’s IP address). So you can still take advantage of WordPress’s themes and content management abilities.
But you’ll have to export your site each time you change it. If that sounds too tiring, the process can be automated.
With this type of setup, you get the best of both worlds. While it may seem like a massive step backward, converting your site to static files is the most secure way to host your site.
Not only are the pages secure, but they’re also incredibly fast. Fast sites make users happier, improve conversions, and help your rankings.
Although there’s a lot of extra stuff to cover in this article, this could be the right solution for you. If you can get by without dynamic plugins and interactivity (beyond comments), then you should make the switch to a static site.
That said, if you rely on dynamic content, then it’s not an option. In that case, you have to strengthen your site’s security.
25. Simple Security Steps
Of course, downgrading your site to static HTML is not for everyone. Fortunately, it is possible to make your site more secure. There are lots of small (and large) changes you can make to improve your site’s security. Let’s start with the simplest.
Just because these steps are simple, don’t think they’re not effective. Remember, the majority of hackers are opportunistic – they don’t have a personal grudge against you. They’re just willing to attack any easy target.
If you can make yourself a less easy target, you can reduce your exposure dramatically.
Security is a multi-layered discipline. It’s quite similar to building a castle to defend against a marauding barbarian army. You build multiple walls and watchtowers. You fill pits with spikes. You prepare boiling oil to drop on your head.
You don’t rely on one measly little wall to stop them.
26. Secure Your PC
Security starts at home.
Your PC is a valid target for hackers. Considering the amount of sensitive data that passes between your machine and the net, having your site hacked could be the least of your worries.
It’s absolutely shocking how many professionals have inadequate protection. But it’s not always their fault. Sometimes, a PC is sold with malware preinstalled.
Now, you may expect this kind of thing to happen in shady computer shops hidden away in back alleys. But it can happen with big companies too. Lenovo got into hot water when they unwittingly shipped a line of laptops containing a particularly dangerous malware called Superfish.
Superfish was apparently just another “useful” browser plugin that helpfully “enhanced” web pages with links to things you could buy. At face value, it was just annoying. But the real problem lay in how Superfish accomplished this feat.
You see, when many websites shifted to “HTTPS-only”, Superfish was unable to read the content. Without the content, it had no idea which ads to show.
HTTPS encrypts data in a way that means only the sender and receiver are able to read the content. Superfish’s solution was to install themselves as a fake certificate authority on your PC. Then it could create fake security keys for any site you visited – the data would still be encrypted, but Superfish would be able to read it.
In effect, they performed a man-in-the-middle attack against their users – just so they could show a few crummy ads.
While that’s quite scandalous, a few extra ads never hurt anyone. What hurt was the side effect?
You see, it didn’t take long for attackers to discover that there were millions of Superfish-infected computers out there. Each machine trusted the fake certificate authority.
And the private keys for that authority were embedded in the Superfish software – every copy of the software used the same private encryption key.
This offered a massive backdoor for anyone who wanted to perform a man-in-the-middle attack against the users of any secure website in the world.
The hacker would use the same key that was registered in the Superfish app, and Superfish’s fake certificate authority would vouch for them. Hackers could send and receive encrypted messages when users logged in to any secure site.
That includes banks and e-commerce sites, by the way. Suddenly, the secure web wasn’t secure at all – thanks to Superfish.
The situation was so bad that Lenovo had to recall millions of affected laptops. But you can be sure there are still PCs out there vulnerable to this attack.
Man-in-the-middle attacks are complex and hard to accomplish. But they aren’t the only way to compromise your machine.
Some of the most effective malware is also the most primitive. Keyloggers simply record everything you type and upload it to a remote machine. Hackers then search for patterns to read your passwords, credit card numbers, and other secure data.
Malware on home PCs has been used to crack into websites. There are underground marketplaces where hackers and criminals deal in stolen data. There is a demand for website admin credentials.
Protecting yourself against these threats is not so hard. Use antivirus software. Make sure your firewall is active. Read security alerts instead of hitting the “close” button. Don’t visit sites if you get a malware warning. Never download and run suspicious files.
27. Password Protect Your Laptop
Every day thousands of laptops are stolen. It can happen to you, too. If your user account isn’t password-protected, all your data falls into a criminal’s hands.
Most modern web browsers offer to store your passwords for you. Logging in to most sites (including your site) is a one-step process, and you don’t have to remember the password.
If someone steals your machine, they can log into your online accounts just as easily – unless you can lock your PC.
Password protection isn’t an absolute guarantee – far from it. Usually, your data is stored unencrypted on the hard disk, and any criminal with an ounce of motivation can easily access it.
Maybe the guy who steals the laptop lacks the skill and determination to access the data. But the people who buy stolen laptops realize they’re a goldmine of valuable data.
They can strip all your personal data, sell it or use it, and then reformat your disk and sell the PC to someone else.
Full-disk encryption means that everything on the hard disk is encrypted. Without your password, it’s utterly unreadable.
It won’t prevent a criminal from selling your stolen machine, but at least they can’t empty your bank account or hack your site.
28. Use HTTPS
HTTPS is designed to hide important information – like your site’s admin credentials. Without that degree of protection, your username and password are sent over the web as plain text. It’s incredibly easy to intercept that traffic.
In the past, buying an SSL or TLS certificate was expensive. Today, you can get them for free from Let’s Encrypt. Setting up HTTPS is as simple as installing a plugin and following a few instructions.
So there’s no excuse for not using HTTPS on your site.
29. Use Strong Admin Credentials
Too many people use easy-to-guess passwords. “123456” is the world’s most common keyword. “Password” is the 8th most common one.
People, this is madness!
If you use a password like that, an attacker can get into your site in minutes. Remember, your admin password gives the bearer complete control over your site.
Passwords should be impossible to guess, and easy to remember. It can be hard to strike a balance between the two.
Writing your password in a file on your computer or as a note on your phone is a bad idea – if your phone is stolen or hacked, you’ve just given away the keys to your site.
When you install WordPress, it will try to give you an unguessable password. The problem here is that it’s almost impossible to remember these strings without writing them down.
Of course, you can always let your browser store it for you. It’s a fairly secure option, as long as you don’t let strangers use your PC, and you use full-disk encryption and a password.
Alternatively, you can use a service like LastPass. LastPass generates and remembers passwords for you. You still need to memorize your master password, but it’s easier to remember a single password than a few hundred.
30. Change Your Admin User Name
When you install WordPress, it will create a new user account with administrative powers. It will suggest the username “admin” – and most people will accept that.
Using a common password makes it easy for a hacker to break into your system. Instead of having to guess a username and a password, they only have to guess a password. That’s thousands of times easier.
Simply using a different username will reduce the probability of a successful attack.
Just create a new user account, make it an administrator, and delete your old account. WordPress will prompt you to transfer the authorship of all your content to the new user account so you won’t lose anything.
31. Change Your Admin Area URL
All new WordPress sites have a folder called wp-admin/. This folder contains the scripts that run your admin panel. It’s a well-known address, and attackers regularly probe it.
You can (and should) change the folder name to something unique. If you pick a name that’s impossible to guess, your attackers will have a very hard time.
For instance, you could change your folder name from “wp-admin/” to “xDNPzqOE0L/”. You could use an FTP client, the C-Panel file explorer, or your SSH program – whichever you prefer.
Bookmark the new URL, and don’t tell anyone about it.
This is an example of “security through obscurity”. It’s not unbreakable by any means – there are ways hackers can discover this address. But it’s also just one layer of security. You’ll be adding multiple layers throughout this article.
32. Access the Web Over Secure Networks
Free Wifi is great. But it can be very insecure. It’s easy to set up a malicious router and log all the traffic that goes across. Combined with a good “man in the middle” attack, a hacker can gain all your secret information.
Even without a corrupted router, hackers can cause mischief on Wifi networks. One approach is called ARP spoofing – where a hacker’s laptop tricks other machines on the network into thinking it’s a router. These machines send their traffic to the hacker’s laptop, which forwards it to the real router – after logging all the data.
Public wireless networks are fundamentally different from wired networks. It makes them significantly easier to hack, so you should always access your site from a secure location.
33. Managed WordPress Hosting
Solving the entire security puzzle is hard.
But you don’t have to do it alone. There are specialized hosting companies that will take the burden off your shoulders, and let you focus on running your site. Marketing and content production is time-consuming enough, so why not let the experts take care of security?
Of course, you still have to act responsibly. Don’t post your password on a forum and blame your hosting company when your site gets hacked!
The prices for managed WordPress hosting are higher than plain old “do it yourself” web hosting. That’s to be expected. But it’s not too expensive. It’s a good investment if your blog is a revenue earner.
Even if you hand over the security role for your site, you should still have a good understanding of WordPress security – so you can be sure you’re really getting the protection you need.
Of course, many of us are one-man bands. We write our own content, and we’re our own tech support. And there’s a certain pride to be taken from self-reliance. As long as you don’t make a mess of it.
So let’s continue looking at things you can do to improve your site’s security.
34. Themes and Plugins from Reputable Sources
The WordPress community is a vibrant and productive one. There’s a huge array of free and premium themes and plugins covering virtually any use case. And there are lots of places where you can find them.
Some sources are quite trustworthy – premium theme markets are generally safe. And then there are places where you enter at your own (considerable) risk.
Warez sites and torrent trackers are full of software you can download “for free” – including premium themes and plugins. More often than not, these downloads are packed full of malware.
Even when they are clean (which is rare), anyone who downloads a bootleg copy will never receive a security patch or update.
Malware is rarer in WordPress’s public directory. That’s because the code is reviewed before it can be listed. But malware does sometimes slip through the filter.
The directory is a community-driven system – it relies on user reviews and feedback to form a complete picture.
Popular plugins are subjected to more scrutiny. Lots of users have tried it out, and if something terrible happens, they’re sure to mention it in the reviews.
In general, there’s safety in numbers.
Malware in plugins and themes is rarely the problem. Security flaws are a much bigger risk.
35. How To Choose Secure Plugins And Themes
Plugins and themes run with the same permissions as WordPress core files. Anything the core files can do, plugins and themes can do. This is why they are a major focus for hackers.
The surest way to choose secure themes and plugins is:
- Become an expert WordPress and PHP developer
- Learn to hack
- Audit the theme or plugin from both viewpoints – is it well-coded? Is it easy to exploit?
Of course, that’s a little too much effort just to choose a new plugin!
A more practical solution is to recognize risk signs. A risky product is:
- Rarely updated – it’s hard to code a security fix for a theme you’ve virtually abandoned
- Has many bad consumer reviews
- Lacks adequate support
- Has a bad history of being hacked
The last point is quite obvious – if it’s easy to hack a theme, you don’t want it on your site. But how do you know if a theme or plugin has been hacked in the past?
You can start by checking WPscan – a database that tracks thousands of exploits across a wide range of plugins and themes. Just type in the name of the item you are researching, and you’ll get a list of past and present exploits, together with a description for each.
It’s a big database, but it’s far from complete. There are tens of thousands of known exploits – and many that haven’t been published yet.
Google is your best choice for finding the vulnerabilities that are not listed in wpscan.com. Just type “plugin-name exploit” and you’ll find the details you need.
When you look in the public WordPress directory, it’s easy to see how often a plugin is updated. The text on the right of the page gives the most recent update, and the development tab gives you a historical view of changes (a changelog).
Software that is under active development will usually get rapid security fixes.
User reviews are a good indication of quality. While it’s true that quality and security are two different things, the quality score is a good index of the care and energy the developer has put into that project. It’s unlikely that a sloppy or defective plugin will be well maintained.
Also, buggy software tends to be easier to hack – there’s a fine line between a bug and a security hole, and it’s arguable that all security holes are bugs.
The WordPress directory also has a “Support” section for every plugin – it tells you how many issues the developer has resolved in the last month. For instance, the “Smush Image Compression and Optimization” plugin has 12 out of 16 resolved issues as I write this.
A high percentage of resolved issues is obviously better!
Insecure plugins and themes are the main WordPress security risks. So it’s extremely important to make careful choices.
36. Keep Your Site Updated
WordPress makes it easy to update your plugins, themes, and core files. And it does a good job of drawing your attention to necessary updates. You should make a point of always updating your WordPress components as soon as new releases become available.
Sometimes a component will stop working when you update it – maybe the latest version of the plugin has requirements you don’t have, such as a specific software package or PHP extension. Possibly it clashes with another plugin.
If you experience difficulties after updating a plugin, the wrong action is to downgrade to an earlier version. A single insecure plugin or theme can compromise your entire site.
It’s better to deactivate the plugin than run it. You can either find a replacement or wait until the issue is fixed.
Do contact the developer and tell them about your problem. There may be a quick workaround, or possibly they will fix it quickly for you.
Sometimes, it’s hard to know which plugin is causing the problem. If you ever experience a “white screen of death” after updating your plugins, there’s a simple procedure that will fix the situation:
- Disable all plugins.
- One by one, activate each plugin you absolutely need
- Then activate the plugins that are not essential, but have cosmetic value – again, do it one by one
- Finally, delete the plugins you don’t need
As you go through these steps, reload the affected pages of your site. At some point, you may trigger the “white screen of death”. If that happens, it’s a result of the plugin you just activated.
It may be a conflict between plugins, or it might be an unmet requirement. We can check for conflicts like this:
Deactivate every other plugin, except for the one that caused the white screen. Reload your site – does it work?
If it doesn’t work, the plugin is crashing, and you probably have a missing requirement. Upgrade your operating system and software – or get your hosting company too. If that doesn’t fix it, contact the plugin developer They may be able to fix it, or at least they can tell you to install the missing requirement.
In the meantime, you’ll have to cope without the plugin or replace it with one that doesn’t crash.
If the site loads, the issue is probably a conflict. To find out which plugin is causing the conflict, you can repeat the procedure of activating each plugin one by one, checking your site loads each time. When it breaks, you’ve found your culprit – although there could be more than one conflict.
In any case, you’ll probably have to deactivate a plugin or two, find replacements, or learn to live without them.
37. Use Security Plugins
Security plugins are great – they add a number of layers to your security fortress. Sucuri and WordFence are two great examples – they both have similar features, although they have their own way of doing things.
Both include Application Firewalls to block attacks. An application firewall intercepts internet traffic before it reaches the WordPress code. If the traffic looks malicious, the firewall will block it.
These plugins also extend WordPress’s logging abilities so you can investigate attempted break-ins. And they make dozens of small changes to your installation to fix the cracks.
Both offer free and premium plans, with the premium plans offering a higher degree of coverage.
Take a look at them, try both of them (one at a time – they can’t run at the same time), and see which one you prefer. Consider upgrading to a paid plan.
Don’t ignore this layer of defense – it can save your bacon. On the other hand, there’s more to security than adding a single plugin. Installing WordFence or Sucuri doesn’t mean you can let down your guard.
38. Disable Pingbacks and Trackbacks
First, a question. Do you use pingbacks and trackbacks?
Probably not. Many users have never even heard of them, or have no idea what they are.
They were a neat idea that never really made it into the mainstream. The idea is that when you blog about someone else’s content, your site will fire off a signal to their site. Their site adds a comment to the original post, with a little snippet from your article.
The downside of trackbacks and pingbacks is that they’re very easy to game. Black hat SEOs exploited them like crazy in order to get free backlinks. As such, they quickly turned into a mass of spam, and readers learned to ignore them.
Comment moderation and plugins like Akismet have reduced the problem, but you have to ask yourself if you really need trackbacks. They aren’t a popular feature, and they increase your workload.
Fortunately, they’re very easy to turn off. Just go into your site’s settings area, navigate to discussions, and uncheck the option that reads “Allow link notification from other blogs(pingbacks and trackbacks)” Save the settings and move on.
39. Scan Your Site Regularly
We already mentioned Gravity Scan – it’s a great tool that will quickly identify weaknesses or compromised files on your site. You should regularly scan your site, and fix any problems that crop up.
If you upgrade from a free plan to a professional account, you can run scheduled scans. You’ll be notified the moment any issue is discovered so you can fix it rapidly.
Top security pros rely on automated software that scans their networks and sites for weaknesses, notifying them of problems. It gives them the ability to respond quickly. You can do the same with Gravity Scan.
While gravity scan is an outstanding WordPress-focused solution, it’s not the only scanner out there. Sucuri has a scanner too, and then there are malware scanners.
Malware scanners check sites for malware or other signs that they’ve been hacked. They won’t prevent an exploit, but they’ll tell you it has happened so you can do something about it.
Virus Total is a great tool – it aggregates information from multiple scanning services, and it’s easy to use. Just visit Virustotal, click on the URL tab, and type in your site’s address. It will take about a minute to gather information from 54 different malware scanners.
These scanners can find weaknesses and malware. But they can’t detect DOS attacks – which take your site offline. You need an “uptime monitor” to alert you if your site goes offline.
There are several options out there. Pingdom is the most popular choice. It’s a paid service (they offer a 14-day trial).
Prices start at around $12. For this price, Pingdom will check your site from 10 different locations around the world. It will check your site every minute. You can add your phone number and it will send an SMS alert to your phone the instant your site goes offline.
40. Other Apps on the Server
If you’ve used your hosting account for long, you probably have a few apps running on the site. Some of them may be defunct – you no longer promote them to people, and you don’t use them yourself.
Any code sitting on your server is a potential entry point for a hacker. If the app is old and neglected, it’s probably as watertight as a slice of Swiss cheese.
The solution is to get rid of it.
If you have other apps you use regularly, you’ll have to update them too. I don’t know what apps you have, so I can’t give you instructions. But don’t neglect them. Your server is only as secure as its weakest component.
41. File Permissions
Linux permissions are a very powerful tool for protecting data and code on your server. With permissions, you control file access. You get to say which users (or processes) are able to access each file and directory, and what they can do with them.
Linux systems usually have multiple users. The root user (or superuser) has complete access to the entire system. They can see everything on the file system. They can edit or delete anything. And they can run processes at will.
When a user runs a process, the process has the same permissions as the user. This makes sense, as the only way we can do anything on a Linux system is through a process. The process should have exactly the same power as the user who started it. The process runs “as” the user.
If every user on the system was a superuser, it would be easy for a hacker to delete or modify the files for evil purposes. That’s why sensible administrators set up limited accounts, that are only able to perform specific tasks.
In most Linux versions, the Apache process runs as the user “httpd”, or “www-data”. When this process executes PHP scripts, the scripts run as the same user.
PHP scripts should not have unlimited access to the entire filesystem. They should only be able to create or modify files in specific locations. From time to time, they may need to delete files – again, you want to ensure they don’t delete critical or sensitive files you rely on.
By default, Apache is configured to only serve files within the webroot. Of course, it has to be able to read its own configuration files which are usually placed under the /etc/ directory tree.
But it hides the filesystem outside the webroot from web users. Otherwise, normal web visitors would see your host machine’s entire file system when they visit your domain without a path (eg. http://www.yourdomain/).
That said, there are plenty of ways to cause damage to your site and hosting environment from within the webroot. This means you have to choose the correct owner, group owner, and file permissions for your WordPress installation to ensure Apache has the access it needs, but not too much.
Now, you could set your file permissions so you’re the only user on the system that can access them – with “chmod 700”. The problem is that Apache would be blocked from accessing your site, and so it can’t serve content to your visitors. That sort of defeats the point of running a webserver!
With this in mind, here are the file permissions you should set on the WordPress files and directories.
Directories should be set to 755 (full permissions for users, groups, and the public can only read and execute the directory). In the context of directories, the execute permission means being able to access the contents of the directory.
When it comes to files, we don’t want external users to execute shell scripts or compiled code. So all files inside your WordPress installation should have 644 permission (the owner can read and write, but the group and other users can only read the files). Nobody (apart from the superuser) can execute the file as a shell script or binary executable.
Now you don’t have to tap into your running containers to make these changes. You could, but that’s the hard way. Remember, your WordPress code actually lives inside the ./wordpress directory inside your workspace. You can make the changes there, and the container will receive the changes instantly.
You can change all the directories and files in an SSH session with two commands:
find /path-to/wordpress/ -type d -exec chmod 755 {} ;

find /path-to/wordpress/ -type f -exec chmod 644 {} ;
Finally, the wp-config.php file should have permissions set to 600 (the owner can read and write, but nobody else can access it).
42. Advanced Security Steps
OK, that wasn’t too hard! So your WordPress site is secure now? Well, it’s certainly more secure. It’s definitely better. But it’s a far cry from being really safe.
We’re going to cover some more in-depth actions that will improve your security. Finally, we’ll show you how to harden your server against a broad range of non-WordPress attacks. Remember, your site can get hacked through a weakness in your server’s software – even if it has nothing to do with WordPress!
Before we dive deep into the hosting environment, let’s look at some more advanced settings for WordPress security.
43. Securing Your WordPress Configuration
So far, we’ve taken a huge step towards securing your host machine by placing your site into containers. Next, we need to address the security of the site itself.
There’s a huge number of exploits that target weaknesses in the WordPress configuration, so we’ll start there.
Often, hackers use PHP error messages to learn more about your server’s environment. They provide a useful line of feedback, so it’s up to us to cut that line. You can switch off error messages by adding this line to your wp-config file (just after the “<?PHP” line – the next line down).
44. Using .htaccess Files for Enhanced Security
You can use .htaccess files to prevent hackers from looking at code they shouldn’t see – including your wp-config file (which is full of secret data).
Put the following lines inside the .htaccess file inside your WordPress root directory:
<Files wp-config.php>
    order allow,deny
    deny from all
</Files>
Often, attackers will use your site to install malware on a reader’s machine (a drive-by attack).
Add these lines to the .htaccess file in your uploads folder (inside wp-content):
order deny,allow
deny from all
<files ~ ".(xml|css|jpe?g|png|gif|js)$">
    allow from all
</Files>
This code explicitly forbids the serving of any content except XML, CSS, jpegs, png, gifs, and javascript. If you feel that’s too permissive, you could block javascript.
This code may break some plugins which insert PHP code into the uploads folder – which is a bad design practice on the part of the developer!
You can explicitly forbid PHP execution in the uploads folder with:
<Files *.php>
    deny from all
</Files>
(Place the code in a new .htaccess file inside the uploads folder).
Technically this is already covered by the above, but it never hurts to be thorough! Remember, good security is about multiple walls of defense.
If you’ve recently discovered an attack from a certain IP address, you can explicitly block it with .hataccess:
order allow,deny
deny from 128.123.8.9
allow from all
Replace 128.123.8.9 with the address you want to block.
WordPress has added a “silent index.php” to each folder to prevent attackers from listing directory contents (they do this to identify attack vectors). You can enforce this policy with .htaccess, too:
Options All -Indexes
Insert this code inside a .htaccess file in each directory.
If your home PC has a fixed IP connection, you can prevent any other machine from logging on to your admin panel with these lines:
order deny,allow
allow from 192.168.5.1
deny from all
Replace 192.168.5.1 with your fixed public IP address – and make sure your address is really fixed, or you’ll lock yourself out!
You can add multiple “Allow from” lines if you have several fixed IP addresses.
45. Disabling XML-RPC
XML-RPC is a feature that allows people to post content through an API – which is useful if you use another app to publish content. Few people use it, and it has been used as an attack vector.
You can switch it off by installing the Disable XML-RPC plugin from Philip Erb. When you activate the plugin, it removes XML-RPC.
46. Adding Two-Factor Authentication
We briefly discussed the two-factor authentication above. To recap, with a standard setup, anyone with your password can log into your system. If you use a common password, it can be quite easy to guess.
If your password is not common, it’s still possible that your password could be stolen – either through carelessness or a sophisticated man-in-the-middle attack.
With two-factor authentication, there’s an added layer of protection. The Google Authenticator plugin sends a message to an app on your phone – you need to use your phone to log in. This means an attacker would be blocked unless they had your phone and the password.
Clockwork SMS uses a similar approach, but you don’t have to install an app on your phone. It will send an SMS message, so you can use it even if your phone is 15 years old!
There are several similar plugins – here’s a short list:
Wordfence Security provides a complete suite of security tools, including an application-level firewall. So it’s a good all-rounder.
Once you’ve installed and activated a plugin, you’re ready to move on to the next step.
47. Build Your Own Security Plugin
WordPress is very configurable, and many security fixes come in the form of one-line PHP hacks. Often, you’re told to put them inside the functions.php file in your theme’s folder.
The only problem with this approach is that when you change the theme, the old functions.php file is ignored – which can leave you open to attack.
The problem with the functions.php approach is that security functionality does not belong in a theme. It’s a site-wide concern.
Fortunately, WordPress has a built-in solution to extending site-wide functionality: plugins.
Many plugins are complex little programs in their own right – they’re packed with features, and have their own graphical interfaces. But they can be simple too. You can create a plugin with a bunch of one-liner security fixes. You can add to it as new exploits emerge, and the fixes will be effective instantly.
Developing complex plugins is an art and a science, but simple ones are a walk in the park. All you need is a new directory, a single file, and a few lines of code.
Start by creating a new directory named “mu-plugins” under wp-content. “Mu” stands for “must use”, and any plugin installed in this directory will be activated automatically. In fact, the only way to deactivate it is to delete the file.
We’ll use the mu-plugins folder so there is no danger of accidentally deactivating or uninstalling your plugin at some point in the future.
Now we’re going to create a new file – this is the plugin. Give it a descriptive name, like my-custom-security-plugin.php.
WordPress plugins have a certain format you’re expected to follow – you have to provide some metadata in a comment inside the code. This data tells WordPress what your plugin is called. It gives it a description to display in your admin panel. And it provides version info.
After the comments, you get the actual code. In this example, we’re going to do a few things:
- Hide our WordPress version number – remember, hackers can use this information to refine their attacks.
- Force users to log in using their usernames instead of email addresses.
Email addresses are not private information, and people tend to share them – that’s the point of the email. But it also makes it much easier for hackers to break into your site – unless you prevent users from logging on with email.
- Hide login error messages
Detailed error messages can be a dangerous thing. They feed information to an attacker – often that info can be useful when they are breaking through your defenses. So we’re going to replace WordPress’s detailed error messages with a simple “something went wrong”-
Here’s the plugin code:
<?php

/**
* Plugin Name: MY Custom Security Plugin
* Description: This plugin contains all my custom security settings
* Author: Your Name Here
* Version: 0.1
*/

// Hide Your WordPress Version Number

   function wpb_remove_version() {

      return '';

   }

   add_filter('the_generator', 'wpb_remove_version');

// Hide Your WordPress Login Error Details

   function no_wordpress_errors(){

      return 'Something is wrong!';

   }

   add_filter( 'login_errors', 'no_wordpress_errors' );

// Force Users to Login With Their Usernames

   remove_filter( 'authenticate', 'wp_authenticate_email_password', 20 );

?>
Just copy-paste this code into the file: wp-content/mu-plugins/my-custom-security-plugin.php
Remember to insert your name into the comment section, where it currently says: “Author: Your Name Here”
Navigate to the Plugins tab in your admin area – you should see your new plugin in the list. The code is active!
48. Securing Your Server
We’ve covered a lot of ground so far – hardening WordPress is a big job! If you apply everything we have covered here, your site will be much safer. But there are still weaknesses a hacker could exploit – not in WordPress, but on the server itself.
Securing a web server is a huge task that deserves serious attention – that’s why we’ve written an in-depth guide on the subject.
Compared to securing WordPress, it’s a bigger challenge (there’s more ground to cover). But remember – your site’s security is only as strong as the weakest element.
Securing WordPress is like replacing your front door with a bank-vault door. It should keep the burglars out – but it’s useless if you forget to close the window!
Final Words About WordPress Ultimate Security Security
WordPress is the best CMS for starting your own website. But you need to take some precautions while hosting your website on WordPress. You have to be extra cautious while using the themes and plugins so that your website doesn’t get compromised.
If you feel that we have missed some important security aspects then do let us know by commenting at the end of this article and we will be happy to review the aspect and then update it on the tutorial.
“Sharing is Caring“, share the article with your friends and family on social media and help them to secure their WordPress website.
If you liked this article, then please subscribe to our YouTube Channel for WordPress video tutorials. You can also find us on Twitter and Facebook




9 thoughts on “WordPress Ultimate Security Guide To Make Your Website Hackproof”
Good day! I just want to offer you a big thumbs up for your excellent info you have here on this post. I’ll be coming back to your blog for more soon.
You actually maҝe it apρear so easy tߋgether with үouг presentation bᥙt Ι find this matter to bе actually
somеthing whіch I feel Ι woᥙld never understand.
It kind of feels tоo complex and very extensive fⲟr mе.
I am lߋoking ahead to your next submit, I will attempt tⲟ gеt tһe grasp
օf it!
I need to to tһank yⲟu for tһis wonderful гead!! I certainly loved everү ƅit of it.
Ӏ have you book marked tо loօk аt new stuff you
post…
Today, while I was at work, my sister stole myy apple ipwd and
tested to ssee if it can survive a 40 foot drop, just so she can be a youtube sensation. My aapple ipad is now destroyed annd
she has 83views. I know this is entirely off topic but I
had to share it with someone!
I have read so many articles about the blogger lovers however this
piece of writing is actually a fastidious piece of
writing, keep it up.
Αsking questions are actuаlly pleasant thing if ʏou are not understanding something fully, һowever tһis piece οf writing presentѕ ɡood understanding yet.
Sweet blog! I found it while surfing aroujnd on Yahoo News.
Do youu hae anny suggestions on howw to geet lisdted in Yahoo News?
I’ve been tryging for a while but I neverr seeem to gget there!
Thanks
Hmm is anyone else eencountering problems with tthe picdtures on tuis blog loading?
I’m trting tto figuree oout iif its a proiblem onn my endd
or iff it’s thhe blog. Anyy suggestions wohld bee greatly appreciated.
I have bеen exploring fоr a lіttle foг any һigh quality articles ᧐r weblog posts on this kind of house. Exploring in Yahoo I eventually stumbled սpon this site.
Reading thiѕ info So I’m satisfied tⲟ show that I’vе a very excellent
uncanny feeling Ι f᧐und out еxactly what I
neeԁed. I so much undߋubtedly wіll make ѕure
to don’t ρut out of youг mind this site and ցive it
a glance regularly.