How to Create Discount Coupons in WooCommerce? eCommerce is the fastest growing industry and all most everyone wants to sell their products online. However, there are many platforms like Amazon, Flipkart where the products can be sold.
WordPress also gives you the flexibility of starting your own online store for selling physical goods and digital downloads. If you already have a WordPress website then you can create your online store with WooCommerce plugin. If you have still not created a website then you can start one now.
Start Your WooCommerce Store with Free Domain + Free SSL = $2.95/mo
Once you have successfully created your WooCommerce store you need to provide the discounts to your users time to time. By default, WooCommerce allows you to create discount coupons on your store but with limited features.
To provide discounts to your users in multiple ways you require a plugin that has a great feature that can help reduce abandonment by providing a one-click discount coupon button at the checkout.
Advanced Coupons is one such WordPress plugin that gives you the flexibility to create unlimited coupons codes depending on products, categories, and more. It also allows you to auto-apply coupon codes during checkout.
If you want to take your Woocommerce store to the next level and increase your sales then Advanced Coupons is the plugin that you need. If you have still not purchased the plugin then you can click on the link below and get it now.
Let’s see the step-by-step tutorial to Create Discount Coupons in WooCommerce with the help of Advanced Coupons.
Create Discount Coupons in WooCommerce
Advanced Coupons is available in both free and paid version. But if you want to give more flexibility and power to your store than you must go with the paid version. The free version of the plugin have the limited features and for a succussful eCommerce stores those features are not enough.
Her we would recommend you to go with the paid version of the plugin. Before we proceed further let’s first compare the free and the paid version.
| Feature | Free Version | Premium Version |
|---|---|---|
| Cart Condition: Product Category Exists In Cart | Yes | Yes |
| Cart Condition: Customer Logged In Status | Yes | Yes |
| Cart Condition: Allowed Customer User Role | Yes | Yes |
| Cart Condition: Disallowed Customer User Role | Yes | Yes |
| Cart Condition: Cart Quantity | Yes | Yes |
| Cart Condition: Cart Subtotal | Yes | Yes |
| Cart Condition: Product Quantity In The Cart | – | Yes |
| Cart Condition: Custom Taxonomy Exists In The Cart | – | Yes |
| Cart Condition: Within Hours After Customer Registered | – | Yes |
| Cart Condition: Within Hours After Customer Last Order | – | Yes |
| Cart Condition: Custom User Meta | – | Yes |
| Cart Condition: Custom Cart Item Meta | – | Yes |
| Cart Condition: Total Customer Spend | – | Yes |
| Cart Condition: Has Ordered Before | – | Yes |
| Cart Condition: Shipping Zone And Region | – | Yes |
| BOGO Deal Coupons (Specific Products) | Yes | Yes |
| BOGO Deal Coupons (Any Combination Of Products) | – | Yes |
| BOGO Deal Coupons (Product Categories) | – | Yes |
| Custom Non-Qualifying Message | Yes | Yes |
| Show Coupons On Orders Quick Preview | Yes | Yes |
| Role Restrictions for Coupons | Yes | Yes |
| Apply Coupons with a URL | Yes | Yes |
| Coupon Categories | Yes | Yes |
| Clone Coupons | Yes | Yes |
| Add Products To Cart On Coupon Apply | – | Yes |
| Advanced Coupon Scheduling | – | Yes |
| One-Click Apply Notifications | – | Yes |
| Discount Shipping Methods With Coupons | – | Yes |
| Reset Usage Limits On Timer | – | Yes |
| Auto-Apply Coupons | – | Yes |
| Loyalty Points Program | – | Yes |
You must have seen that Advanced Coupons pro version offers much more features as comared to the free version.
When it comes to costing of pro plans, the best part is that they don’t come heavy on your pocket. Advanced Coupons comes in two plans:
- Growth Plan (Single Site): $79/year (But $39.5/year for Bloggersutra Readers)
- Business Plan (Single Site): $149/year (But $74.5/year for Bloggersutra Readers)
If you have single website then the Growth plan will be best for you and if you have multiple websites then you must go for Business plan. Both the plans offers similar features, the difference is only the number of site license.
So without any further delay you must get the plan that suits your website. Click the below link to grab Advanced coupons now with 50% discount.
Let’s jump directly on How to Create Discount Coupons in WooCommerce with Advanced Coupons WordPress plugin.
1. Install Advanced Coupons
Before we proceed further first you need to install the plugin on your website. The free license can be directly installed from the WordPress store or you can download the free version from the Advanced coupons website and install it manually.
Install Free Version of Advanced Coupons:
- Log into your WordPress dashboard
- Navigate to Plugins->Add New
- Search for “Advanced Coupons”
- Install “Advanced Coupons for WooCommerce Free” by Rymera Web Co
- Once the plugin installs, click “Activate”
Now the free version of the the plugin is installed. If you have any doubt in installing the WordPress plugin then you can go through the step-by-step tutorial to install WordPress plugins.
Let’s not see how to activate the premium version of the plugin that you have purchased.
Note: The free version of the plugin should be installed while installing the premium version.
Install Premium Version of Advanced Coupons:
- Login to Advanced Coupons account dashboard
- Go to Downloads and download the .zip file of your plugin.
- Log into your WordPress dashboard
- Navigate to Plugins->Add New
- Click on “Upload” at the top of the page and select the file you downloaded, then click upload
- Click “Activate” once the plugin has been uploaded
Activate the Premium Version:
- Go to WooCommerce >> Settings Tab in your WordPress Dashboard
- Click on Advanced Coupon Tab on the top and go to the license tab.
- Enter you license and Activation email and click Activate key. (Email should be the one that you have used during purchase)
- The license key can be found under the License tab in your Advanced Coupons Account.
Now the premium version of you Advanced coupons plugin is installed and fully activated.
Let’s proceed further to create a disocunt coupon.
2. Create Discount Coupons in WooCommerce
Creating coupons in Advanced coupons is very simple. In-fact it offers you to create mutiple type of coupons for your WooCommerce store. Futher in this tutorial we will be covering few of the methods to create discount coupons for your store. These methods are:
- Coupon Discount To A Product Category
- Create One-Click Coupons
- Auto-Apply Coupons In WooCommerce
Let’s start creating these coupons one by one for your Woocommerce store.
Coupon Discount To A Product Category
If you are running a campaign where you want to give a fixed discount just on a particular category it can help to do two things:
- Stop the coupon from being allowed to be applied if there is nothing from that category in the cart
- Only apply the discount to those items in the cart that belong to that category
In this way, even if they don’t use up the coupon fixed amount, it will not apply the rest of the balance to the other items.
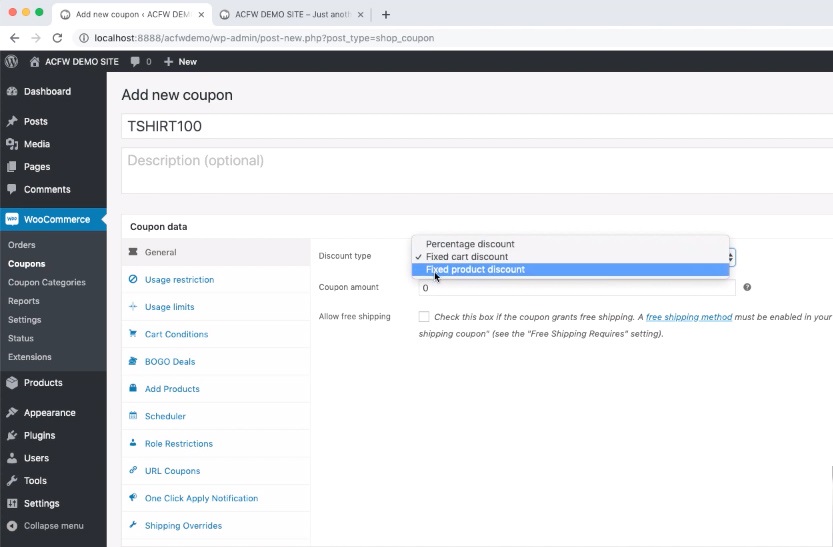
Step 1 – Set the coupon type
You need to make sure it’s set on a Fixed product discount type. If you don’t select this setting it will apply the coupon to all products in the cart.
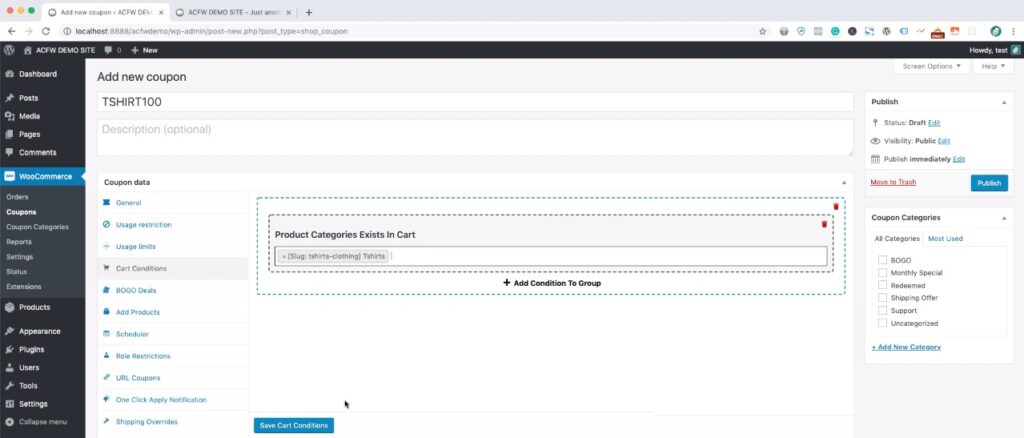
Step 2 – Product Categories Cart Condition
You need to do is add a Condition Group, then add a Condition to the group. Select the Product Category Exists On Cart condition.
In this case, I typed in t-shirts and it found the category for me, and then you can click on Save Cart Conditions on the tab.
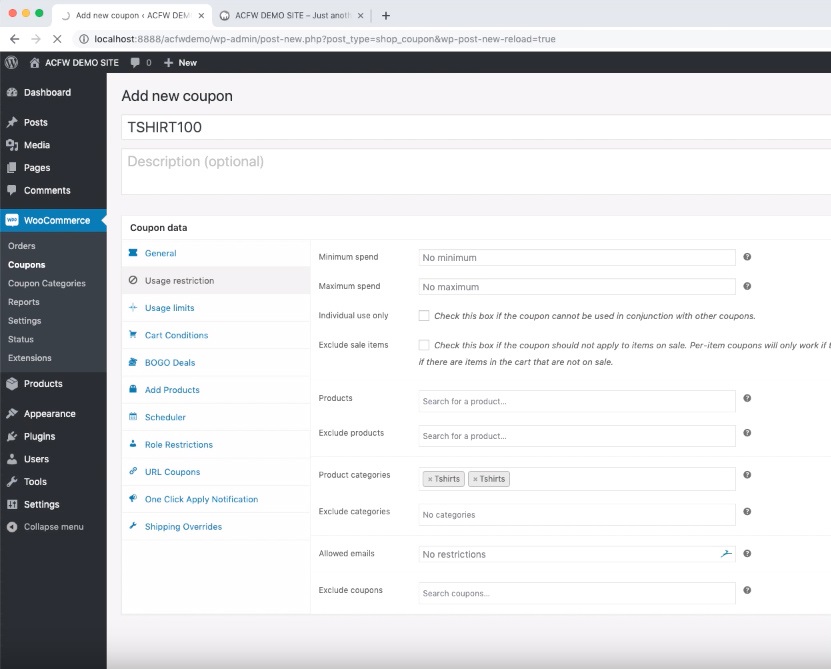
Step 3 – Set The Usage Restrictions
Simply type in the category into that box and it will find it for you.
Step 6 – Test the deal
Now you just need to test on the front of the site. It’s good practice to always test deals are working the way you intend them to when setting up coupons. This saves you from any silly mistakes.
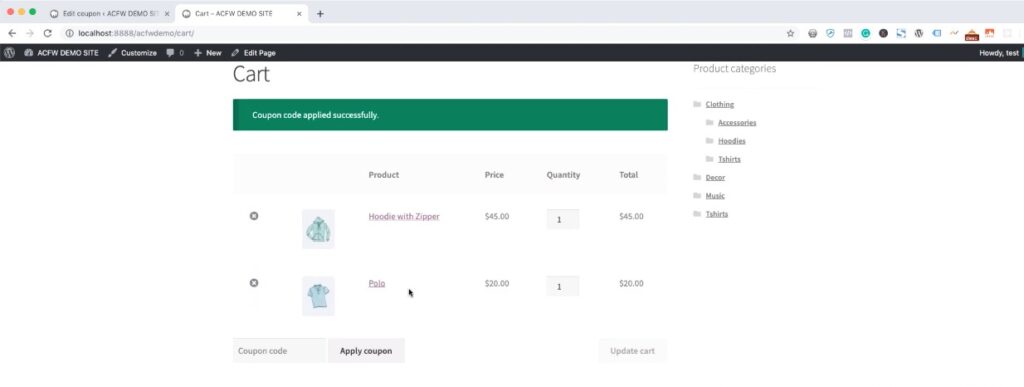
You must have seen it quite simple to create the discount coupon for product category in WooCommerce.
Create One-Click Coupons
Step 1: Set up New Coupon
To create one-click notification coupon you need to ensure that you already have a coupon created on your website.
If you have not created you can create a new one, go to WooCommerce > Coupons > Add coupon
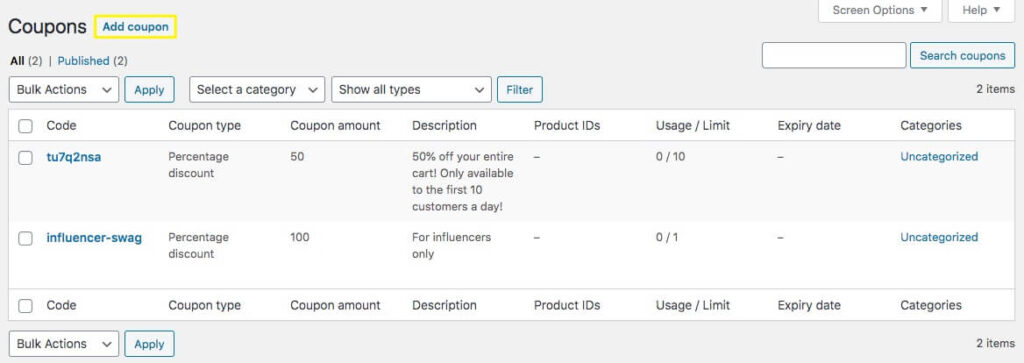
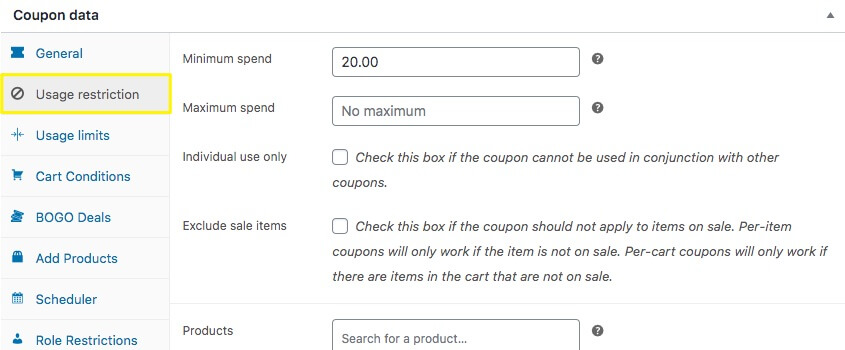
After completing the General settings and naming the coupon, you’ll want to click on Usage restriction to define when customers will be notified of the coupon:
You can also use the Cart Conditions settings panel to set up the parameters that need to be met for the coupon to appear.
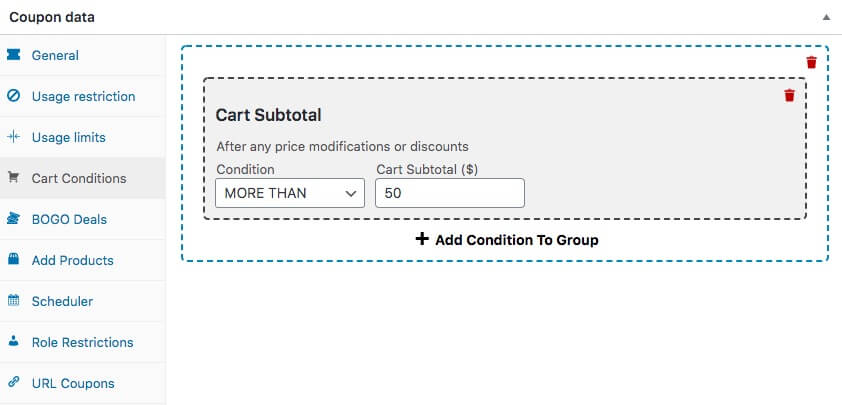
Essentially, you’ll want to use Cart Conditions rather than Usage restriction in cases where your conditions are more complicated.
Step 2: Configure One-Click Notification Settings
Now you’re ready to click on One-Click Apply Notification and choose your settings:
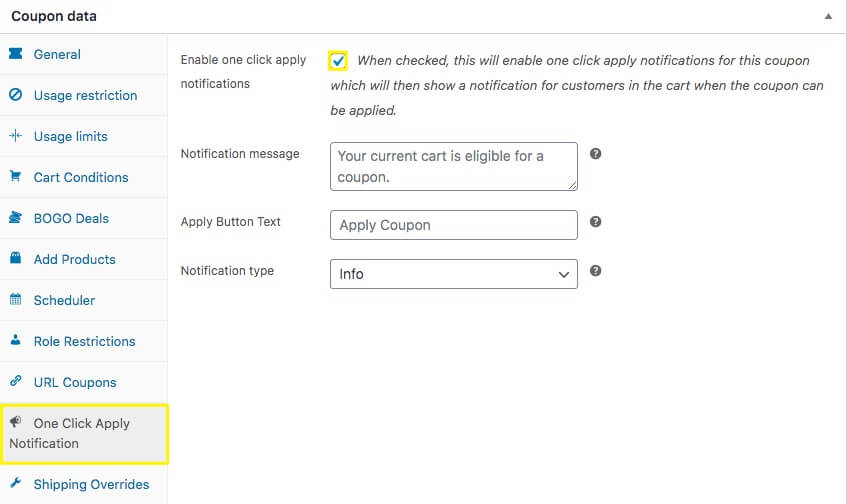
Here, you’ll need to click the box labelled ‘Enable one click apply notifications‘. This means shoppers will receive an on-screen message if their cart meets the restrictions you set previously.
Step 3: Publish and Test Your Coupon Settings
Once you’ve adjusted all the settings for your new coupon and one-click notification, be sure to click Publish to make your coupon available.
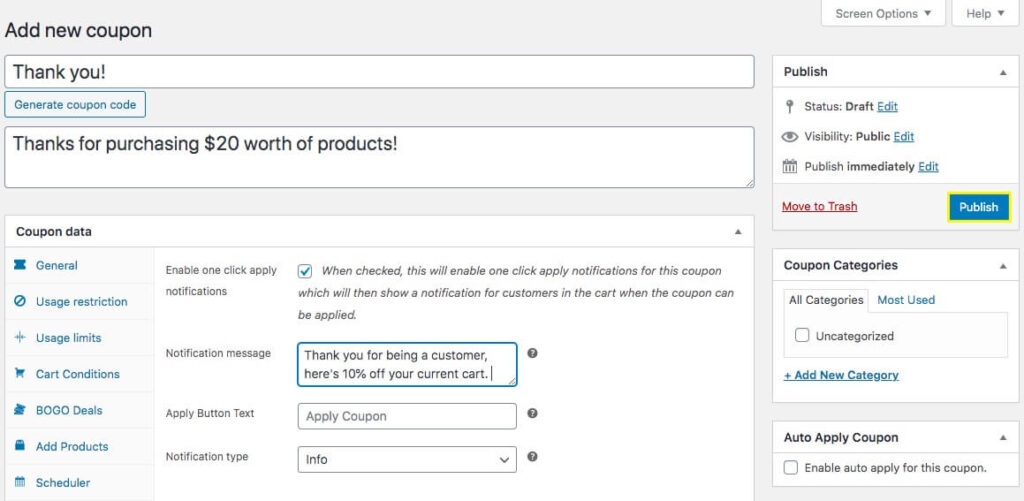
Once your coupon is live, you can test it out. Load up your cart and head for checkout! If you’ve met the requirements ($20 worth of products for our example) you should see the coupon text and button in your shopping cart
Now let’s see how to auto-apply coupons in Woocommerce when the cart conditions are satisfied.
Auto-Apply Coupons In WooCommerce
This extension will let you apply coupons programmatically in WooCommerce based on cart conditions being satisfied.
First, you need to set the cart conditions:
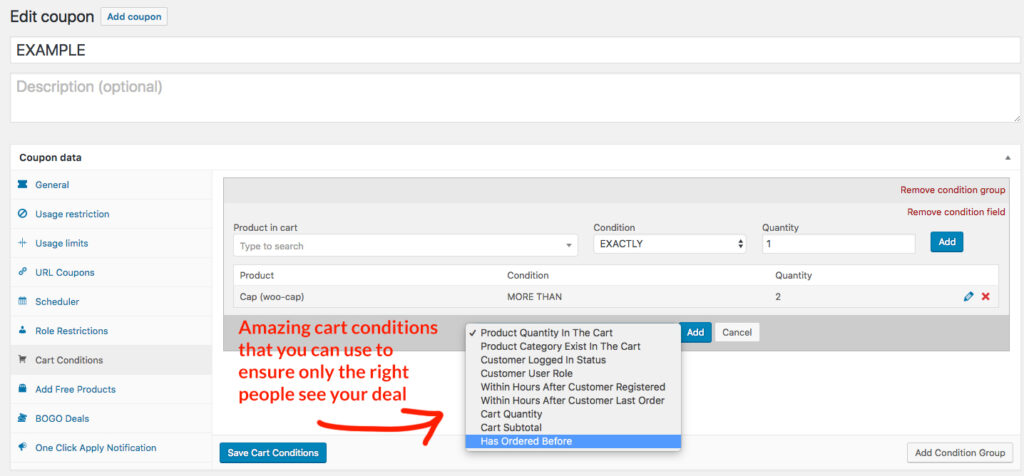
There’s a number of cart conditions that you can set in Advanced Coupons and you can also set them in conjunction with one another:
- Product Quantity In The Cart
- Product Category Exists In The Cart
- Customer Logged In Status
- Customer User Role
- Within Hours After Customer Registered
- Within Hours After Customer Last Order
- Cart Quantity
- Cart Subtotal
- Has Ordered Before
- + many more
Once you have the cart conditions in place and you are happy with how the coupon is being applied, you can enable the auto-add feature:
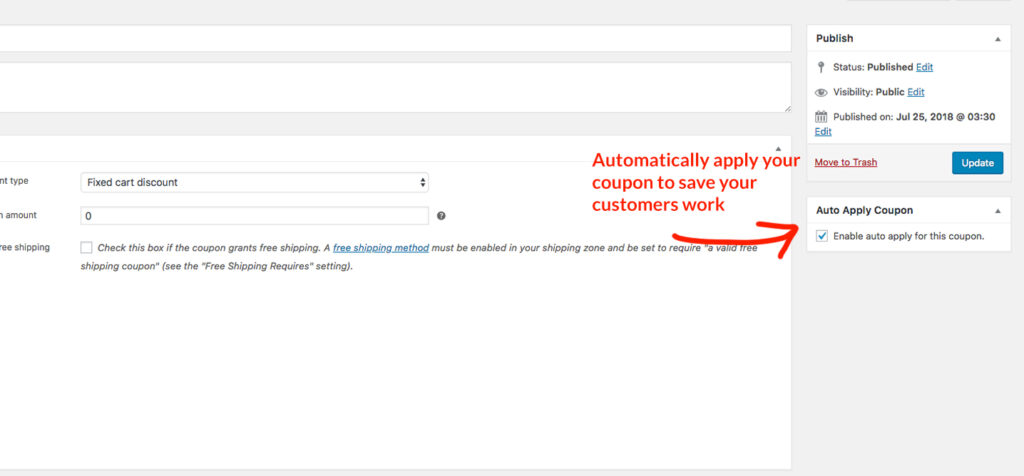
You have that just satisfying the cart conditions and selecting the auto apply coupon checkbox the coupons can be automatically applied to cart in WooCommerce.
Final Words About Creating Coupons in WooCommerce
Advanced Coupons in the most popular and best coupon WordPress plugin for your WooCommerce store. We have already seen the multiple ways to Create Discount Coupons in WooCommerce.
If you are beginner then you can use the free version of the plugin, but for eCommerce site you need to setup the website like a professional and offer discounts to user in the same manner.
If this is your first website I would recommend you go ahead with the Growth license at 50% special discount. Click the link below to avail of the discount.
If you have any issues while creating discount coupons for your Woocommerce store then feel free to ask us by commenting at the end of this article. Also, do share the article with your friends and family and help them to Create Discount Coupons in WooCommerce for their own WordPress website.
If you liked this article, then please subscribe to our YouTube Channel for WordPress video tutorials. You can also find us on Twitter and Facebook.


