WordPress is one of the widely used Content Management Systems available today. This is because you can develop a stunning WordPress blog or website with the least efforts as compared to the other platforms.
WordPress offers power-packed features which include extended security, bundled features using free and premium WordPress plugins, customizing functionality, and most importantly, stability.
Even though WordPress has the best developers working on it and tremendous support available from the community, there are times when you can encounter some common errors using the platform.
How To Resolve 500 Internal Server Error
The 500 internal server error is one such error which is quite common and can occur due to various reasons.
There are many factors that can be responsible for the 500 Internal Server error including a corrupted .htaccess file, crossing the PHP memory limit, improper file permissions, etc.
There are some rare conditions that can also cause the 500 Internal Server Error, like an outgrown hosting plan or a known issue with your hosting provider.
You can fix the 500 Internal Server Error by following various methods listed in this post. Some of them are very easy to execute while the others require proper guidance, which is sufficiently provided in this post.
The easiest way to remove this error is by restoring your WordPress from a previously working version. You can also just turn the WordPress debugging on which might provide the required insight to find out what’s wrong.
Whatever may be the reason, you can follow this step-by-step guide for finding out the exact problem and solve it.
So without any further delay, let’s get down to it.
Follow the steps below to ensure that you fix the 500 internal Server error before resorting for help from your website host.
Step 1: Backing up Your Site
It is essential to back up your site because the procedure you are about to follow requires intricate execution and if by chance you mess something up and there is a major error on your website, you can always revert to the backed up version of your website.
There are various methods you can use to backup your WordPress powered site.
You can backup your website using the:
- cPanel
- FTP Client
- WordPress Backup Plugin
1. Using cPanel to Backup
This is the easiest and quickest way to make a backup of your Website. To use this method simply log in to your web host and then navigate to cPanel. Navigate to the file manager which will lead you to the Home directory.
You can then navigate and select the WordPress directory you want to backup. Unfortunately, you can’t download the folder unless you compress it, but there is a quick workaround for it in the cPanel itself.
Just right click on the folder and select Compress from the drop-down box that appears. You can choose between the various types of compressed file formats. We recommend you to use the.ZIP format.
After the compression is finished, you can right-click on this archived file and click download from the drop-down box that appears. Choose the location where you want to save the backup on, hit save and that’s it. Your WordPress site has been successfully backed up using cPanel.
2. Using FTP to Backup
FTP means File Transfer Protocol and it can be used easily to backup your WordPress website. Simply download an FTP service provider like FileZilla, which is the best among its competitors and is free to use.
After the installation is complete, you can log in to your server, locate your WordPress directory, and download the files to your computer. In case you don’t yet have the FTP account to access the server you can easily set it up using the cPanel FTP manager option.
Note: Download the FileZilla Client, not the Server.
3. Using My WP-Backup Plugin (Recommended)
Using a WordPress plugin to backup your website is the easiest way to take the backup of your WordPress website without any hassle. Use the free My WP backup plugin by MyThemeShop.
You just need to search for the plugin from the WordPress dashboard under the plugins section, install, activate, and create a backup of your website.
Secure Your WordPress Website -> Download WordPress Backup Plugin Now
Step 2: Using FTP Client to access WordPress Installation
If you know what an FTP Client is and how to use it to access your WordPress files, you can skip this step right away. For those who don’t know what or how an FTP Client works, stay glued to the post.
Here is a quick tutorial!
Go to the FileZilla homepage and download FileZilla client. You can then install the client on your computer. Once the installation is complete, open the software and Click File -> Site Manager, Click New Site and enter your site’s name.
Configure these settings:
- Host – Your domain name
- Port – Blank in 99 out of 100 cases
- Protocol – FTP – File Transfer Protocol
- Encryption – Use Plain FTP
- Logon Type – Normal
The username and password you provide here are the ones you will use to access your host’s file manager. Mostly, the hosts use cPanel and if yours too uses the same, just type in the username password you use for cPanel.
If it is otherwise, you can always ask for your Username and Password from your host.
Next, you need to head over to Transfer Settings. Once you’re there, just click the checkbox for the Limit Number of Simultaneous Connections. Set the Maximum Number of Connections to 8.
Doing so will keep your site’s server from blocking your IP address which is essential to your site’s server. Next, press the Connect button and you’re good to go.
Download the proper version of FileZilla Client by checking your system configuration(32 bit or 64 bit)
Step 3. Troubleshooting the 500 Internal Server Error
Before we begin solving the 500 internal server error, it would be wise to know what causes the error. There can be a lot of reasons which can cause this type of error but, most often it happens when the web server is not able to locate the page you requested.
So, if that is the case, how can you troubleshoot the error? Well, there are a few things you can try and solve this error.
To find out the cause of the 500 Internal Server Error
- Check Themes And Plugins
- Troubleshoot .htaccess Configuration File
- Verify PHP Memory Limits Are Fine
- Check For Corrupt Core Files
- Ask for Help From Your Web Host
Check Themes And Plugins
Many times, a defected theme or plugin is responsible for the 500 error. To check whether these are the one’s causing distraught on your website, you can use the trial and error method.
What we mean by that is that you try and activate the default WordPress theme on your website and check whether it has fixed the error. If not, deactivate all the WordPress plugins and check if it works. If it does and the error is no more, you know for sure that the plugins are causing the error.
Do note that if even your admin area isn’t opening and is showing a 500 error, you won’t be able to activate the default theme like you usually do.
In this case, you will need to rename every other theme except the default one and name them something like “myTheme.bak” etc. If your website loads after that, you know for sure that it is the theme causing this issue.
To know which plugin is causing the error, deactivate all plugins and then keep on activating the plugins one by one. Simultaneously keep a check whether there is an error when you activate each plugin.
The moment your website goes bonkers again, you know for sure which plugin is the culprit. Again, if you can’t access the dashboard, just rename every plugin folder using the FTP client until you find the culprit.
If this method does not work, you should definitely try the next method.
Troubleshoot .htaccess Configuration File
The .htaccess file is located in the root WordPress installation directory alongside the wp-admin, wp-content, and wp-includes folders and although this is not the most common source of the 500 internal server error, it still is among the top contenders.
This is the point where your knowledge of FTP and cPanel will come in handy. Simply login using FTP client and locate the .htaccess file. It is sometimes hidden and in that case, you will need to check the option of “Show hidden files” in your FTP client of choice.
Rename the .htaccess file to something like .htaccess_test or .htaccess_old so that you can replace it with a new one.
Navigate to Settings > Permalinks from the dashboard of your WordPress site and hit Save once. This will generate a new copy of .htaccess
If the 500 error was due to a corrupt .htaccess file, replacing it in this manner should solve your problem. If you are still getting the 500 error, move on to the next step.
Verify PHP Memory Limits Are Fine
Sometimes reaching or exceeding the PHP memory limit is the cause of 500 server error. If that is the case for you, there are two main methods you can use to address the error. Login to your FTP client and locate PHP.ini inside the root folder of your WordPress installation. If by chance you can’t find this file, you can create a blank text file and name it php.ini. Find or paste in the below line:
memory_limit = 64M ; /* Change the 64M to your needs */
If there is already a php.ini folder in your installation, 64 might be replaced with one of a series of numbers like 32, 64, 128, 256, 512 etc
If you already have a php.ini and the memory limit is less, double it. If you’ve created your own php.ini, change 64 to 128 or 256. The resulting line should then read memory_limit = 64M or memory_limit = 64M
Save and exit the file. If you’ve had to create your own php.ini, upload it to the WordPress root folder via FTP.
The second method can be used when you are unable to create a php.ini file or don’t have access to it. You can use this method by logging into your FTP client and then locating wp-config.php in your root WordPress directory. Once you have opened the file, insert “define (‘wp_memory_limit’, ’64M’);” without the quotes in the main php tag.
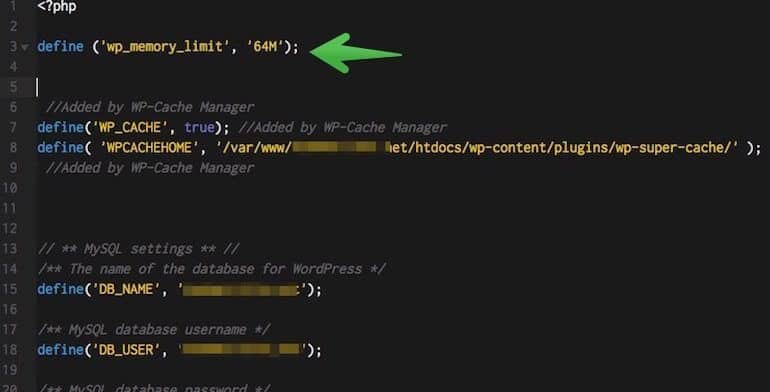
This is a temporary path that sets the ceiling high for memory usage, so the solution is not going to last for long, as the underlying problem will reach new memory heights following its natural route.
It is better to root out the cause and fix it before the memory patch stops working.
Check For Corrupt Core Files
Core files seldom need repairing but still, there is a chance that the 500 server error has its roots in the core files.
To fix this, you will have to login to your FTP client and copy in a new wp-admin and wp-includes folder. Changing these won’t affect the customization work you’ve done on your site unless you’ve excessively customized the files inside these folders, which is typically not the case.
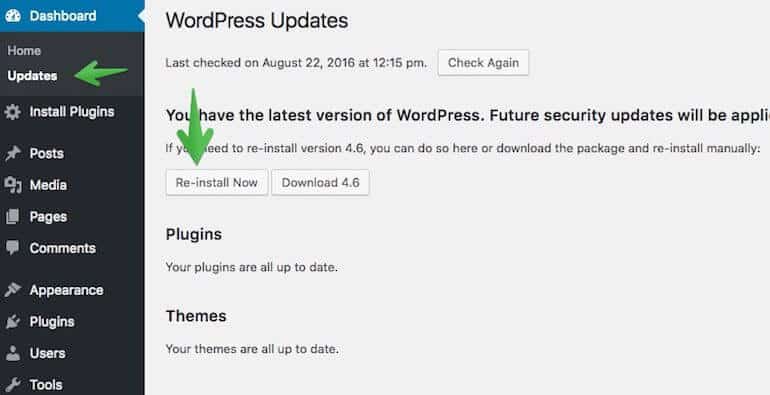
The files inside wp-content are where your theme, plugins, and custom changes you’ve made to your site are housed. Do not upload a fresh wp-content or you will wipe your site. You could also try a “Re-install” from your WordPress Updates screen to overwrite any corrupt core files.
5. Ask for Help From Your Web Host
If the above methods don’t seem to fix the 500 internal server error, you can always contact your WordPress hosting provider to ask for genuine help.
We are not in any way suggesting that the above methods are an exhaustive list of methods that can be used to take care of 500 error. We have listed out the most common problems that can cause the 500 error. If these methods don’t work, there is a chance that your host has something to do with it.
So, without shying away, you can contact them directly to know the cause of this error and if your host is a good one – they will provide you a solution promptly.
Conclusion
Fixing the 500 Internal Server Error can be quite frustrating as it requires a lot of troubleshooting before you even begin to comprehend what is actually wrong with your website. We hope that this post helped you eradicate the issue.
If still the error isn’t fixed you can leave your queries in the comment section or head over to our support forum for further technical support.
If you liked this article, then please subscribe to our YouTube Channel for WordPress video tutorials. You can also find us on Twitter and Facebook
