Do you want to add an online poll to your WordPress site? Learn how to easily create an interactive poll in WordPress with real-time reports.
A poll is the great way to engage your customers and take their feedback and useful information on the topic of your interest. In this article, we will show you how to easily create and add a poll in your WordPress website.
Which Plugin to Choose for Adding a Poll in WordPress?
There are many WordPress plugins that offer to create online polls on your website. But most of them are just restricted to creating polls. You should always select a multipurpose plugin for your website.
5 WordPress Best Poll Plugins Compared in 2020
Formidable Forms is one such multipurpose drag-n-drop builder WordPress that offers multiple features to take your blog to the next level. One such feature is creating interactive polls on your WordPress website.
If you are looking for a good user experience, with full control over poll data, then you’ll need Formidable Forms. It is the best WordPress form builder plugin and their pro plan includes powerful surveys and polls addon.
With Formidable Forms, you’ll be able to do the following:
- Create polls in WordPress using a drag and drop form builder
- Gather poll results on your own websites
- Display poll results after voting
- Display poll anywhere on your website
- Create multiple polls
Having said that, let’s take a look at how to easily create online polls in WordPress using Formidable Forms.
Now let’s see step-by-step how to create an interactive poll in WordPress website with Formidable Forms.
Create an Interactive Poll in WordPress
This tutorial will tell you how to create polls with WordPress. But before we proceed further Formidable forms plugin needs to install and activated.
Step 1: Install and Activate Formidable Forms Plugin
Formidable Forms can be easily installed like any other WordPress plugins. If you have difficulty in installing WordPress plugins then below is the detailed tutorial to help you.
Installing Formidable Forms is easy follow the simple steps given below.
- Login to your WordPress Admin Panel.
- Look for the Plugins menu at the left of the screen.
- Click on Plugins >> Add New.
- On the search bar type Formidable Forms.
- Install and Activate the Formidable Forms Plugin.
If you are looking for the in-depth tutorial for creating WordPress contact form in 5 minutes the click on the link below.
The plugin which you installed is the free version and has limited functionality. You need to purchase the license to explore and use all the features.
You can try our plugin risk-free for 14-days. If you don’t like it, you can ask your money back – no questions asked. With this plugin, you’ll be able to create polls in WordPress in just minutes.
Purchase Formidable Forms Pro License
To validated licence key just follow the simple steps.
Validate Formidable Forms License Key:
- After the activation of WPForm plugins. Go to Formidable Forms >> settings.
- This option will be available to you at the left sidebar of your page. Here, you can see the text field to verify the license key. Put the license key in the text field and click on the button “verify key“.
Step 2: Build and Publish an Online Poll
Now since you have successfully installed and activated Formidable Forms, let’s proceed with building and publishing the online poll.
Go to Formidable → Forms and click + Add New at the top of the page.
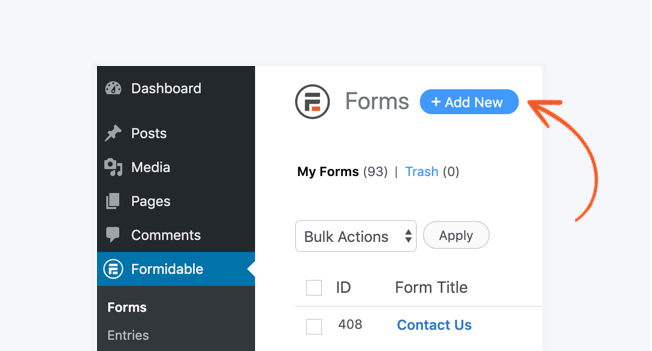
Click + Blank Form. This will be our poll, so name it whatever you want and click Create.
How to Add Poll Fields
The poll fields can be easily added to the blank form created in the previous step.
The poll field generally consists of one question with choices given in the answer. That means it could be a multiple-choice question, or a yes/no question. So we only need to add one form field to make this work!
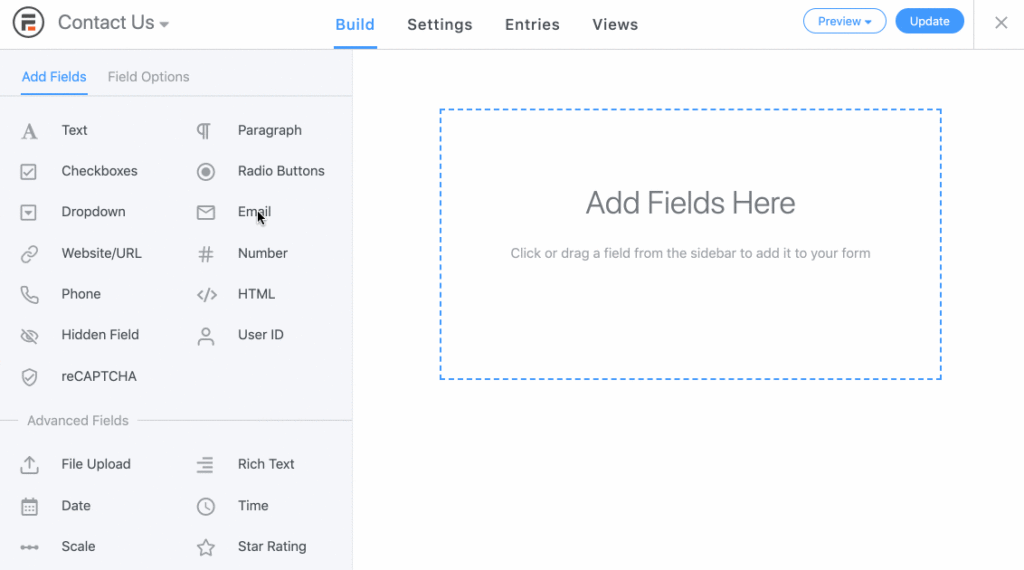
To create the question you can just use the Text field from the left and to provide the multiple-choice answers Just drag and drop a Radio Buttons field from the left column into the form building area.
Then you just need to change the question and the multiple-choice responses in the Field Options section back in the left column.
Once you have created all the fields you just need form ID for adjusting our Form Settings in the next step.
Below we have created a online poll with 6 multiple choice answers. You can see the form ID given at the top right corner of the form.
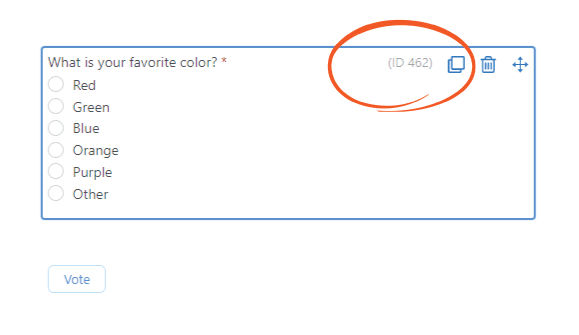
Here our form ID is 462. Take note of yours and let’s move to the final step!
Step 3: Display the Poll Results
Now since we have successfully created out the poll form in the previous step and we also have the Form ID in hand. Let’s proceed to the final step of displaying the poll on your WordPress website.
There are two things we want to do:
- Change the poll button text
- Display the poll results after voting
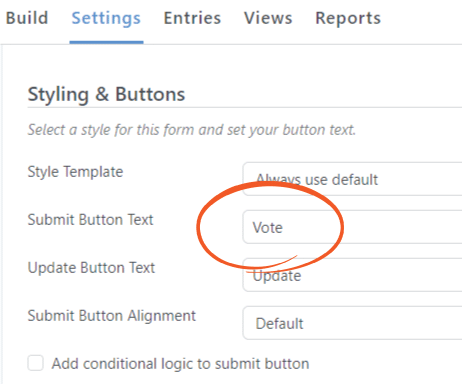
To change the text on the button, click on the Styling & Buttons tab in the left column of the form settings page. Then, change the text to “vote” or something of your choice as per poll.
Formidable Forms gives you the flexibility to display the simple poll results or you can even disply the results in the form of graphs.
To display a graph of the poll results after each vote, we’ll need to insert a graph shortcode into the Messages section at the bottom of the General Settings.
The sample shortcode of poll for with the graph display will look something like this.
[frm-graph fields="462" type="pie"]
And your graph will look something like this:
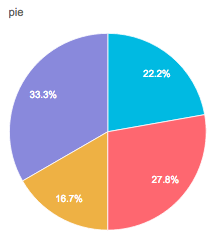
The above graph is the simple one but Formidable forms offers you the graph with multiple features to display them like a pro on your website.
For example, you could use a shortcode like this:
[frm-graph fields="462" type="pie" bg_color="#DFF0D8" width="600" title_size="20" is3d="true"]
And your poll results will shine with a 3D pie chart! You can even mouse-over the sections to get more info.
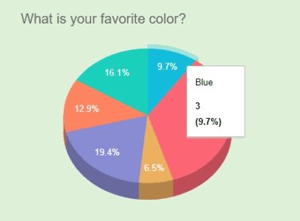
When you’ve finished, be sure to update your form and add a few Entries for testing.
We have successfully created the Poll form and displayed it in multiple forms in WordPress with the help of Formidable Forms.
Also Read,
- How to Create Calculators in WordPress Site With Formidable Forms
- How to Preview Responses Before Submitting a WordPress Form
- How to Automatically Export WordPress Form Submissions to CSV with Formidable Forms
- How to Manage Your MailChimp Email Subscribers from WordPress
Wrapping UP
Formidable Forms is the best drag-n-drop builder WordPress contact form plugin offering you multiple pro features to take your business to the advanced level. We have seen how to Create an Interactive Poll in WordPress with easy steps.
Creating online poll on their website for engaging you visitors and getting information form them is very important. The results of the poll will help you to decide how to move ahead with your users.
Formidable Forms is available in the free and premium version. If you want to take the full advantage of the plugin then you must try the premium version with 14 days money-back guarantee. Click the link below to buy the Formidable Forms premium plans.
You can run multiple polls and use Formidable’s Views feature to feed the results into a single page. Imagine a master article with all your poll results updated dynamically in real-time!
If you have any doubts regarding the tutorial feel free to ask us by leaving a comment at the end of this article.
If you liked this article, then please subscribe to our YouTube Channel for WordPress video tutorials. You can also find us on Twitter and Facebook


