This step-by-step guide will help you move a WordPress site to a new server or a WordPress site to a new server. There are already many articles on the internet guiding WordPress migration.
Then why am I writing this article again?
Well, migration of bloggersutra.com from one server to another server came as a nightmare to me. My website was out for almost 10 days before I could stabilize it.
I had migrated bloggersutra.com from 1and1.com to bluehost.com and finally to Hostinger.
What made me shift to hostinger.com after 10 days of purchasing hosting from Bluehost (case study)
The biggest loss for me and my readers during this time was the Black Friday Deals. Since my website was offline, I could not post any Black Friday deals on my website or send them via newsletters.
I will definitely take it as good learning and help my reader to avoid the mistakes I have made during the bloggersutra.com migration.
When you should start your WordPress website migration
There are many WordPress plugins available that help you with WordPress website migration. But I personally feel you should migrate your website manually, as you have full control over it.
If you face a problem with manual website migration, then you should go with these WordPress plugins.
10 WordPress plugins for website migration from one server to another
Further, in this article, I will be covering the manual WordPress migration procedure.
SO LET’s GO
Backup Your Website
These days, almost all hosting providers give the auto backup or manual backup option from the hosting panel itself. So you can directly download your website back up with 1 click.
If your hosting provider doesn’t provide you with the auto backup option or charges you additional for this, then you can back up your website with the help of WordPress plugins too.
10 WordPress plugins help you to back up your website for free
The best way is to backup your website manually. How to take the manual backup of your website.
Files Backup
Go to your hosting control panel. Go to file manager. Go to your website folder -> Select all files in the website folder -> Right click and zip.
Almost all hosting providers allow you to zip your entire file on your website and download it directly via the hosting panel. Certain hosting providers have an upload and download limit on file size. If you have an old website with lots of data and your web host has a downloading limit, then you can download your file via FTP.
CoreFTP or FileZilla can be used to connect to your hosting provider via FTP. You can easily find the FTP connection setting in your hosting panel. If you still find difficulty in connecting via FTP, you can always contact your hosting provider to help you.
Once connected via FTP, you can directly download the entire unzipped website folder, or you can download the zip file created in the previous step.
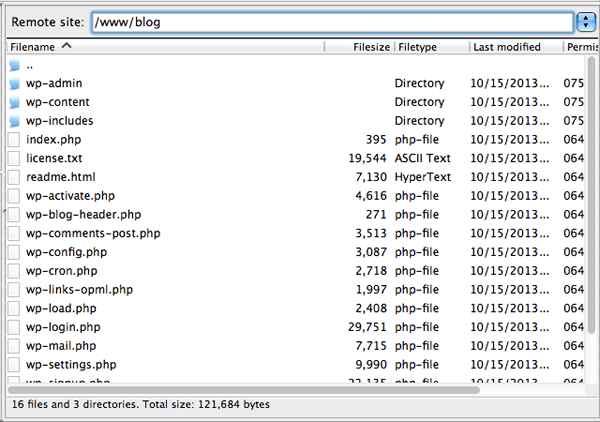
Always keep this file safe until your website is completely migrated to the new host and you create another backup on your new host.
Database Backup
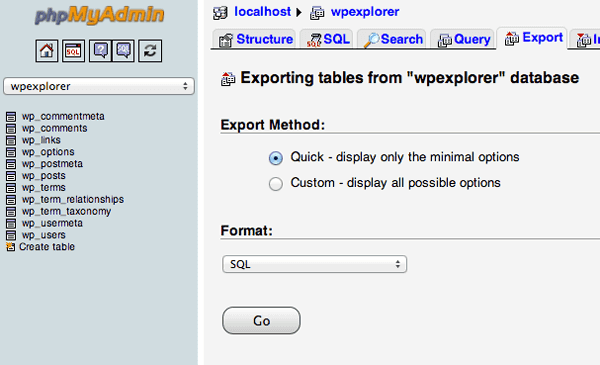
Exporting a database is again a very simple procedure. You can directly log in to your hosting cPanel and go to the MySQL database option.
Some hosting providers allow you to directly download the database from the MySQL option, whereas some offer the same via the PHPMyAdmin page.
Go to PhpMyAdmin -> Select the database to download -> Go to Export tab on top -> Click on Go button to download the database.
Now your website backup is complete. If you face any issue with the bove steps, you can drop a message in the comment section or you can directly contact your hosting provider to help you.
You can also use WordPress plugins to take a backup of your website.
Website Migration: Important!
This step-by-step guide will help you move your WordPress website to the new hosting provider for the same domain name. If you are looking to migrate your website to a different domain name, then check this out.
Step-by-step guide to migrating WordPress website to the new domain name
Website migration can be done by two methods:
- Uploading complete files to the new server
- Uploading only the wp-content folder
The important thing is how to find if you require uploading the complete file or only the wp-content folder. Just check out the wp-content folder of your backup and look for the mu-plugins folder. If this folder exists, then upload only the wp-content folder for website migration.
The mu-plugins folder contains additional plugins installed by your hosting provider while using the 1-click WordPress installation service from their hosting control panel. These plugins may help you with the smooth functioning of your website.
Uploading complete files to new server
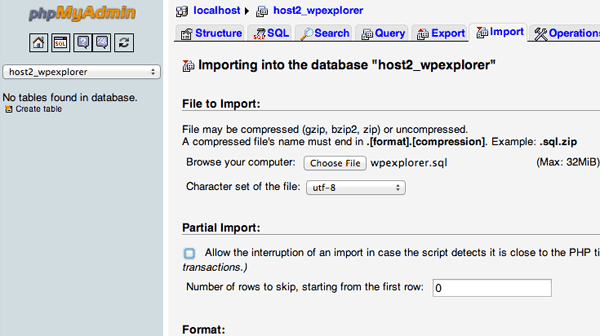
- Upload the complete zip folder to the new server and unzip it. ( via Cpanel or FTP)
- Create a new MySQL database.
- Go to PhpMyAdmin
- Import MySQL database
The last step is to configure the wp-config.php file.
Configure wp-config.php
Browse to the folder on your local computer where you downloaded your website files. In that folder, there is a file called wp-config.php that controls access to WordPress and your database.
Make a copy of this file and store it in another folder on your local computer. This is necessary for restoring the changes we are about to make should something go wrong later.
Open the original version of the file with your favorite text editor and make the following three changes:
1. Change The Database Name
Locate the following line:
define('DB_NAME', 'db_name');
The db_name portion of this line will currently be set to the MySQL database name of your old web host. This must be changed to the name of the new database you have just created.
2. Change the Database Username
Below this, you will find the line:
define('DB_USER', 'db_user');
In this line, you need to change the db_user portion from the username of your old host to match the new username you have just created.
3. Change The Database User Password
Finally, edit the third line:
define('DB_PASSWORD', 'db_pass');
As with the others, the db_pass section of this line must be changed to the new secure password you created for your MySQL user.
Save wp-config.php and close the file.
Uploading only the wp-content folder
This step is very simple to carry out. But while using this step to
- Carry out a fresh WordPress installation by using the auto-script installer service provided by your hosting provider.
- Install SSL certificate if required (Very important)
- copy the wp-content folder to the new server (overwrite on the new server)
- Go to PhpMyAdmin and select your database.
- Import your website database.
- Edit wp-config.phpfile
Remember, in this step, you don’t need to edit the database name, user, and password fields in the wp-config folder.
All you need to change is the table prefix. Just check the table prefix of your uploaded database and edit it.
$table_prefix = ‘mMvXjd’;
Important: Remember in this step to install the SSL certificate after the installation of WordPress. With some hosting provider, the installation of SSL after configuring the website gives a problem.
Bluehost: Installation of SSL could not be done after configuring the website. (Case Study)
Editing Nameserver for Domain
If you have not transferred your domain name from the current hosting and just purchased a new web hosting package, then you need to change the name server of your domain name, pointing to your new hosting address.
You can find the nameserver details within your hosting panel, or you can ask directly from your hosting provider. Just edit the name server details with your domain name provider.
Note: It might take up to 24-48 hours to propagate your name server details over the internet.
Step-by-step guide to linking your domain name with hosting via nameserver
Fix Broken Links After Moving WordPress Site
- Log in to your WordPress admin panel.
- From the plugins menu, click Add New.
- Enter Search and replace, and then click Search Plugins.
- Locate the Search and Replace plugin, and then click Install Now.
- Click OK.
- Click the plugin.
- From the Tools menu, click Search and Replace.
- Enter your old site URL in the search field. For example, http://olddomainexample.com (no trailing slash).
- Enter your new site URL in the Replace with the field. For example, http://newdomainexample.com (no trailing slash).
- Select All, and then click Go.
Conclusion
Well, there are many tutorials available online about migrating your WordPress website to the new server. This is a case study, as I almost suffered 10 days of website downtime due to an SSL installation error. Just keep in mind to install your SSL certificate as soon as you install WordPress and before copying your content to the website.
If you have faced any issues while migrating your website, then do share with our readers in the comment section.
If you liked this article, please subscribe to our YouTube Channel for WordPress video tutorials. You can also find us on Twitter and Facebook.





5 thoughts on “Step-by-Step Guide To Move WordPress Site To New Server (Updated)”
wonderful article.
got new info from this blog. thanks for information provide
waiting for your next post.. great work
wonderful article.
got new info from this blog. thanks for information provide
waiting for your next post.. great work
Hi.Pradeep
This is great information on moving WordPress site from one server to another.
It’s impressive that you are getting ideas from
this article as well as from our dialogue made here.
Nice And Very useful info,This article important and really good the for me is.Amazing write-up,Great article. Thanks!